Notification Output Channels
Overview
The following list contains all available Output Channels with a detailed description:
For each Output Channel of this type you can define an SMTP Server, a sender address, username, and password for SMTP authentication (if required), and a template for the e-mail subject and body.
+ You can define that an Output Channel of this type is restricted to a certain User (recipient), to a Group of Users, to one or multiple Customers — which implies that it is restricted to all Users of the selected Customers that have the necessary Permissions.
Mobile Notification
Any Avantra user using the Avantra Mobile App on an iOS or Android device is able to receive mobile notifications.
+ You can define that an Output Channel of this type is restricted to a certain User (recipient), to a Group of Users, to one or multiple Customers — which implies that it is restricted to all Users of the selected Customers that have the necessary Permissions.
AWS — Simple Notification Service
Notification messages are sent to a topic by means of the Amazon Web Services Simple Notification Service.
+ This Output Channel provides all the options that are available for the Simple Notification Service in Amazon Web Services.
AWS — SMS
Notification messages are sent as text messages by means of the Amazon Web Services Simple Notification Service.
+ This Output Channel provides all the options that are available for the SMS service in Amazon Web Services.
+ You can define that an Output Channel of this type is restricted to a certain User (recipient).
Write into a log file
For each Output Channel of this type, you can define an output file name, a template line defining the log file format, and a maximum line length.
Run an external command
For each Output Channel of this type, you can define an executable to run, a working directory, and the command line call as well as a timeout restricting the run time.
+ The command can be executed on the Avantra server, the Server hosting the Avantra Agent the Check is executed on, or on Servers defined by the use of System Selectors.
Rewrite a template file
The Output Channel allows you to rewrite template files. When defining this type of output channel, you can also use the Customer Filter to restrict it to one or more Customers.
Create a Ticket
This Output Channel creates a Ticket within Avantra.
You can define a short and a long description. Critical Check Results create Tickets with priority High, Warning Check Results create Tickets with priority Medium.
Windows Event Log
This Output Channel creates an entry within the Windows Event Log if the Avantra Server is running on Microsoft Windows operating systems.
RESTful Web Service
This Output Channel delivers Notifications by calling a REST API that is provided by a third-party Web Service. It offers Basic and OAuth 2.0 authentication schemes, the latter of which are provided by profiles that may be shared between different REST and SOAP Output Channels.
SOAP Web Service
This Output Channel delivers Notifications by calling a SOAP Web Service. It offers Basic and OAuth 2.0 authentication schemes, the latter of which are provided by profiles that may be shared between different REST and SOAP Output Channels.
In-browser Notification
This Output Channel delivers Notifications to Users logged into Avantra WebUI.
+ You can define that an Output Channel of this type is restricted to a certain User (recipient), to a Group of Users, to one or multiple Customers — which implies that it is restricted to all Users of the selected Customers that have the necessary Permissions.
Ticket Log
This Output Channel is only available for Ticket Notification Actions and allows updating the particular Ticket triggering the Notification Action.
SAP Start/Stop
You can perform a Start, a Soft Shutdown, or a Hard Shutdown operation on * The affected SAP Instance or SAP System * A single SAP Instance or SAP System * All SAP Instances or SAP Systems defined in Selectors.
Cloud Automation
You can perform a Start or a Stop operation on: * The affected Cloud Server * A single Cloud Server * All Cloud Servers defined in Selectors.
Null Output Channel
An Output Channel that produces no output at all. Sounds useless, but you can use this if you want to only perform Check Confirmation.
Composite Output Channel
This Output Channel combines multiple other Output Channels. You can configure the conditions under which a particular Notification message is passed to one or more of the combined Output Channels.
All Output Channels can be restricted to a single or multiple Customers. In this case, they are only effective for Notifications generated for Notification Elements of Managed Objects owned by the defined Customers.
Every Notification takes some data with it. This data is primarily derived from the Notification Elements the Notification is triggered by, as well as the Managed Object the Notification Elements was running on, and the Customer owning the Managed Object. And there is even more, like the Notification reason, various timestamps, etc.
This data is available in the Output Channels by means of the so-called Interpolations. You best think of Interpolations as placeholders that are replaced by some real-world data once an Output Channel is executed.
|
If you are working with Filter Lists and Output Channels and you are working with Macros, you will find a button Convert to FTL that allows you to convert them into Interpolations. |
Defining Output Channels
Although you can define an Output Channel while you are defining a Notification Action, we describe the two steps separately in here.
Define an Email Output Channel
In order to define an Email Output Channel proceed as follows:
-
Select from the top-level menu. Select the Output Channels tab. Choose in the toolbar.
-
Fill in a Name and optionally a Description. The name of the Output Channel has to be unique.
-
If you plan to restrict the Output Channel to one or multiple Customers select the appropriate items from Customer Filter.
-
Choose one or more of the Supported Action Types.
Push the Finish button. The Output Channel detail view is opened automatically.
-
-
Define a valid sender e-mail address in field Sender Mail Address, a default for this value can be defined in Notifier.Mail.fromSenderName. A Sender Name can be configured also but is not mandatory. If more detailed control over the sender is required, open the sender details with the Edit Details… button after you have saved the Output Channel. The
Reply-Toand theReturn-Pathe-mail address can be entered there. -
Select a value for Recipient.
-
If you want this Output Channel to deliver only to a single user, select Single user. Choose a User from the User drop-down list. You can only select a User that has the "Receive Notification Messages" permission for the Customers selected in Customer Filter.
-
If you want this Output Channel to deliver to a group of users, select Group of users. You can only select a Group that has a Role containing the "Receive Notification Messages" permission for the Customers selected in Customer Filter.
-
If you want this Output Channel to deliver to all Users of the selected Customers (or all Customers) that have the "Receive Notification Messages" permission, select Users of selected/all customers.
-
-
Select a value for Priority. Possible values are Highest, High, Normal, Low, and Lowest. Please note that it depends on the recipient’s mail client how this value is interpreted.
You can also choose to send the messages as blind carbon copies (
BCC) only. -
Define the Subject of the e-mail.
You can include any of the available Interpolations in this field. Simply click and select the appropriate one from the list.
-
To edit the Mail Content press the Edit mail content… button. A dialog will be opened with the details of the mail content. It is possible to define either HTML or plain text content.
You can include any of the available Interpolations in this field. Simply click and select the appropriate one from the list.
When finished, Save your details and close the dialog.
-
Refer to Handling Mail Servers on how to create a mail server, and afterwards select a mail server from the Mail Server drop-down list.
-
Push the Save button.
You can test your settings using the Send Test Email button.
Handling Mail Servers
To create a Mail Server, perform the following steps:
-
Select from the top-level menu. Select . Choose .
-
Fill in a Name, an optional Description, and choose a Customer.
Choose either
SMTPorSMTPSfrom the Protocol drop-down list.Define the server hostname in Target and optionally the Port number.
Choose if or if not the server requires TLS (i.e. the so-called
STARTTLSmethod).If your mail server requires authentication, please fill in a User and a Password.
-
Push the Create button to finish.
You can now use the mail server in the Mail Server field of the Email Output Channel.
Define a Log File Output Channel
In order to define a Log File Output Channel proceed as follows:
-
Select from the top-level menu. Select the Output Channels tab. Choose in the toolbar.
-
Fill in a Name and optionally a Description. The name of the Output Channel has to be unique.
-
If you plan to restrict the Output Channel to one or multiple Customers select the appropriate items from Customer Filter.
-
Choose one or more of the Supported Action Types.
Push the Next button.
-
-
Define a File Name. If you do not enter an absolute path to the file, the file location will be relative to the
log/notifierdirectory of the Avantra Server.You can include any of the available Interpolations in this field. Simply click and select the appropriate one from the list.
If you use Interpolations within this field you may face problems if the resolved value contains characters that are invalid for the use with file or directory names (e.g. the
NOTIFICATION_DATEInterpolation contains a colon:). In this case you should write${escapeFile(text)}instead of${text}.escapeFileis a method that escapes these characters probably. -
Define a Line Format.
You can include any of the available Interpolations in this field. Simply click and select the appropriate one from the list.
-
You may define a maximum length for every line in Line Length. By default this is unrestricted.
You may define a maximum size of the log file in field Maximum File Size. If the maximum file size is reached, a timestamp is appended to the file name and a new log file is created. Make sure you define a value ≥ 1 in Number of old Files to keep in this case.
-
Push the Finish button.
Define a Command Output Channel
In order to define a Command Output Channel proceed as follows:
-
Select from the top-level menu. Select the Output Channels tab. Choose in the toolbar.
-
Fill in a Name and optionally a Description. The name of the Output Channel has to be unique.
-
If you plan to restrict the Output Channel to one or multiple Customers select the appropriate items from Customer Filter.
-
Choose one or more of the Supported Action Types.
Push the Next button.
-
-
Define a Working Directory (optional). If you do not enter an absolute path to the file, the file location will be relative to the
tmpdirectory of the Avantra Server.You can include any of the available Interpolations in this field. Simply click and select the appropriate one from the list.
If you use Interpolations within this field you may face problems if the resolved value contains characters that are invalid for the use with file or directory names (e.g. the
NOTIFICATION_DATEInterpolation contains a colon:). In this case you should write${escapeFile(text)}instead of${text}.escapeFileis a method that escapes these characters probably. -
You may define a value for Command Timeout.
-
You have to define the command line call (i.e. the executable plus all the arguments) in the field Command Line.
In the next step, you can also choose different commands per operating system, or select the host(s) to execute the command.
You can include any of the available Interpolations in this field. Simply click and select the appropriate one from the list.
If you use Interpolations within this field you may face problems if the resolved value contains quotes. In this case you should write
${escapeCmd(text)}instead of${text}.escapeCmdis a method that escapes these characters probably. -
Push the Finish button. The Output Channel detail view is opened automatically.
-
By default, the command is executed on the host running the Avantra Server. But you can also choose a different Scope: either the Server hosting the Managed Object the Notification Element is generated for, or an arbitrary set of Servers defined by a Selectors.
For commands executed on remote hosts, it may be handy to define different commands for Unix and Windows hosts. Push New in order to add an additional command for a different platform. Adapt the OS field accordingly.
Push the Save button in case you made any modifications.
Define a Rewrite a template Output Channel
In order to define a Rewrite a template Output Channel proceed as follows:
-
Select from the top-level menu. Select the Output Channels tab. Choose in the toolbar.
-
Fill in a Name and optionally a Description. The name of the Output Channel has to be unique.
-
If you plan to restrict the Output Channel to one or multiple Customers select the appropriate items from Customer Filter.
-
Choose one or more of the Supported Action Types.
Push the Next button.
-
-
Define a File Name. If you do not enter an absolute path to the file, the file location will be relative to the
log/notifierdirectory of the Avantra Server.You can include any of the available Interpolations in this field. Simply click and select the appropriate one from the list.
If you use Interpolations within this field you may face problems if the resolved value contains characters that are invalid for the use with file or directory names (e.g. the
NOTIFICATION_DATEInterpolation contains a colon:). In this case you should write${escapeFile(text)}instead of${text}.escapeFileis a method that escapes these characters probably. -
Define a template text in Template.
You can include any of the available Interpolations in this field. Simply click and select the appropriate one from the list.
If you use Interpolation>s within this field you may face problems if the resolved value contains characters that have a special meaning in XML, like
<or>. In this case you should write${escapeXml(text)}instead of${text}.escapeXmlis a method that escapes these characters probably. -
Push the Finish button.
Define a Ticket Output Channel
In order to define a Ticket Output Channel proceed as follows:
-
Select from the top-level menu. Select the Output Channels tab. Choose in the toolbar.
-
Fill in a Name and optionally a Description. The name of the Output Channel has to be unique.
-
If you plan to restrict the Output Channel to one or multiple Customers select the appropriate items from Customer Filter.
-
Choose one or more of the Supported Action Types.
Push the Next button.
-
-
Define a Ticket Summary.
You can include any of the available Interpolations in this field. Simply click and select the appropriate one from the list.
-
Optionally, define a template text in Ticket Detail Description.
You can include any of the available Interpolations in this field. Simply click and select the appropriate one from the list.
-
Push the Finish button.
Define an AWS — Simple Notification Service Output Channel
In order to define an Output Channel proceed as follows:
-
Select from the top-level menu. Select the Output Channels tab. Choose in the toolbar.
-
Fill in a Name and optionally a Description. The name of the Output Channel has to be unique.
-
If you plan to restrict the Output Channel to one or multiple Customers select the appropriate items from Customer Filter.
-
Choose one or more of the Supported Action Types.
Push the Next button.
-
-
Create an AWS – Simple Notification Service record as described in Handling AWS SNS Services and select it from the Service drop-down list.
-
Define a Topic ARN.
For more information hover over (?).
-
Define an optional Subject.
For more information hover over (?).
You can include any of the available Interpolations in this field. Simply click and select the appropriate one from the list.
-
Define a Message.
For more information hover over (?).
You can include any of the available Interpolations in this field. Simply click and select the appropriate one from the list.
-
Define Attributes.
For more information hover over (?).
Handling AWS SNS Services
You need to create an AWS Simple Notification Service record in Avantra before you can make use of the AWS – Simple Notification service.
This record contains the credentials of an Amazon Web Services user with programmatic access and a customer-managed policy attached.
See Procedure: Create an API User with minimum access to EC2 on how to create such an AWS user and a policy, but use the following JSON policy instead:
{
    "Version": "2012-10-17",
    "Statement": [
        {
            "Sid": "AllowPublishToTopic",
            "Effect": "Allow",
            "Action": [
                "sns:Publish"
            ],
            "Resource": "*"
        }
    ]
}-
Select from the top-level menu. Select . Choose .
-
Fill in a Name, an optional Description, and choose a Customer.
Fill in the AWS Access Key ID, the AWS Secret Access Key, and choose a Region.
-
Push the Create button to finish.
You can now use the AWS – Simple Notification Service in the Service field of the AWS — Simple Notification Service Output Channel.
Define an AWS — SMS Output Channel
In order to define an Output Channel proceed as follows:
-
Select from the top-level menu. Select the Output Channels tab. Choose in the toolbar.
-
Fill in a Name and optionally a Description. The name of the Output Channel has to be unique.
-
If you plan to restrict the Output Channel to one or multiple Customers select the appropriate items from Customer Filter.
-
Choose one or more of the Supported Action Types.
Push the Next button.
-
-
Create an AWS – Simple Notification Service record as described in Handling AWS SNS Services for SMS and select it from the Service drop-down list.
-
Define a Sender ID.
For more information hover over (?).
You can include any of the available Interpolations in this field. Simply click and select the appropriate one from the list.
-
Choose a Mode. See also AWS - Worldwide SMS Pricing
-
Define a Max. Price (USD) you are willing to pay per text message. For more information hover over (?).
-
Define a Message.
You can include any of the available Interpolations in this field. Simply click and select the appropriate one from the list.
-
Select a value for Recipients.
-
Push the Save button.
Handling AWS SNS Services for SMS
You need to create an AWS Simple Notification Service record in Avantra before you can make use of the AWS – SMS service.
This record contains the credentials of an Amazon Web Services user with programmatic access and a customer-managed policy attached.
See Procedure: Create an API User with minimum access to EC2 how to create such an AWS user and a policy, but use the following JSON policy instead:
{
    "Version": "2012-10-17",
    "Statement": [
        {
            "Sid": "AllowSendSms",
            "Effect": "Allow",
            "Action": [
                "sns:SetSMSAttributes",
                "sns:Publish"
            ],
            "Resource": "*"
        }
    ]
}-
Select from the top-level menu. Select . Choose .
-
Fill in a Name, an optional Description, and choose a Customer.
Fill in the AWS Access Key ID, the AWS Secret Access Key, and choose a Region that supports SMS sending.
-
Push the Create button to finish.
You can now use the AWS – Simple Notification Service in the Service field of the AWS — SMS Output Channel.
Define a UI Browser Output Channel
In order to define a UI Browser Output Channel, proceed as follows:
-
Select from the top-level menu. Select the Output Channels tab. Choose in the toolbar.
-
Fill in a Name and optionally a Description. The name of the Output Channel has to be unique.
-
If you plan to restrict the Output Channel to one or multiple Customers select the appropriate items from Customer Filter.
-
Choose one or more of the Supported Action Types.
Push the Next button.
-
-
Select a value for Recipient:
-
If you want this Output Channel to deliver only to a single user, select Single user. Choose a User from the User drop-down list. You can only select a User that has the "Receive Notification Messages" permission for the Customers selected in Customer Filter.
-
If you want this Output Channel to deliver to a group of users, select Group of users. You can only select a Group that has a Role containing the "Receive Notification Messages" permission for the Customers selected in Customer Filter.
-
If you want this Output Channel to deliver to all Users of the selected Customers (or all Customers) that have the "Receive Notification Messages" permission, select Users of selected/all customers.
Push the Next button.
-
-
Define a Message.
You can include any of the available Interpolations in this field. Simply click and select the appropriate one from the list.
-
Push the Finish button. The Output Channel detail view is opened automatically.
-
You can also select a Severity and upload an audio file for Audio Source. The audio file is played whenever a browser notification is generated.
Define a Mobile Output Channel
To define an Output Channel, proceed as follows:
-
Select from the top-level menu. Select the Channels tab. Choose in the toolbar.
-
Fill in a Name and optionally a Description. The name of the Output Channel has to be unique.
-
If you plan to restrict the Output Channel to one or multiple Customers select the appropriate items from Customer Filter.
-
Choose one or more of the Supported Action Types.
Push the Next button.
-
-
Select a value for Recipient.
-
If you want this Output Channel to deliver only to a single user, select Single user. Choose a User from the User drop-down list. You can only select a User that has the "Receive Notification Messages" permission for the Customers selected in Customer Filter.
-
If you want this Output Channel to deliver to a group of users, select Group of users. You can only select a Group that has a Role containing the "Receive Notification Messages" permission for the Customers selected in Customer Filter.
-
If you want this Output Channel to deliver to all Users of the selected Customers (or all Customers) that have the "Receive Notification Messages" permission, select Users of selected/all customers.
-
-
Push the Next button.
-
Define an Alert Message.
You can include any of the available Interpolations in this field. Simply click and select the appropriate one from the list.
-
Push the Finish button.
Define an EventLog Output Channel
|
This Output Channel is only available if the Avantra Server is running on Microsoft Windows operating systems. |
In order to define an EventLog Output Channel proceed as follows:
-
Select from the top-level menu. Select the Output Channels tab. Choose in the toolbar.
-
Fill in a Name and optionally a Description. The name of the Output Channel has to be unique.
-
If you plan to restrict the Output Channel to one or multiple Customers select the appropriate items from Customer Filter.
-
Choose one or more of the Supported Action Types.
Push the Next button.
-
-
Define a Message Format.
You can include any of the available Interpolations in this field. Simply click and select the appropriate one from the list.
-
You can also define Event Source, Event Server, Event ID, Category ID, and select a Type.
-
Push the Finish button.
Define a REST Output Channel
| Consult the documentation of the REST API of the Web Service you plan to connect to. |
In order to define a REST Output Channel proceed as follows:
-
Select from the top-level menu. Select the Output Channels tab. Choose in the toolbar.
-
Fill in a Name and optionally a Description. The name of the Output Channel has to be unique.
-
If you plan to restrict the Output Channel to one or multiple Customers select the appropriate items from Customer Filter.
-
Choose one or more of the Supported Action Types.
Push the Finish button. The Output Channel detail view is opened automatically.
-
-
Define the REST API Url.
You can include any of the available Interpolations in this field. Simply click and select the appropriate one from the list.
-
Choose the Protocol and the request Method.
-
You can define additional headers using the next to Headers.
-
If you desire authentication or authorization, you can choose between Basic and OAuth 2.0. For Basic authentication, fill in User and Password. For the setup of OAuth 2.0 see Using OAuth 2.0 with the RESTful Web Service Output Channel.
-
Push the Save button.
Define a ServiceNow Incident Output Channel
Before you start, please perform the steps described in ServiceNow, in particular, Authorizing Avantra with ServiceNow.
To define a ServiceNow Incident Output Channel, proceed as follows:
-
Select from the top-level menu. Select the Output Channels tab. Choose in the toolbar.
-
Fill in a Name and optionally a Description. The name of the Output Channel has to be unique.
-
If you plan to restrict the Output Channel to one or multiple Customers select the appropriate items from Customer Filter.
-
Choose one or more of the Supported Action Types.
Push the Finish button. The Output Channel detail view is opened automatically.
-
-
Choose a value for ServiceNow Authentication, the Urgency.
-
Adapt Short Description and Additional Comments if desired.
You can include any of the available Interpolations in this field. Simply click and select the appropriate one from the list.
-
Push the Save button.
Use Additional Attribute Mapping
In order to map additional fields, proceed as follows:
-
In your ServiceNow instance, under System Definition search for
tablesand select them.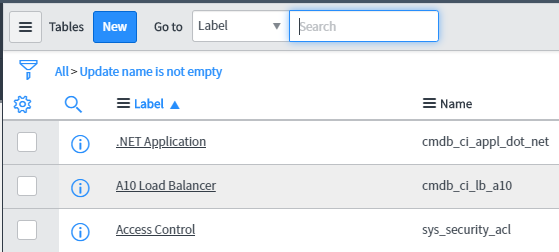
-
Search for
imp_incidentand select it. This table has been imported with the Avantra Integration:
-
Use New to create additional attributes:
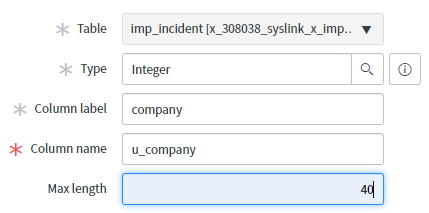
Please note that the field Column Name gets filled automatically. Keep a note of these values. You will need them later for the definition in the Output Channel.
-
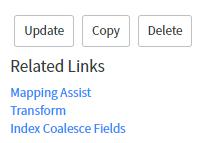
Map the new fields to the existing ServiceNow table, Search for
transformin your ServiceNow instance. Under Administration, click on Transform Maps. Select table Transform Incidents.
Map all the fields using the Mapping Assist:
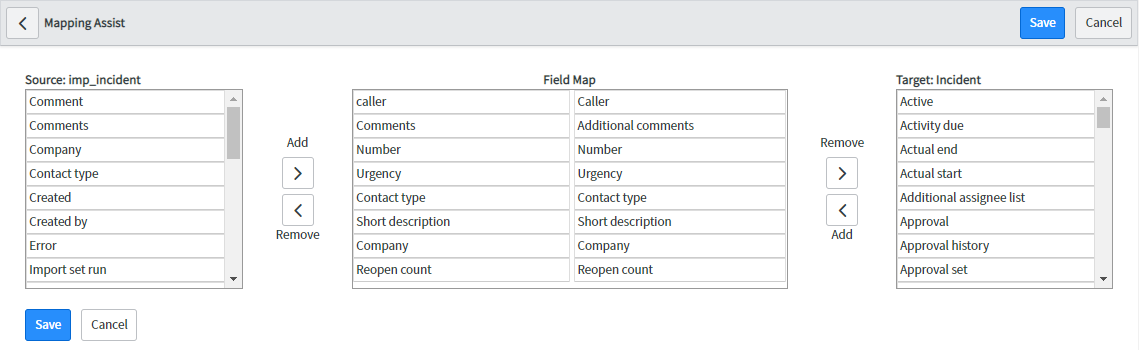
Push the Save button once you are done.
-
In Avantra WebUI, proceed to the ServiceNow Output Channel and fill in the mappings:

Define a ServiceNow Event API Output Channel
| ServiceNow Event API Output Channel is available in the Avantra Pro Edition starting with patch 20.11.4. |
To define a ServiceNow Event API Output Channel, proceed as follows:
-
Select from the top-level menu. Then select the Channels tab. Lastly, choose in the toolbar:
-
Fill in the Name and Description fields (optional). The name of the output channel has to be unique.
-
If you plan to restrict the output channel to one or more customers, select the appropriate items in the Customer Filter.
-
Choose one or more of the Support Action Types.
Push the Finish button. The detail view of the Output Channel opens automatically.
-
-
Select a value for ServiceNow Authentication from the drop-down menu.
-
Fill in the rest of the fields, such as Source, Source Instance, Node, Resource, Metric Name, Type, Message Key, Description.
You can include any of the available Interpolations in this field. Simply click and select the appropriate one from the list.
-
Also, it is possible to define any number of additional fields using mappings in the Additional Information Mapping section. To learn more about ServiceNow Custom Alert Fields, see this document.
-
Finally, push the Save button.
Define a SOAP Output Channel
| Consult the documentation of the Web Service you plan to connect to. |
In order to define an SAP Output Channel proceed as follows:
-
Select from the top-level menu. Select the Output Channels tab. Choose in the toolbar.
-
Fill in a Name and optionally a Description. The name of the Output Channel has to be unique.
-
If you plan to restrict the Output Channel to one or multiple Customers select the appropriate items from Customer Filter.
-
Choose one or more of the Supported Action Types.
Push the Finish button. The Output Channel detail view is opened automatically.
-
-
Define the WSDL Url.
You can include any of the available Interpolations in this field. Simply click and select the appropriate one from the list.
-
Choose the Protocol and the request Method.
-
You can define additional headers using the next to Headers.
-
If authentication or authorization is needed, you can choose between Basic and OAuth 2.0. For Basic authentication, fill in User and Password. For the setup of OAuth 2.0 see Using OAuth 2.0 with the RESTful Web Service Output Channel.
-
Push the Save button.
Define a Cloud Automation Output Channel
| This function is only available with the Avantra Automation, Cloud and Enterprise Editions. For more information about editions please see the Avantra Editions Matrix. |
To define a Cloud Automation Output Channel, proceed as follows:
-
Select from the top-level menu. Select the Output Channels tab. Choose in the toolbar.
-
Fill in a Name and optionally a Description. The name of the Output Channel has to be unique.
-
If you plan to restrict the Output Channel to one or multiple Customers select the appropriate items from Customer Filter.
-
Choose one or more of the Supported Action Types.
Push the Finish button. The Output Channel detail view is opened automatically.
-
-
In Selection choose the Cloud Server you want to stop or start. This can be:
-
A single Cloud Server whose name you have to choose from the list in Server.
-
The affected Cloud Server. This is, for instance, the Server a notified Check is executed for.
This Selection usually is only useful for Server Checks. For other Notification Elements, it may not have the desired result.
-
-
In Action, you can choose whether to start or stop the System.
-
Push the Save button.
Define a SAP Automation Output Channel
| This function is only available with the Avantra Automation, Cloud and Enterprise Editions. For more information about editions please see the Avantra Editions Matrix. |
To define an SAP Automation Output Channel, proceed as follows:
-
Select from the top-level menu. Select the Output Channels tab. Choose in the toolbar.
-
Fill in a Name and optionally a Description. The name of the Output Channel has to be unique.
-
If you plan to restrict the Output Channel to one or multiple Customers select the appropriate items from Customer Filter.
-
Choose one or more of the Supported Action Types.
Push the Finish button. The Output Channel detail view is opened automatically.
-
-
In Selection choose the Systems you want to stop or start. This can be:
-
A single SAP Instance or SAP System whose name you have to choose from the list in SAP System or SAP Instance, respectively.
-
The affected SAP Instance or SAP System. This is, for instance, the System a notified Check is executed for.
This Selection usually is only useful for SAP Instance or SAP System Checks. For other Notification Elements, it may not have the desired result. -
Predefined or ad-hoc Selectors of SAP Instances or SAP Systems.
-
-
In Action you can choose whether to start the System or to perform a soft or hard shutdown. For a soft shutdown – which is only available for ABAP SAP Instances and SAP System – you can also define a soft shutdown timeout.
-
Push the Save button.
Define a Ticket Log Output Channel
|
This Output Channel is only available for Ticket Notification Actions. It modifies the Ticket that triggers the Notification Action. |
To define a Ticket Log Output Channel, proceed as follows:
-
Select from the top-level menu. Select the Output Channels tab. Choose in the toolbar.
-
Fill in a Name and optionally a Description. The name of the Output Channel has to be unique.
-
If you plan to restrict the Output Channel to one or multiple Customers select the appropriate items from Customer Filter.
-
Choose one or more of the Supported Action Types.
Push the Finish button. The Output Channel detail view is opened automatically.
-
-
Choose values for Type, Author, and Ticket Log. Optionally choose a New Status and if or if not the entry will be flagged Hidden.
-
Fill in a text for the Log Content.
You can include any of the available Interpolations in this field. Simply click and select the appropriate one from the list.
-
Push the Save button.
Define a Null Output Channel
To define Null Output Channel, proceed as follows:
-
Select from the top-level menu. Select the Output Channels tab. Choose in the toolbar.
-
Fill in a Name and optionally a Description. The name of the Output Channel has to be unique.
-
If you plan to restrict the Output Channel to one or multiple Customers select the appropriate items from Customer Filter.
-
Choose one or more of the Supported Action Types.
Push the Finish button.
-
Define a Composite Output Channel
To define a Composite Output Channel, proceed as follows:
-
Select from the top-level menu. Select the Output Channels tab. Choose in the toolbar.
-
Fill in a Name and optionally a Description. The name of the Output Channel has to be unique.
-
If you plan to restrict the Output Channel to one or multiple Customers select the appropriate items from Customer Filter.
-
Choose one or more of the Supported Action Types.
Push the Next button.
-
-
Fill in at least two Output Channels using , and for the second one choose whether it is executed in any case, only if the previous Output Channel fails, or only if the previous Output Channel succeeds. Repeat for a third, fourth, and fifth Output Channel, if desired.
-
Push the Finish button.
|
You cannot add a Composite Output Channel into another Composite Output Channel. |
|
If you are working with Filter Lists and Output Channels and you are working with Macros, you will find a button Convert to FTL that allows you to convert them into Interpolations. |