Complex network setups
For more complicated network set ups where your Avantra Server may not have direct access to the servers and systems it intends to manage, you can use a combination or a Avantra Gateway Agent along with other components such as reverse proxies, NATs and more to establish connectivity to your remote systems.
Using an Avantra Agent as a gateway
When to Use an Agent as a gateway
If your network is configured in a way that the Avantra Agents cannot connect directly to your Avantra Server, you might consider using an intermediate Avantra Agent as a Gateway to the remote Agents.
The intermediate Agent must be installed on a host which is reachable from the other Avantra Agents as well as from the Avantra Server. It is also possible to cascade multiple Agents as Gateways if necessary.
Installing an Agent as a gateway
To install an Avantra Agent as a Gateway, no special action is required. The Gateway functionality is embedded into each Avantra Agent by default. Therefore you simply have to install an Avantra Agent on your gateway host, see Installing the Avantra Agent.
If you need to migrate from an existing avantra-gateway see the following document: Replace Gateway with Xandria Agent 7.3.
After you have installed the Avantra Agent on the target host and configured it in Avantra WebUI, perform the following steps:
- Open the Properties tab of the corresponding Server.
- Mark the checkbox Use As Gateway. This will enable the Agent to be used as a Gateway in The Route Configurator.
![]()
Route Configurator
A graphical editor for Routes is provided and it's recommended to configure Routes by means of the so-called Route Configurator instead of configuring them manually.
A Route defines the way points a request to and from an Agent has to pass in order to reach its respective destination. Technically, a Route corresponds to a hidden Parameter Set based on the two Monitoring Parameters AgentConnectRoute and MasterConnectRoute.
Creating a Route
To create a Route:
- Open Administration > Routes. This opens the Route Configurator.
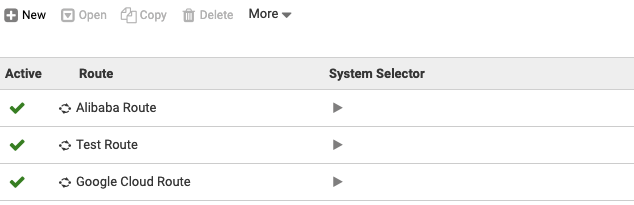
- Press New to create a new Route.
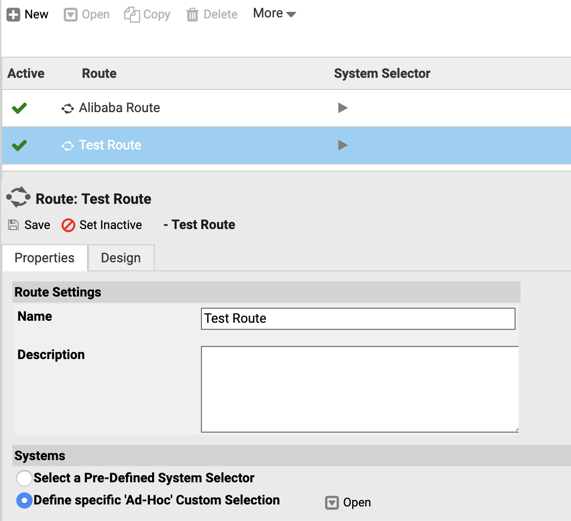
- Fill in a Name and optionally a Description of the Route.
- Define a System Selector for the Servers that shall be connected via the Route.
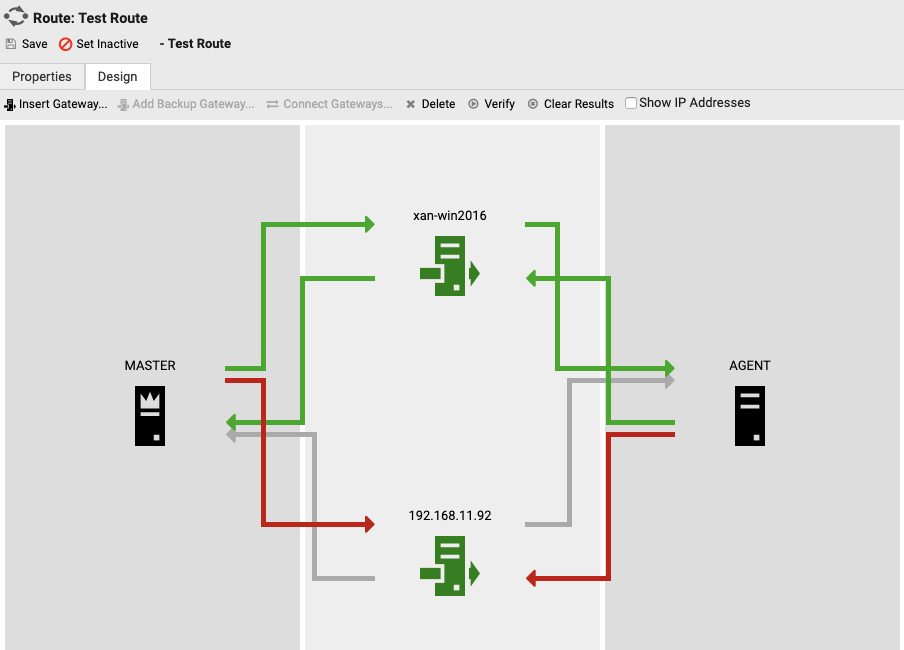
After completing these steps, switch to the Design tab to define the routing.
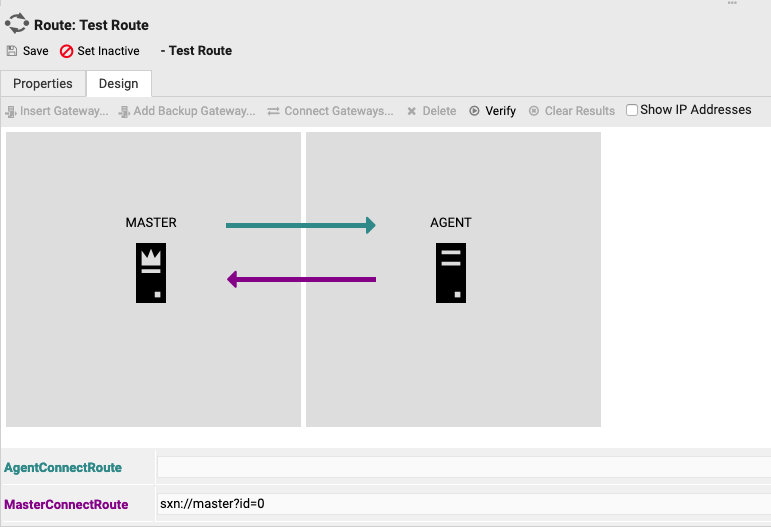
On the left-hand side, the Master icon is displayed, and on the right-hand side, a placeholder icon for the Servers selected by the System Selector is shown. By clicking on either of the icons, information on the corresponding object is shown in a details view.
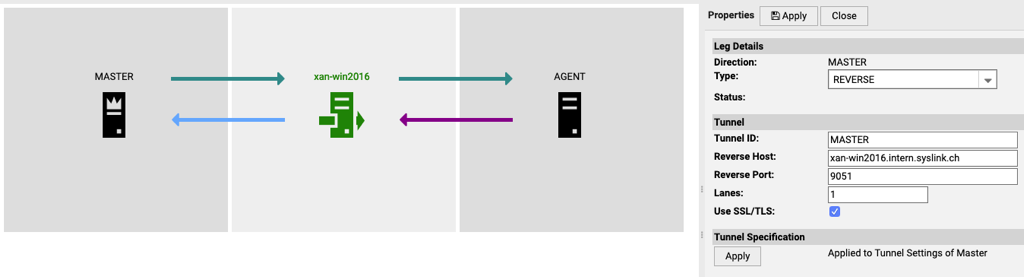
You may also click on the arrows connecting the two nodes. This opens the properties of the corresponding network leg. Here you will be able to define individual settings for a leg, like IP address, port, SSL encryption, etc.
Designing the Route
To design the Route, the buttons in the toolbar or the context menu on the respective element (accessible by right-clicking an element) can be used.
![]()
- To insert a Gateway, you must select one or a pair of adjacent legs (shift-click for multi-selection) and press Insert Gateway. A popup window appears which lets you select one of your Gateway Agents. To have all connecting legs created automatically, leave the Add legs automatically checkbox marked. Alternatively, you can use the context menu on the leg by right-clicking it and by selecting Insert Gateway.
- To add a backup Gateway (for redundant routings), select a Gateway node and press Add Backup Gateway. The legs connected to the original Gateway are copied and connected to the newly created Backup Gateway. Alternatively, you can select Add Backup Gateway from the context menu of the Gateway node.
- To connect two nodes of your Route, select both nodes using shift-click and press Connect Gateways. A popup window appears which lets you select the direction of the legs you want to create. For example, if you only want to create a leg into the direction of the Server, deselect the Agent Route checkbox. In the context menu on the node, you can also select Connect To to bring up a list of possible nodes to connect to.
- To delete any component of your Route, simply select it and press the Delete button. The Route will be rearranged accordingly. The same can be achieved by selecting Delete from the context menu. Take care to delete the correct element by checking the context menu title; at the moment there's no undo functionality available.
Defining leg details
When you select a leg of the Route by clicking on it, its details are shown in the details pane.
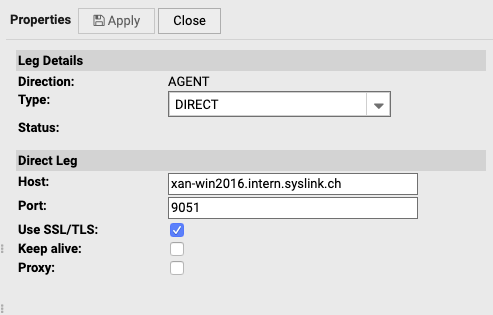
There are multiple leg types available, depending on the target node of the leg.
| Type | Description | Purpose |
|---|---|---|
DIRECT | A direct TCP/HTTP connection to the specified IP address and port is used | This is the preferred connection type when the target IP and port are reachable from the source node. |
REVERSE | A reverse tunnel is used; an incoming connection from the target node is used for communication. | This connection type can be used when connecting to the target node directly is not possible, but a connection from the target node to the source node can be established. |
AGENT | Placeholder for the final leg of the Route to the Agents. | Defined by the Server IP address and the Monitoring Parameter AgentListenerPort; this must be a placeholder to address all target Servers defined by the specified System Selector. |
MASTERHOST/PORT | Possible choice for the final leg of the Route to the Server. | This setting makes use of the Monitoring Parameters MasterHost/MasterPort on the source node. |
Direct Legs Direct legs require that the target node is reachable directly with a TCP connection. For direct legs, an IP address and a port is required.
| Field | Description |
|---|---|
| Host | IP address or FQDN of the target host |
| Port | Listener port of the Agent on the target host. |
| Use SSL/TLS | Enable communication encryption of the leg. Deactivate this only in case there are SSL/TLS problems and only until they are fixed. |
| Keep alive | If activated, connections aren't closed immediately after transmission (only after 60 secs idle time). This only makes sense for high throughput connections with activated SSL/TLS; in those cases, the cost of the SSL handshake per connection can be saved. |
| Proxy | If the connections need to use an HTTP proxy, activate this flag. The direct leg connection makes use of the HTTP CONNECT method to tunnel its messages through the proxy. Therefore make sure the HTTP CONNECT method feature is configured correctly on the proxy. |
| Proxy Host | IP address or FQDN of the proxy host |
| Proxy Port | Listener port of the proxy |
REVERSE Legs
A REVERSE leg relies on a configured tunnel on the target node, which maintains a connection to the source node. For this to work, a tunnel configuration must be present on the target node.
The Route Configurator allows configuring tunnels directly if the tunnel affects the Route in the direction to the Master.
| Field | Description |
|---|---|
| Tunnel ID | The ID that is sent from the target node to the source node to identify the tunnel. All messages bound for that tunnel are tagged with this ID. The source node's Agent then sends those messages via the corresponding tunnel connection. |
| Reverse Host | IP address or FQDN of the source node as seen from the target node. |
| Reverse Port | Listener port of the source node Agent as seen from the target node. |
| Lanes | Defines how many connections from the target node to the source node are kept alive for reverse communication. This should only be increased if there are hundreds of Agents communicating via the tunnel. |
| Use SSL/TLS | Enable communication encryption of the tunnel leg. Deactivate this only in case there are SSL/TLS problems and only until they are fixed. |
By pressing Create Tunnel / Update Tunnel in the properties pane of the REVERSE leg, the tunnel is configured on the fly directly on the Avantra Server or avantra-gateway. It will become active and usable after a couple of seconds to minutes.
To configure a tunnel in the direction to the Agent, a tunnel specification file must be installed at the corresponding Gateway Agent. The Route Configurator provides this file for download depending on the tunnel setup by means of the Download button, however, since the corresponding Agent can't be reached directly (otherwise you wouldn't need a tunnel), you'll have to download the tunnel spec and copy it to the Agent's cfg directory. The Agent scans periodically for tunnel specs and will establish the tunnel at runtime.
To verify the tunnels maintained by any node, you may click on the node, and the details pane will reveal all active tunnels of the node together with their states.
Testing connectivity
The button Verify allows testing the current routing as seen in the editor, without the need to make it active or even save it.
By clicking on the legs afterwards, you can investigate the response time of the respective leg and - in case an error occurred - the latest error message.
To clear the results of the latest connectivity test, simply press Clear Results.
Example network setup
The following diagram outlines a recommended setup of Avantra.
