Adding an SAP System
Add a system manually
Perform the following steps to define a new SAP System:
-
Select from the menu and push the New button, then choose SAP System from the drop-down menu.
In the section Configure Agentless Monitoring you will learn how to configure Agentless Monitoring for an SAP System where you cannot install Avantra Agent. But for now, we assume you have access to the operating system which hosts the SAP System's instances. -
Enter the Unified SAP SID and Real SAP SID into the corresponding fields, choose a Customer, a System Role, and the SAP System Type. Click Next.
- ABAP-only SAP Instance
-
You also need to define the RFC user you have configured during the Avantra Agent installation process in the RFC User field.
Add the corresponding password in RFC User Password and the client the RFC user was defined in the field RFC Logon Client.
Fill in the ABAP Schema User and the corresponding password in the fields ABAP DB Schema User and ABAP DB Schema User Password.
You can also configure the RFC connection using SNC encryption. Please see the description of the Check RFCConnect and of the Monitoring Parameters concerning SNC, like SNCMode and SNCLibraryPath. - Java-only SAP Instance
-
You also need to define the J2EE User you have configured during the installation process in the J2EE User field.
Add the corresponding password in the J2EE User Password field.
Fill in the Java Schema User and the corresponding password in the fields Java DB Schema User and Java DB Schema User Password.
- ABAP+Java SAP Instance
-
You need to fill in the corresponding data for both the ABAP and the JAVA parts.
- Web Dispatcher and Abap_Scs with Web Dispatcher SAP Instances
-
Web Dispatcher and Abap_Scs with Web Dispatcher SAP Instances monitoring uses solely the SAPControl Web Service Interface. By default, the Avantra Agent tries to access SAPControl by named pipes provided on OS level, which does not require a user and password. However, this might not work due to missing file access authorization on the OS level, especially on Unix-like operating systems. In this case, please define the SAPControl User, see Defining the SAPControl User and switch to HTTP(S) using SAP Instance Monitoring Parameter SAPControlProtocol.
- TREX SAP Instance
-
There is no user data to fill in.
-
Push OK to create the SAP System
All other data is optional.
If this SAP System is running with a MaxDB, you may want to define a MaxDB DBM Operator and the corresponding password in the DBM Operator Password field. You find the fields in the SAP System Database section of the Properties tab once the Database has been discovered.
If this SAP System is running with an SAP HANA database you may want to define the SAP HANA System DB. To do so you have to create the SAP HANA System DB as a standalone Database. Once you created the System DB you can assign the System DB to your SAP System. The System DB is used to start and stop the SAP System including the SAP database.
In case you do not want the System to have the generic Customer Application, choose one of the Customer Applications from the Customer application combo box.
If you want to assign certain users being responsible for this system, you may select the corresponding values for the Administrator and Administrator’s Deputy fields in the Responsibilities block.
If you intend to use Service Level Agreements you probably want to select a value for the SAP System TimeZone.
If you have already defined Service Level Agreements, you can select one from the Assigned SLA list.
You can also set the SAP System not operational by defining Operational Since and/or Operational Until.
In case you made any modifications, click the Apply button.
Remarks:
-
Further data (for example, version information) will be inserted and updated automatically with the next Daily Check. You cannot enter information there.
-
The user and password information is stored encrypted in the Avantra Database and will be transferred to the Avantra Agent in an encrypted state. The Avantra Agent itself also stores the user and password data locally in an encrypted format. Transfer of user and password information between Avantra WebUI and the web browser happens also in a secured way unless you hit Show.
-
Once the additional data has been retrieved by the Avantra Agent, you can also view Performance and availability data.
|
In order to open an existing SAP System, choose from the menu, select the desired entry from the list, and push the Open button (or double-click the selection). |
Defining SAP Systems automatically
Starting with release 21.11, Avantra is able to define SAP Systems automatically. Based on the results of the automatic instance detection, Avantra will create a SAP System for the detected instances - if no matching existing system can be found in the Avantra database - and attach the instances to the newly created system.
|
While Avantra can define SAP Systems for you, you will still have to complete the definition of a system by configuring system credentials. |
To let Avantra define SAP Systems automatically, you have to configure the Monitoring Parameter SAPSystemAutoCreation for an Avantra Agent which is installed on a server hosting the system, see also Installing the Avantra Agent.
|
Please make sure that the used server is assigned to the correct customer; the created system will be assigned to the same customer automatically. |
Choose a mode fitting your needs; set it to Monitor Off if you want to avoid any notifications being sent due to initial system check statuses.
An automatically created SAP system is set to the Monitor Level Connected, which indicates to the agent that only checks for that Monitor Level can be performed.
Therefore, after monitoring has started for an automatically defined system, only checks that don’t require credentials are performed and reported. System connectivity checks, like RFCConnect, J2EECONNECT etc. then run in a special mode where they simply try to establish a network connection without any logins. This allows to calculate a simplified SystemAlive check as well as system Availabilities, even in the lowest Monitor Level.
The next steps after automatic system creation are:
-
Enter the missing credentials in the SAP System details page in Avantra to raise the Monitor Level to Authenticated. However, this is not required if it’s sufficient to run the system with Monitor Level Connected for a start.
-
Validate the marked fields which have been set automatically by system creation.
-
Press Confirm to accept all changes and confirm the new system.
-
If the system was created in Monitor Off mode, check if the system icon is green, and enable monitoring by means of the Monitoring Switch on the System details page in Avantra.
-
If the system was set to not operational, clear the Operational Since setting and press Confirm/Apply.
Further steps for ABAP systems would include importing the Avantra transport to the system, see Importing the SAP Transport Request.
Defining the SAPControl User
|
SAPControl is used for SAP System Agentless Monitoring, for the DispatcherQueue Check, and for monitoring of Web Dispatcher SAP Instances. Furthermore, it is required for the PARAMETER_VALUES Custom Check of Abap_Scs, Java_Scs ,Trex, and Web Dispatcher instances, as well as for starting and stopping SAP Instances and SAP Systems. |
These functions require valid credentials to access the SAPControl Web Service Interface of an SAP Instance. This is optional for Systems monitored locally. For remote systems, however, the user must be defined.
To define the user, navigate to the Credentials tab of the SAP system and activate the checkbox to the left to the SAP Control User (or SAP_CONTROL) field. Then edit and fill in the user, password, or certificate, or private key of a valid OS user, for example <sid>adm.
Additionally, you may define a SAPControl user per SAP Instance, if for example, the credentials of the OS user differ on an SAP Instance from the credentials set in the SAP System properties. If SAPControl credentials are defined on an instance, they override the SAPControl credentials defined on the parent SAP System.
To define a SAPControl user on an SAP Instance, navigate to the Credentials tab of the instance and follow the procedure described above.
Please see SAP Instance Monitoring Parameter SAPControlProtocol for further reference.
Assigning SAP Instances to SAP Systems
|
As a general rule, SAP Instances of an SAP System are discovered automatically once the SAP System and all Servers hosting components of this SAP System are defined and monitored. In other words, there is no need to define SAP Instances |
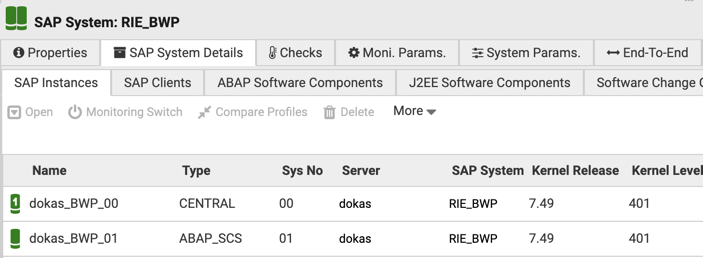
In order to verify if instances have been discovered and inserted correctly, proceed as follows:
-
Choose from the menu, select the desired entry from the list and push the Open button (or double-click the selection).
-
Switch to the SAP System Details tab. You should see a list of discovered SAP Instances as shown below:
If you’re using Logical Host Names, it is recommended to activate the SAP System Monitoring Parameter SAPLogicalHostDetection.
In some cases, you might want to override the SAP Instance Auto Discovery process.
This can be done by setting the Monitoring Parameter SAPInstanceProfiles on the Servers hosting the corresponding SAP Instance. See also Adding, Modifying & Deleting Monitoring Parameters and the description of SAPInstanceProfiles.
In very rare cases, you will have to create SAP Instances manually, e.g. there are two or more SAP Systems having the same Real SAP SID for a given Customer, or the Server is assigned to a different Customer than the SAP System. In this case, perform the following steps:
-
Choose from the menu, select the desired entry from the list and push the Open button (or double-click the selection).
-
Select the SAP System Details tab. On the SAP Instances tab, choose .
-
Select the Instance Type, the hosting Server, and fill in a System Number. Push the Create button.
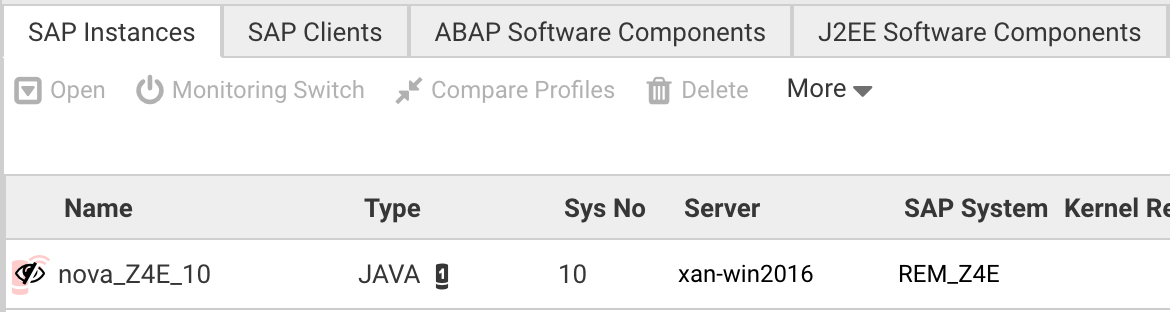
If an SAP Instance is no longer discovered by any Avantra Agent it is (obviously) no longer monitored and displayed like this:
|
In order to open an existing SAP Instance, choose from the menu, select the desired entry from the list, and push the Open button (or double-click the selection). |
Assigning Database instances to SAP Systems
|
As a general rule, the Database instance of an SAP System is discovered automatically once the SAP System and all Servers hosting components of this SAP System are defined and monitored. In other words, there is usually no need to define Database instances. |
However, there might be some cases in which the Auto Discovery does not work correctly. As a result, a “wrong” Database host might be inserted, or no Database host at all.
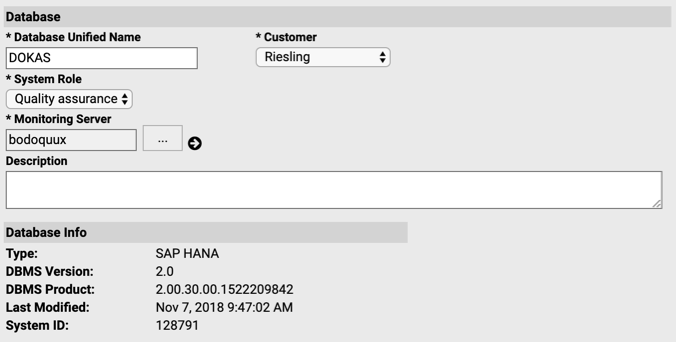
In order to verify if the Database Instance has been discovered and inserted correctly, proceed as follows:
-
Choose from the menu, select the desired entry from the list and push the Open button (or double-click the selection).
-
Proceed to the SAP System Database section of the Properties tab.
You should see a Database entry as shown below:
In order to manually define the Database host proceed as follows:
-
Click on the … button next to DB Monitoring Server.
-
Select the Server from the list that monitors the Database. If required, select Show Servers of all Customers. Push the Select button.
-
In order to prevent all future Auto Discovery attempts, check the Prevent Automatic Updates box.
-
Push the Apply button.
This section describes preparations that are required to monitor SAP Systems or Databases using the Avantra Agent. If the agent shall only monitor the operating system, no preparations are required and you can continue reading the appropriate installation section: Installing the Agent on Microsoft Windows or Installing the Agent on Unix.
To monitor ABAP or ABAP+Java SAP Systems, the Avantra Agent needs an ABAP user to connect with, the so-called Avantra RFC User.
We recommend creating a dedicated RFC user for Avantra, as described in Avantra RFC User Setup.
Make sure to import the transport requests before you create the RFC user since the transport requests include an authorization object and an authorization profile that the user requires.
For an ABAP+Java system, we recommend enabling the RFC user as a J2EE Administrator as well.
For a Java-only system, we recommend creating a user avantra_j2ee, as described in Avantra J2EE User Setup.
Avantra ABAP Interface
We are often asked questions about our ABAP interface, specifically what is in our two transports and why do customers have to import them to their ABAP-based systems. We understand the concerns given the importance for companies to run their production systems as stably as possible.
First, Avantra, i.e. the Avantra Agent, uses RFC (Remote Functions Calls) to communicate with ABAP systems. We are using a recent version of the official SAP JCo library, which provides RFC capabilities for Java-based software, like the Avantra Agent. Using original RFC-enabled SAP function modules, we can already get a lot of useful information to do our job, for example, we use a function module called TH_WPINFO to get information on the work processes of an SAP NetWeaver or S/4HANA instance; or we use SWNC_COLLECTOR_GET_AGGREGATES to read the performance data, like the number of dialog steps and the response times.
|
Avantra can also manage ABAP systems without the transports being applied, as long as the RFC user has enough permissions. It is clearly indicated which checks work and which do not work. This is especially useful to quickly roll out the Avantra Agent while the transports are being approved, to immediately benefit from all functionality that works without the transport being imported. |
However, not all information we require is available with RFC-enabled function modules, or it is not available in a way that suits important Avantra principles, like the separation of RealTime Monitoring and Daily Checks. Therefore, we have created our own RFC-enabled function module together with some ABAP classes to get the data we need to do our job. Then these ABAP classes either call original SAP code (function modules, classes or programs) or do queries on data from SAP tables. Certainly, you can examine this ABAP code once imported into your first ABAP system, if you wish to do so. Our ABAP interface is protected by our own authorization object ZSYSXANMON. So only RFC users, which have this authorization object included in their role, can use our interface. For all data being transferred via our interface, the Agent then calls the RFC-enabled function module /SYSLINK/MONXAN5 together with some parameters: the name of the ABAP class which actually delivers the data, and other input data to do the queries, for example, a timestamp to look for records in a table. All this code is delivered in the first of the two transport requests.
Another important principle for the ABAP interface is that we allowlist any authorization we require. All these authorizations are provided as a role called ZAVANTRA which is delivered in the 2nd transport of the interface. It includes a complete role with authorizations being reduced to the very minimal set. For instance, each of the RFC-enabled function modules we call from the Avantra Agent are allowlisted one by one. For example, we do not have access to business data unless required. These authorizations were frequently reviewed by security departments of large-scale enterprises or audited by external companies.
|
For Solution Manager systems there is an additional 3rd transport that is required which contains the role |
In many organizations, importing a transport request requires going through an approval process. Since this can take some time, we are frequently asked how often we update the ABAP interface and provide new transports. Now, as with all software, we do further enhance the product and fix problems, however, not every customer might need a new function or a fix. That’s why the Avantra Agent is backward compatible with previous versions of the Avantra ABAP interface (at least to a certain extent). So you can rest assured that a new version of our Avantra Agent is able to use an older version of the ABAP interface.
Lastly, people are sometimes concerned if our ABAP interface will cause issues during SAP System upgrades. The short answer is: it will not. First, all our objects are delivered within our own namespace /SYSLINK/, which is officially registered at SAP. Second, our ABAP code does not modify any of SAP’s programs. And third, if our interface would be reported by an SAP upgrade phase, simply let the upgrade process delete them and reimport afterwards. The only thing to take care of is that you may need to import the version suitable for your new basis release after the upgrade.
Importing the SAP Transport Request
|
For a general overview of our ABAP interface, please see the Avantra ABAP Interface. |
|
This section does not apply to Java-only systems. |
Avantra ships with workbench transports containing ABAP Objects used for monitoring and automation and customizing transports used for authorizations. You should import transport requests that match the basis release of your SAP System. Unicode and non-Unicode systems of all basis releases listed in SAP Basis are supported.
Use the document below to check the required transports for the deployed Avantra Agent version and the monitored SAP system type and version.
|
Avantra Agent also supports the V7 interface delivered with Syslink Xandria 7.3 in transport request |
|
Make sure to import the workbench request before the customizing request containing the role. On Solution Manager systems, the additional transport |
A minimum of two transports should be imported. First, import the workbench transport for your required version of Avantra Agent, and then import the customizing transport.
The workbench requests contain the client-independent ABAP Objects required for retrieving monitoring-related data, which cannot be directly retrieved by RFC.
All objects, except for the authorization object, use the registered namespaces /SYSLINK/, /AVANTRA/, and /ZXAN/. This is not possible for the authorization object, so it is delivered in the customer name range.
For the customizing transports, as these are client-dependant, please import the requests to the same client as the RFC user (see Avantra RFC User Setup). Choose the appropriate transport from the link above based on your SAP release. This transport contains the ZAVANTRA role only which includes the ZSYSXANMON authorization object. This is required for the Avantra monitoring interface and other system authorization objects.
|
For Solution Manager systems an additional role |
For Avantra Enterprise Edition, there are optional additional workbench and customizing transports that are required to enable specific automation templates. It is ESSENTIAL that the standard Avantra transports are imported prior to importing any of these additional transports.
We recommend that the following steps are only performed by an SAP Basis administrator or another person with proper knowledge of the SAP transport system.
To import the transport request, replace all occurrences xxxx with the numbers indicated above.
Proceed as follows for all requests you have chosen to import:
-
Download the file
transports-for-avantra-23.zipeither from the Support menu of avantra.com (it is in the CONTRIB RELEASE 23 section) or from your Avantra Server (if you followed Preparing the Avantra Agent Deployment):$ curl http://[avantra-server]:9050/AgentUpdate/transports-for-avantra-23.zip > transports-for-avantra-23.zip -
Extract the zip file to some proper location, referenced as
<transport-source>in this procedure. -
Copy the control files
<transport-source>/cofiles/K90xxxx.*to the directorycofilesof your transport domain, e.g./usr/sap/trans/cofiles(on Unix-like operating systems). -
Set the file permission of the copied cofiles in a way that they are readable and writable for any operating system user
[sid]admsupposed to import the request. On Unix-like operating systems, you can do this like in the following example:root$ chgrp sapsys K90xxxx.* root$ chmod 664 K90xxxx.*
On Microsoft Windows operating systems, you can use the Properties menu opened from the context menu of the file in order to modify the file attributes and other file security settings. Refer to your operating system documentation for further information.
-
Copy the data files
<transport-source>/data/R90xxxx.*to the directorydataof your transport domain, e.g./usr/sap/trans/data(on Unix-like operating systems). -
Set the file permission of the copied data files in a way that they are read- and writable for any operating system user
[sid]admsupposed to import the request. On Unix-like operating systems, you can do this like in the following example:root$ chgrp sapsys R90xxxx.* root$ chmod 644 R90xxxx.*
On Microsoft Windows operating systems, you can use the file Properties menu opened from the context menu of the file in order to modify the file attributes and other file security settings. Refer to your operating system documentation for further information.
-
Import the transport requests. This might be done with the SAP transport program
tpon operating system level, however, we recommend using transactionSTMS:-
Start transaction
STMS. -
Select Import Overview and select the SAP System where you want to import the request.
-
Choose menu item and type the transport number
[XAN|ASM|AVA]K90xxxxe.g.AVAK90xxxxin the transport request text field of the following dialog.Please set the Ignore Invalid Component Version flag at the Options tab, otherwise, the import may fail.
Press the Continue button. The transport request has been added to the import queue.
-
Import the request. If you are not sure whether to import all requests or only the newly added Avantra request
AVAK90xxxx, importAVAK90xxxxonly.Repeat the steps until all transport requests are imported.
-
-
Check the transport log for errors. Warnings can usually be ignored.
Add Role ZAVANTRA to other Clients
If the ZAVANTRA, ZAVANTRA_SOLMAN (for Solution Manager) or ZAVANTRA_AUTOMATION (Enterprise Edition) roles are required in more than one client, then perform the import for each of the additional clients required.
Avantra RFC User Setup
If you do not know how to set up an SAP (ABAP) user, please contact your SAP Basis or security administrator to perform the following steps:
-
Start SAP GUI and log in to the SAP System to monitor.
-
Please choose an appropriate logon client:
-
For ABAP+Java systems using SAP Java User Management Engine (UME), the user has to be created in the main client used by UME to enable it for Java monitoring.
-
If you intend to monitor an SAP BI/BW system, you need to create the user in the standard client of the BI/BW system.
-
If you intend to monitor an SAP PI/XI system, you need to create the user in the productive client of the PI/XI system.
-
Otherwise, we recommend using client
000.
-
-
Call the user maintenance transaction
SU01. -
Enter the name of the new user in the User field and press the Create button. We recommend naming the user
AVANTRA_RFC. -
Enter at least a value for Last name in the following screen and switch to the Logon data tab.
| Please setup the language for the RFC User to English (field “Language”) |
-
In the Logon data screen, enter a password in the fields Initial password and Repeat password.
-
Also in Logon data, for User type choose the value
System(orCommunication, orBackground). -
Switch to the Roles tab and enter the Avantra roles that have been imported
ZAVANTRAorZAVANTRA_SOLMAN(for Solution Manager) and alsoZAVANTRA_AUTOMATION(if using Enterprise Edition). If the correct transport(s) have not yet been imported, then refer to Importing the SAP Transport Request for instructions on how to import a transport request and then assign a profile. -
Press the Save button.
|
You may need a license for the user you fill in. In case of doubt, double-check with SAP. |
|
If you want to make use of security-related monitoring, like the Custom Checks USER_PROFILES or USER_AUTHORIZATIONS, you may want to create the RFC user in all clients you want to monitor. |
Avantra J2EE User Setup
Things are getting a little bit more complicated if Java comes into play. We need to distinguish between ABAP+Java and Java-only systems.
Setup for ABAP+Java systems
For an ABAP+Java System, we recommend authorizing the user created as described in Avantra RFC User Setup as an administrator in the J2EE instance.
The easiest way to achieve this is to assign the ABAP role SAP_J2EE_ADMIN to the user created in the ABAP part.
-
Go to transaction
SU01, enter the name of the user created as described in Avantra RFC User Setup in the User field, and click Change. -
Switch to the Roles tab and enter the role
SAP_J2EE_ADMIN.If you intend to monitor SAP XI/PI systems, you have to assign the ABAP role
SAP_XI_MONITORto the user.Additionally, you must assign the action
xi_af_channel_admin_displayto the SAP Java user to enable PI channel monitoring. -
Press the Save button.
Setup for Java-only systems
For a Java-only system, we recommend creating a new user (for example AVANTRA_J2EE) and authorize it with the available read-only role AVANTRA_READONLY. Do not use the Administrator user for monitoring.
-
Start the
UMEconsole pointing your browser at the URLhttp://<hostname>:<port>/useradmin. -
Logon as
administratoruser. -
Click Create User and fill in the required fields. Afterward, save the user.
-
Import the role
AVANTRA_READONLYaccording to the instructions from this solution document. -
For a PI/PO system, also assign the
SAP_XI_MONITOR_J2EErole. -
For a MII system, also assign the
SAP_XMII_ADMINISTRATORrole -
Click Save.
-
Follow the solution document JavaJobs and JavaJobStat check critical with message "No scheduler assigned" in order for the checks JavaJobs and JavaJobstat to run properly.
|
You may need a license for the user you fill in. In case of doubt, double-check with SAP. |
User Setup for Database Monitoring
The Avantra Agent needs the credentials of an SQL (!) Database User to connect to a stand-alone Database or the Database instance of an SAP System.
- Database instance of an SAP System
-
As a general rule, use the following Database users to monitor the Database instance of an SAP System:
ABAP-only SAP System
Use the SAP ABAP schema user (e.g. SAPSR3)
Java-only SAP System
Use the SAP Java schema user (e.g. SAPSR3DB)
Double-stack SAP System
Use both users
For an SAP System with MaxDB Database, you also need a DBM Operator (e.g. the
CONTROLuser). Customers with a higher focus on security can use their own database user instead of using schema user. Please follow the instructions under "Stand-alone Databases" to create users with minimal required permissions. - Stand-alone Databases
-
As a general rule, use an administrative Database user for the Database monitoring.
If for security reasons administrative users are not allowed, please follow the steps below:
- Oracle
-
Please make sure the SQL user you use has the permission to access the Catalog Views in Oracle; at least the role
SELECT_CATALOG_ROLEmust be granted to the user unless it is an Oracle administrator user. To do so, connect to your Oracle Database using SQLPlus and enter the following command:SQL> GRANT CONNECT, SELECT_CATALOG_ROLE TO <sql-user>Additionally, when using BR*Tools, the SQL user must be granted
SELECTprivileges to theSDBAHtable in the corresponding SAP schema, unless you already use the SAP schema owner or an administrator user.The same holds true for the table
BC_COMPVERSfound in the SAP schema of Java SAP Instances. - DB2
-
Please make sure your user is part of the
SYSMONauthority group or has system administration or system control authority. Please refer to your DB2 documentation on how to grant those authorities to your user. - Microsoft SQL Server
-
Please make sure the user you use has been assigned
view server stateanddb_datareaderpermissions. See the Microsoft SQL Server documentation on how to grant the permissions to your login user.Avantra supports both, SQL Server authentication and Windows authentication. In case you choose a Windows authentication user, please define the user in domain format in the Avantra WebUI:
[domain]\[username]. - MaxDB
-
Please define a user in the
DBA User Class. For a MaxDB Database, you also need aDBM Operator(e.g. theCONTROLuser).The CONTROLuser usually is not able to run SQL commands! - SAP HANA
-
Please make sure the user is assigned the role
Monitoring. In case you run a Java SAP Instance on top of HANA the Database user also needs the following permissions:GRANT SELECT ON TABLE [DBSCHEMA.]BC_COMPVERS TO [user] - SAP ASE (formerly SAP Sybase ASE)
-
Please make sure the user has assigned the roles
mon_roleandoper_role.For the SYB_Backup check, the permission setting depends on whether granular permissions are enabled for the database or not.
With granular permissions enabled, the dump configuration privilege must be granted to the user.
With granular permissions disabled, according to official Sybase ASE documentation, the role oper_role should be sufficient for the check SYB_Backup (all other checks only require mon_role permissions). Unfortunately, tests have shown that the stored procedure called for SYB_Backup fails with permission error unless the user is a member of sa_role.
- SAP SQL Anywhere
-
Please make sure the user has assigned the system privileges to run the procedure
sa_disk_free_space. To do this, run the following grant statements:GRANT EXECUTE ON sa_disk_free_space to [user] GRANT MANAGE ANY DBSPACE to [user] GRANT SELECT ON maint_plan to [user] GRANT SELECT ON maint_plan_report to [user]Make sure to replace
[user]with the real user name. - SAP IQ
-
Please make sure the SAP IQ system role
SYS_AUTH_OPERATOR_ROLEis granted to the database user for the checks to run in SAP IQ. - MySQL / MariaDB
-
In this version only the DBCONNECT check and the RUN_JS Custom Check are supported. The permissions required for the database user depends on the functionality included in the Custom Checks.
- PostgreSQL
-
In this version only the DBCONNECT check and the RUN_JS Custom Check are supported. The permissions required for the database user depends on the functionality included in the Custom Checks.
|
You may need a license for the user you fill in. In case of doubt, double-check with your database vendor. |
Verify Java requirements
|
The Java 8 Runtime Environment is required. You will need a 64-bit JVM on 64-bit operating systems. |
You may use the package management tools of your operating system to install a suitable version.
Otherwise, download the JRE from the Avantra Server (if you followed Preparing the Avantra Agent Deployment) or directly from https://www.java.com/en/download/manual.jsp and install it.
Stand-alone Oracle-specific requirements
If you intend to monitor Oracle stand-alone Databases using the OCI driver connection method, make sure the ORACLE_HOME environment variable is properly set in the environment of the user running the Avantra Agent.
On some platforms, you might need to set the library path environment variable as well.
Otherwise, the Oracle OCI driver will not be able to access the native shared libraries.
Deploying Avantra Agents to the target systems
On the Physical Servers supposed to run the Avantra Agent, download the appropriate package agent-23.0.n.bin (on Unix-like operating systems) or agent-23.0.n-setup.exe (on Microsoft Windows operating systems) from the Avantra Server (if you followed Preparing the Avantra Agent Deployment).
$ curl http://[avantra-server]:9050/AgentUpdate/agent-23.0.n.bin > agent-23.0.n.binOtherwise, download directly from the Support menu of avantra.com (in the AGENT RELEASE 23.0.n section)
|
Starting with Avantra Version 21.11, it is possible to install the Agent with the self-registration function for Linux operating systems, which is described here Installation on Unix-like operating systems with automatic Agent registration. This feature will also support Microsoft Windows operating systems in future releases. |
Additional Setup for Monitoring of Java-only SAP Systems with MaxDB
There is still some work to do in order to make the Avantra Agent work properly with a Java-only SAP System using MaxDB.
To make the handling easier, we urgently recommend running the Avantra Agent service for Java-only SAP System using MaxDB on Microsoft Windows operating systems as the user [sid]adm.
The user running Avantra Agent (usually, the user avantra on Unix-like operating systems and the user [sid]adm on Microsoft Windows operating systems), needs a so-called XUSER entry to access the MaxDB Database.
See also the MaxDB documentation: .
Proceed as follows to create the XUSER entry:
-
Depending on your operating system:
-
On Unix-like operating systems login to the host running the Avantra Agent and switch to the user
avantra. -
On Microsoft Windows operating systems login as
[sid]admto the host running the Avantra Agent and open a command shell.
-
-
Execute the following command to verify if there are any
XUSERentries present for this user:[path_to_sapdb]/programs/bin/xuser list
If there is already a key
DEFAULTpresent, you can skip the following step. If there is also a keycwith a user nameCONTROLpresent, then you are done! -
Execute the following command to create the
DEFAULTkey. This is required (by the MaxDB system) although not used by Avantra. See also the MaxDB documentation : .[path_to_sapdb]/programs/bin/xuser -u CONTROL,[pw_of_CONTROL] -d [SID] -n [host]
where
pw_of_CONTROLis the password of theCONTROLdatabase user andSIDis the database name which usually is the same as the Real SAP SID of the SAP System. -
Repeat the command from Step 2. You should see the following entry:
XUSER Entry 1 -------------- Key :DEFAULT Username :CONTROL UsernameUCS2:C.O.N.T.R.O.L. . . . . . . Password :????????? PasswordUCS2:????????? Dbname :[SID] Nodename :[host] Sqlmode :<unspecified> Cachelimit :-1 Timeout :-1 Isolation :-1 Charset :<unspecified> -
Execute the following command to create a
ckey:[path_to_sapdb]/programs/bin/xuser -Uc -u CONTROL,[pw_of_CONTROL] -d [SID] -n [host]
-
Repeat the command from Step 2. You should also see the following entry:
XUSER Entry  2
--------------
Key         :c
Username    :CONTROL
UsernameUCS2:C.O.N.T.R.O.L. . . . . . .
Password    :?????????
PasswordUCS2:?????????
Dbname      :[SID]
Nodename    :[host]
Sqlmode     :<unspecified>
Cachelimit  :-1
Timeout     :-1
Isolation   :-1
Charset     :<unspecified>