Maintenance Windows
Maintenance Windows can be used to schedule periods of time during which the monitoring of one or more Systems is turned off.
Even more, you can automatically stop an SAP Instance or an SAP System at the beginning of a Maintenance Window and start it again at the end of it.
Availability Data is recorded even if the monitoring is turned off. And if a system is down during the Maintenance Windows, the downtime is considered as "planned" and does not count for the Service Level Report.
A Maintenance Window can be thought of as a container for Schedules indicating when to turn monitoring off (and on) for a Dynamic Group or a Static Group of Servers, SAP Systems, Databases, and Business Services.
A Schedule is a recurrent or non-recurrent event with a start time and a duration reflecting one or more periods of time. One or more Schedules can be assigned to a Maintenance Window, forming the following relation:
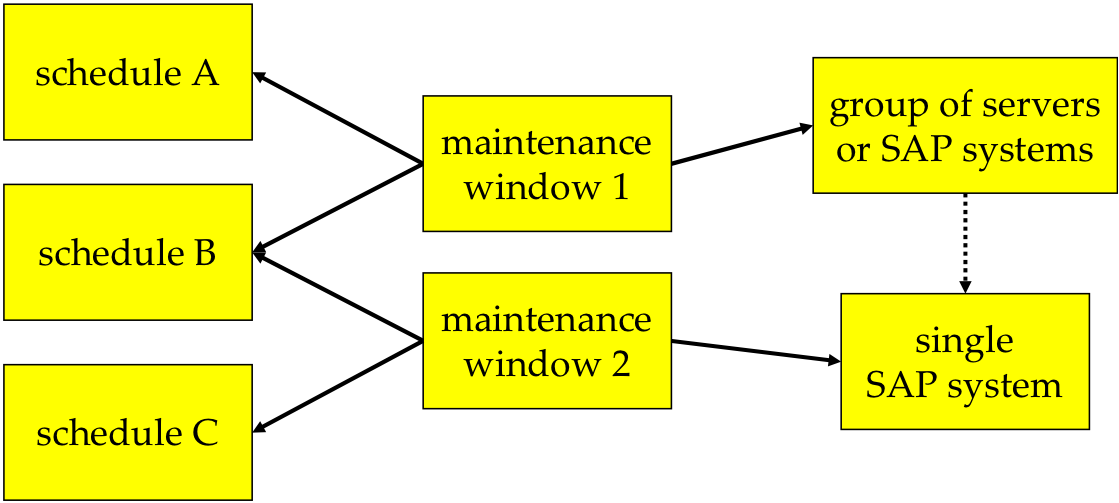
A particular System can be affected by multiple Maintenance Windows, thus Schedules may overlap.
Turning monitoring on or off using a Maintenance Window
Apart from turning the monitoring on or off, Maintenance Windows can also be used to disable Notifications and to stop and start Systems.
Perform the following steps in order to create a new Maintenance Window:
Please bear in mind the cascading of monitoring on or off for Maintenance Windows as described in effects of monitoring on/off.
- Select Configuration > Maintenance Windows from the top-level menu and click New.
- Fill in a Name, choose whether the Maintenance Window should be Active, and select a System Type.
Applying a Maintenance Window to a Business Service has the same effect as setting the Business Service inactive for the given period of time.
- Choose a Customer if desired. In case you selected one, only the Systems of this Customer (and its descendants, if a Customer hierarchy is used) are considered. Also, a User must have the Permission View Maintenance Window / Edit Maintenance Window for the named Customer in order to view or modify the Maintenance Window.
If you leave this field empty, Systems of all Customers are considered, but one needs the Permission View Maintenance Window / Edit Maintenance Window for all Customers in order to view or modify the Maintenance Window. - If you only want Notifications to be turned off during the Maintenance Window but keep monitoring turned on, choose leave monitoring ON for During maintenance.
- Click Next.
- Choose the Systems the Maintenance Window is applied to:
- You can select existing System Selectors (also see Systems).
- You can define a specific ad-hoc custom selection (which is only valid for this particular Parameter Set Maintenance Window). In this case, set the flag next to Define specific 'Ad-Hoc' Custom Selection and click Create. Fill in selection criteria, push the Test System Selector to verify the Systems, and click Save & Close.
- Click Next.
- Add a Schedule(s) for the Maintenance Window:
- Click New.
- Fill in a Name and select a Timezone value.
- Choose one of the following options:
- For a non-recurrent Schedule
Choose the Non-recurrent tab and fill in the Start date and either an End date or a Duration. - For a recurrent Schedule
Choose the Non-recurrent tab and fill in the Start date and either an End date or a Duration.
Select a Range Start and optionally a Range End. - You may choose to disable the Delete After End option (it's enabled by default).
- Click OK.
- Add further Schedules if desired.
- For a non-recurrent Schedule
| Range | Description |
|---|---|
| Daily | is effective every day or every nth day. |
| Weekly | is effective for selected days of every th week. |
| Monthly Day | is effective for a single day of every nth month, where the day of the month is given as number from 1 to 31. For values 29-31 the recurrence will fall on the last day of the month if the month has only 28, 29 or 30 days. |
| Monthly Weekday | is effective for a single weekday of a single week of every nth month, where the weekday may be chosen from Sunday to Saturday and the week is specified as either 1st, 2nd, 3rd, 4th or last week of the month. |
| Yearly Day | is effective for a single day of a single month of every year. |
| Yearly Weekday | is similar to Monthly Weekday, except that it's only effective for the chosen month. |
- Click Create.
In availability Tracking Downtimes eventually detected during the Schedules of Maintenance Windows are considered “planned”. In availability data, these records are marked with the Wrench symbol.