Installing the Avantra Agent
|
Before you start your installation, please ensure to read the release notes for Avantra 20.5. Please also ensure you use the latest software versions and patches of Avantra, as described in the Components section. |
Verify Network Connectivity
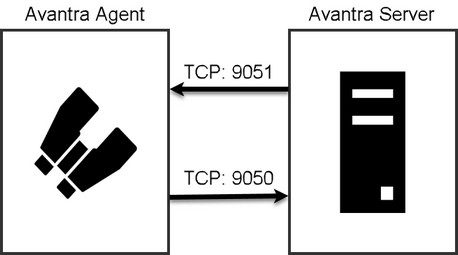
The Avantra Agent contacts the Avantra Server on TCP port 9050. The other way round, the Avantra Server connects to the Avantra Agent on TCP Port 9051.
Verify the connection from the Avantra Agent to the Avantra Server using
telnet [avantra_server] 9050
The telnet tool will report an error if a connection cannot be established.
If network restrictions are in place on your site, please contact your network staff to enable the communication in both directions, from the Avantra Agent to Avantra Server on port 9050, and the other direction on port 9051.
Preparing the Installation
This section describes preparations which are required to monitor SAP Systems or Databases using the Avantra Agent. If the agent shall only monitor the operating system, no preparations are required and you can continue reading the appropriate installation section: Installing the Agent on Microsoft Windows or Installing the Agent on Unix.
In order to monitor ABAP or ABAP+Java SAP Systems, the Avantra Agent needs an ABAP user to connect with, the so called Xandria RFC User.
We recommend creating a dedicated RFC user for Avantra, as described in Avantra RFC User Setup.
Make sure to import the transport requests before you create the RFC user, since the transport requests include an authorization object and an authorization profile that the user requires.
For an ABAP+Java system, we recommend enabling the RFC user as a J2EE Administrator as well.
For a Java-only system, we recommend creating a user avantra_j2ee, as described in Avantra J2EE User Setup.
Importing the SAP Transport Request
|
For a general overview on our ABAP interface, please see Avantra ABAP Interface. |
|
This section does not apply to Java-only systems. |
The current version of Avantra ships with seven transport requests but you only have to import two transport requests matching the basis release of your SAP System. Unicode and non-Unicode systems of all basis releases listed in SAP Basis are supported. The following table gives an overview:
| Transport | Short Text | Client Dep. |
|---|---|---|
|
Avantra Interface V20.5.3 for SAP Release 7.50 |
No |
|
Avantra Interface V20.5.3 for SAP Release 7.40 |
No |
|
Avantra Interface V20.5.3 for SAP Release 7.30 |
No |
|
Avantra Interface V7 for SAP Release 7.20 and older |
No |
|
Role for Avantra (ZAVANTRA) for SAP release ≥ 7.50 |
Yes |
|
Role for Avantra (ZAVANTRA) for SAP release 7.40 |
Yes |
|
Role for Avantra (ZAVANTRA) for SAP release < 7.40 |
Yes |
|
Avantra Agent also supports the interface V7 delivered with Syslink Xandria 7.3 in transport request |
|
Make sure the workbench request is imported before the customizing request containing the role, i.e., first import
|
Transports AVAK900034, AVAK900035, AVAK900036, and XANK900240 are workbench requests and thus client independent.
The contain interfaces for some monitoring related data which cannot be directly retrieved by RFC. In greater detail:
| Short Description | Program ID | Object Type | Object Name |
|---|---|---|---|
Class (ABAP Objects) |
R3TR |
CLAS |
/SYSLINK/CL_APPLOG_GET … /SYSLINK/CL_WORKLOAD_GET (not all classes listed here) |
PACKAGE |
R3TR |
DEVC |
/SYSLINK/XANDRIA |
PACKAGE |
R3TR |
DEVC |
ZXAN |
DOMAIN |
R3TR |
DOMA |
/SYSLINK/RESULTS_TYPE |
DATA ELEMENT |
R3TR |
DTEL |
/SYSLINK/RESULTS_TYPE |
FUNCTION GROUP |
R3TR |
FUGR |
/SYSLINK/MON_XANDRIA |
MESSAGE CLASS |
R3TR |
MSAG |
/SYSLINK/MON_XANDRIA |
NAMESPACE IN R/3 REPOSITORY |
R3TR |
NSPC |
/SYSLINK/ |
PROGRAM |
R3TR |
PROG |
/SYSLINK/RUNMON |
AUTHORIZATION OBJECT |
R3TR |
SUSO |
ZSYSXANMON |
TABLE |
R3TR |
TABL |
/SYSLINK/MONSTRUCT |
TABLE TYPE |
R3TR |
TTYP |
/SYSLINK/LIST_TTY |
TABLE TYPE |
R3TR |
TTYP |
/SYSLINK/SELOPS_TTY |
TABLE TYPE |
R3TR |
TTYP |
/SYSLINK/ZBAPILAWRGE_SYS_TTY |
| Short Description | Program ID | Object Type | Object Name |
|---|---|---|---|
Package |
R3TR |
DEVC |
/SYSLINK/XANDRIA |
Report Source Code |
LIMU |
REPS |
/SYSLINK/RUNMON |
Function Group |
R3TR |
FUGR |
/SYSLINK/MON_XANDRIA |
Table |
R3TR |
TABL |
/SYSLINK/MONSTRUCT |
Package |
R3TR |
DEVC |
ZXAN |
Authorization object |
R3TR |
SUSO |
ZSYSXANMON |
Namespace |
/SYSLINK/ |
All objects, except for the authorization object, use the registered namespace SYSLINK. For the authorization object this is not possible, therefore it is delivered in the customer name range.
Transports AVAK900010, AVAK900008, and XANK900244 are the customizing requests and thus client dependent. Please import the requests to the same client as the RFC user (see Avantra RFC User Setup). Choose the appropriate transport based on your SAP release. The transport contains the role ZAVANTRA only.
This role includes the authorization object ZSYSXANMON which is required for the Avantra monitoring interface and other read-only system authorization objects.
We recommend the following steps to be performed only by an SAP Basis Administrator or another person with proper knowledge of the SAP transport system.
To import the transport request, replace all occurrences xxxx by the numbers indicated above.
Proceed as follows for all request you have chosen to import:
-
Download the file
transports-for-avantra-20.5.zipeither from the Support menu of avantra.com (it is in the CONTRIB RELEASE 20.5 section) or from your Avantra Server (if you followed Preparing the Avantra Agent Deployment):$ curl http://[avantra-server]:9050/AgentUpdate/transports-for-avantra-20.5.zip > transports-for-avantra-20.5.zip -
Extract the zip file to some proper location, referenced as
<transport-source>in this procedure. -
Copy the control files
<transport-source>/cofiles/K90xxxx.*to the directorycofilesof your transport domain, e.g./usr/sap/trans/cofiles(on Unix-like operating systems). -
Set the file permission of the copied cofiles in a way that they are readable and writable for any operating system user
[sid]admsupposed to import the request. On Unix-like operating systems, you can do this like in the following example:root$ chgrp sapsys K90xxxx.* root$ chmod 664 K90xxxx.*
On Microsoft Windows operating systems, you can use the Properties menu opened from the context menu of the file in order to modify the file attributes and other file security settings. Refer to your operating system documentation for further information.
-
Copy the data files
<transport-source>/data/R90xxxx.*to the directorydataof your transport domain, e.g./usr/sap/trans/data(on Unix-like operating systems). -
Set the file permission of the copied data files in a way that they are read- and writable for any operating system user
[sid]admsupposed to import the request. On Unix-like operating systems, you can do this like in the following example:root$ chgrp sapsys R90xxxx.* root$ chmod 644 R90xxxx.*
On Microsoft Windows operating systems, you can use the file Properties menu opened from the context menu of the file in order to modify the file attributes and other file security settings. Refer to your operating system documentation for further information.
-
Import the transport requests. This might be done with the SAP transport program
tpon operating system level, however, we recommend using transactionSTMS:-
Start transaction
STMS. -
Select Import Overview and select the SAP System where you want to import the request.
-
Choose menu item and type the transport number
[XAN|SA1|AVA]K90xxxxe.g.AVAK90xxxxin the transport request text field of the following dialog.Please set the Ignore Invalid Component Version flag at the Options tab, otherwise the import may fail.
Press the Continue button. The transport request has been added to the import queue.
-
Import the request. If you are not sure whether to import all requests or only the newly added Avantra request
XANK90xxxx, importXANK90xxxxonly.Repeat the steps until all transport requests are imported.
-
-
Check the transport log for errors. Warnings can usually be ignored.
Avantra RFC User Setup
If you do not know how to setup a SAP (ABAP) user, please contact your SAP basis or security administrator to perform the following steps:
-
Start SAP GUI and login to the SAP System to monitor.
-
Please choose an appropriate logon client:
-
For ABAP+Java systems using SAP Java User Management Engine (UME), the user has to be created in the master client used by UME in order to enable it for Java monitoring.
-
If you intend to monitor a SAP BI/BW system, you need to create the user in the standard client of the BI/BW system.
-
If you intend to monitor a SAP PI/XI system, you need to create the user in the productive client of the PI/XI system.
-
Otherwise we recommend to use client
000.
-
-
Call the user maintenance transaction
SU01. -
Enter the name of the new user in the User field and press the Create button. We recommend to name the user
AVANTRA_RFC. -
Enter at least a value for Last name in the following screen and switch to the Logon data tab.
-
In the Logon data screen, enter a password in the fields Initial password and Repeat password.
-
Also in Logon data, for User type choose the value
System(orCommunication, orBackground). -
Switch to the Roles tab and enter the role
ZAVANTRA. This profile has been imported with transport requestXANK900244orAVAK900010. If the transport has not been imported so far, please see Importing the SAP Transport Request on how to import the transport request and assign the profile afterwards. -
Press the Save button.
|
You may need a license for the user you fill in. In case of doubt double-check with SAP. |
|
If you want to make use of security related monitoring, like the Custom Checks USER_PROFILES or USER_AUTHORIZATIONS, you may want to create the RFC user in all clients you want to monitor. |
Avantra J2EE User Setup
Things are getting a little bit more complicated if Java comes into play. We need to distinguish between ABAP+Java and Java-only systems.
Setup for ABAP+Java systems
For an ABAP+Java System we recommend to authorize the user created as described in Avantra RFC User Setup as an administrator in the J2EE instance.
The easiest way to achieve this is to assign the ABAP role SAP_J2EE_ADMIN to the user created in the ABAP part.
-
Go to transaction
SU01, enter the name of the user created as described in Avantra RFC User Setup in the User field, and click Change. -
Switch to the Roles tab and enter the role
SAP_J2EE_ADMIN.If you intend to monitor SAP XI/PI systems, you have to assign the ABAP role
SAP_XI_MONITORto the user.Additionally, you must assign the action
xi_af_channel_admin_displayto the SAP Java user in order to enable PI channel monitoring. -
Press the Save button.
Setup for Java-only systems
For a Java-only system we recommend creating a new user (for example AVANTRA_J2EE) and authorize it with the available read only role AVANTRA_READONLY. Do not use the Administrator user for monitoring.
-
Start the
UMEconsole pointing your browser at the URLhttp://<hostname>:<port>/useradmin. -
Logon as
administratoruser. -
Click Create User and fill in the required fields. Afterwards, save the user.
-
Import the role
AVANTRA_READONLYaccording to the instructions from this solution document. -
For a PI/PO system, also assign the
SAP_XI_MONITOR_J2EErole. -
For a MII system, also assign the
SAP_XMII_ADMINISTRATORrole -
Click Save.
-
Follow the solution document JavaJobs and JavaJobStat check critical with message "No scheduler assigned" in order for the checks JavaJobs and JavaJobstat to run properly.
|
You may need a license for the user you fill in. In case of doubt, double-check with SAP. |
User Setup for Database Monitoring
The Avantra Agent needs the credentials of an SQL (!) Database User in order to connect to a stand-alone Database or the Database instance of an SAP System.
- Database instance of an SAP System
-
As a general rule, use the following Database users in order to monitor the Database instance of an SAP System:
ABAP-only SAP System
Use the SAP ABAP schema user (e.g. SAPSR3)
Java-only SAP System
Use the SAP Java schema user (e.g. SAPSR3DB)
Double-stack SAP System
Use both users
For an SAP System with MaxDB Database you also need a DBM Operator (e.g. the
CONTROLuser). Customers with a higher focus on security can use own database user instead of using schema user. Please follow the instructions under "Stand-alone Databases" to create users with minimal required permissions. - Stand-alone Databases
-
As a general rule, use an administrative Database user for the Database monitoring.
If for security reasons administrative users are not allowed, please follow the steps below:
- Oracle
-
Please make sure the SQL user you use has the permission to access the Catalog Views in Oracle; at least the role
SELECT_CATALOG_ROLEmust be granted to the user, unless it is an Oracle administrator user. To do so, connect to your Oracle Database using SQLPlus and enter the following command:SQL> GRANT CONNECT, SELECT_CATALOG_ROLE TO <sql-user>Additionally, when using BR*Tools, the SQL user must be granted
SELECTprivileges to theSDBAHtable in the corresponding SAP schema, unless you already use the SAP schema owner or an administrator user.The same holds true for the table
BC_COMPVERSfound in the SAP schema of Java SAP Instances. - DB2
-
Please make sure your user is part of the
SYSMONauthority group or has system administration or system control authority. Please refer to your DB2 documentation on how to grant those authorities to your user. - Microsoft SQL Server
-
Please make sure the user you use has assigned the login permission
VIEW SERVER STATE. See the Microsoft SQL Server documentation on how to assign the permission to your login user.Avantra supports both, SQL Server authentication and Windows authentication. In case you choose a Windows authentication user, please define the user in domain format in the Avantra UI:
[domain]\[username]. - MaxDB
-
Please define a user in the
DBA User Class. For a MaxDB Database you also need aDBM Operator(e.g. theCONTROLuser).The CONTROLuser usually is not able to run SQL commands! - SAP HANA
-
Please make sure the user has assigned the role
Monitoring. In case you run a Java SAP Instance on top of HANA the Database user also needs the following permissions:GRANT SELECT ON TABLE [DBSCHEMA.]BC_COMPVERS TO [user] - SAP ASE (formerly SAP Sybase ASE)
-
Please make sure the user has assigned the roles
mon_roleandoper_role.For the SYB_Backup check, permission setting depends if granular permissions are enabled for the database or not.
With granular permissions enabled, the dump configuration privilege must be granted to the user.
With granular permissions disabled, according to official Sybase ASE documentation the role oper_role should be sufficient for the check SYB_Backup (all other checks only require mon_role permissions). Unfortunately tests have shown that the stored procedure called for SYB_Backup fails with permission error unless the user is a member of sa_role.
- SAP SQL Anywhere
-
Please make sure the user has assigned the system privileges to run the procedure
sa_disk_free_space. To do this, run the following grant statements:GRANT EXECUTE ON sa_disk_free_space to [user] GRANT MANAGE ANY DBSPACE to [user] GRANT SELECT ON maint_plan to [user] GRANT SELECT ON maint_plan_report to [user]Make sure to replace
[user]by the real user name.
|
You may need a license for the user you fill in. In case of doubt, double-check with your database vendor. |
Verify Java requirements
|
The Java 8, 9, or 10 Runtime Environment is required. You will need a 64-bit JVM on 64-bit operating systems. |
You may use the package management tools of your operating system in order to install a suitable version.
Otherwise download the JRE from the Avantra Server (if you followed Preparing the Avantra Agent Deployment) or directly from https://www.java.com/en/download/manual.jsp and install it.
Stand-alone Oracle-specific requirements
If you intend to monitor Oracle stand-alone Databases using the OCI driver connection method, make sure the ORACLE_HOME environment variable is properly set in the environment of the user running the Avantra Agent.
On some platforms you might need to set the library path environment variable as well.
Otherwise, the Oracle OCI driver will not be able to access the native shared libraries.
Deploying Avantra Agents to the target systems
On the Physical Servers supposed to run the Avantra Agent, download the appropriate package agent-20.5.n.bin (on Unix-like operating systems) or agent-20.5.n-setup.exe (on Microsoft Windows operating systems) from the Avantra Server (if you followed Preparing the Avantra Agent Deployment).
$ curl http://[avantra-server]:9050/AgentUpdate/agent-20.5.n.bin > agent-20.5.n.binOtherwise, download directly from the Support menu of avantra.com (in the AGENT RELEASE 20.5.n section)
Installing the Agent on Microsoft Windows
Start the Microsoft installer file agent-20.5.n-setup.exe and follow the instructions on the screen:
-
On the introduction screen press Next.
-
Read and accept the license agreement and click I Agree.
-
Choose installation location and press Next.
-
The installer will search for a suitable Java Runtime Environment.
If no suitable Java Virtual Machine is found automatically, click Select Java to choose an installed Java Virtual Machine.
Press Next to continue if a Java Virtual Machine is defined.
-
To define a custom agent listener port in case the default port (
9051) does not match, select the Set Agent Port checkbox and enter the custom port. If the port settings are correct proceed by pressing Next.If you change this value, you must set the AgentListenerPort Monitoring Parameter for this Server accordingly. See Maintaining Parameter Sets and Maintaining Parameter Sets.
-
Read the Windows Firewall configuration rules which will be added to your system. Press Next to proceed.
-
On the next screen you can define a different service user. The Avantra Agent service by default runs using the
LocalSystemuser account. This user may not be allowed to access network resources. If some of your SAP Systems profile data are located on remote (shared) resources, the SAP System will most likely not be monitored. In this case it is necessary to change the service user to an operating system user allowed to read the network resources (e.g. the SAP System's[sid]admuser).Using the SAP System’s
[sid]admas service user is especially recommended for Java-only SAP System running with a MaxDB.If you have chosen the user account press Install to proceed.
-
Wait until Avantra Agent installation is completed. Press Next to proceed.
-
Select Start Avantra Agent to start the windows service now. You can also start Avantra Agent later in Windows Services. Press Finish to finish the installation.
|
In case there is any issue with the installation, you can find the log files in |
Unattended/Silent Installation on Microsoft Windows operating systems
The Avantra Agent can be installed in an unattended (silent) mode. This is useful if the Agent is installed on many servers with scripts.
Following options can be set to configure the installation:
- /S
-
Required. Start the Agent in silent mode.
- /JAVA_PATH
-
Required. Path to Java installation directory. Do NOT point to
java.exeorjvm.dll, JAVA_PATH must point to the directory where java is installed. - /PORT
-
Required. The port used for the Agent (default is 9051).
- /START_SERVICE
-
Optional. Set to 1 if the Agent should be started immediately after the installation.
- /USER
-
Optional. Set the service user. If not set the Local System account user is used.
- /PASSWORD
-
Optional. Set the password of the service user. Only required if USER is set (see above).
- /D
-
Optional. Installation path. This setting must be the last setting! Spaces are allowed. If you use spaces do not wrap with
"". If you do not set the path, the Avantra Agent will be installed to%ProgramFiles%\syslink\agent.
agent-20.5.n.-setup.exe /S /JAVA_PATH="C:\Program Files\Java\jre1.8.0_92" /PORT=9051agent-20.5.n-setup.exe /S /JAVA_PATH="C:\Program Files\Java\jre1.8.0_92" /PORT=9051 /START_SERVICE=1 /D=C:\syslinkInstalling the Agent on Unix
|
On Linux, you need to have the GNU C Library (glibc) version 2.7 or higher installed. |
It is recommended to create a dedicated file system for the Avantra Agent of at least 1.5 GB size.
-
Create a directory to hold the Avantra Agent software, i.e.
/syslink.root$ mkdir /syslink
-
Create an operating system user
xandriamember of an operating system groupxandriain order to run the Avantra Agent.If you want to run the Avantra Agent using another OS user (e.g.
sidadm), simply follow the instructions with usersidadminstead ofxandria. -
Add the user
xandriato the groupsapsys.The user running the Avantra Agent needs the permissions to read and access the home directories of any user
[sid]admof the installed instances, as well as the profile directories/usr/sap/[SID]/SYS/profile. -
Verify that the following access permissions are set for the directory
/home/[sid]adm, i.e. the group read permissions are set for the groupsapsys:drwxr-x--- 2 [sid]adm sapsys 2048 Jan 24 17:28 . -rw-r----- 1 [sid]adm sapsys 1515 Apr 9 2002 .cshrc -rw-r----- 1 [sid]adm sapsys 2820 Apr 17 2002 .dbenv_[hostname].csh -rw-r----- 1 [sid]adm sapsys 7307 Apr 17 2002 .sapenv_[hostname].csh -
Verify the group access permission of
/usr/sap/[SID]/SYS/profilein the same way.-
For SAP installations based on an Oracle database, add the user
xandriato the groupdba.For SAP installations based on an Oracle database, the user
xandrianeeds permissions to read and access the directory/oracle/[SID|(and all sub-directories). In particular it needs the permissions to read allinit*files in `/oracle/[SID]/[ORA`VERS]/dbs_. -
For SAP installations based on an IBM DB2 UDB/LUW database add the user
xandriato the groupdb[sid]adm.For SAP installations based on an IBM DB2 UDB/LUW database, the user
xandrianeeds permissions to read and access the fail-over log archive path directory (FAILARCHPATH), if configured.
-
-
It is recommended that the path to the
javaexecutable is included in thePATHenvironment of the userxandria. Additionally the path/syslink/javais searched for suitable Java Virtual Machines.If no Java executable can be found during the installation, the setup is aborted.
-
Change ownership of
/syslinkdirectory toxandria.root$ chown xandria /syslink
-
Change user to
xandriaand directory to/syslink.root$ su - xandria xandria$ cd /syslink
-
Copy the Avantra Agent installation software
agent-[version].bininto your current working directory/syslinkand start the installer:xandria$ chmod +x agent-20.5.n.bin xandria$ ./agent-20.5.n.binThe installer will ask for the Agent listener port during the installation and whether it should start or not. Usually, you can confirm the default port 9051 by pressing Return. You may as well start the Agent immediately.
Please enter the agent listener port[9051]:
Start Xandria Agent [version]? [y,n] y
If you change this value, you must set the AgentListenerPort Monitoring Parameter for this Server accordingly. See Maintaining Parameter Sets and Maintaining Parameter Sets.
If everything works fine, you will get a notice:
Starting 'xandria_agent' using property 'agent.cfg': Sending nohup output to nohup.out.
Done, running with pid 4128818
Removing 'agent-inst'
-
You may want to include the Avantra Agent into your system initialization process. The way how to achieve this depends on the Unix type.
To manually start and stop the Avantra Agent, simply execute the rc script either with parameter
startorstop. This can either be done by userrootor by userxandria. Example:root$ /syslink/agent/rc.agent start agent is running with PID 12345 xandria$ /syslink/agent/rc.agent stop Stopping 'avantra_agent' using property 'agent.cfg': Done
Unattended/Silent Installation on Unix-like operating systems
The Unix Agent can be installed in an unattended (silent) mode. This is useful if the Agent is installed on many servers with scripts.
Following options can be set to configure the installation:
- --
-
Required to pass arguments to the integrated self installation script.
- --silent
-
Required. Turns on unattended/silent installation without any questions.
- --target-dir=
full path to target dir -
Optional. Path to the target directory where the Agent will be installed. Default:
<current working dir>/agent. - --jvm=
start to search for compatible JVM in this directory -
Optional. Path to the directory to start searching for a compatible Java. If not specified PATH environment is searched. To use a certain JVM, be as specific as possible, e.g.
/opt/java/jre1.8.0_102/. - --port=<number>
-
Optional. The TCP/IP port the Agent is listening on (default is 9051).
- --start=no
-
Optional. Do not automatically start the Agent process after installation.
./agent, find java and start automatically./agent-20.5.n.bin -- --silent./agent-20.5.n.bin -- --silent --target-dir=/opt/agent --jvm=/opt/java/jre1.8.0_102/ \
--port=9052 --start=noInstalling the Agent on Linux using RPM
If you want to install the Avantra Agent on Linux, you may also use the RPM package.
The installation target will be /opt/syslink. You can override this using the --prefix command line option of the rpm command. The RPM package creates a user xandria and a corresponding group. Unfortunately, the RPM facility provides no means to change this. Use the manual installation if you want to run the Avantra Agent using a different user or a different group.
-
Download the package
avantra-agent-20.5.n-[o].[p].x86_64.rpmfrom the Support menu of avantra.com (it is in the AGENT RELEASE 20.5.n section) and save it to e.g./tmp. -
Download the custom GPG key RPM-GPG-KEY-syslink-xandria from the Support menu of avantra.com (it is in the CONTRIB RELEASE 20.5 section) and save it to e.g.
/tmp. -
Import the GPG key:
root$ rpm --import /tmp/RPM-GPG-KEY-syslink-xandria -
Install the RPM (as user root):
root$ yum install /tmp/avantra-agent-20.5.n-[o].[p].x86_64.rpm(for RedHat, CentOS, Fedora, Amazon Linux, etc.), or
root$ zypper install /tmp/avantra-agent-20.5.n-[o].[p].x86_64.rpmfor SuSE Linux.
-
If you have a host-based firewall configured please make sure to open port 9051 for incoming TCP traffic. See also Using Firewalls and SuSEfirewall2.
-
Perform the following steps to enable automatic startup of the Avantra Agent:
-
Operating systems using
systemd(i.e. RedHat Enterprise Linux 7 and higher, SuSE Enterprise Linux 12 and higher):-
Copy the service file:
root$ cp /opt/syslink/agent/avantra-agent.service /etc/systemd/system -
Enable the service
root$ systemctl enable avantra-agent -
Start the service
root$ systemctl start avantra-agent
-
-
Operating systems using the SysV init process:
-
Link the
rc.agentfileroot$ ln -s /opt/syslink/agent/rc.agent /etc/rc.d/init.d/avantra-agent -
Run
chkconfigroot$ chkconfig --add avantra-agent -
Start the service
root$ service avantra-agent start
-
-
|
The RPM package does not configure automatic start of the Avantra Agent because the RPM packaging guidelines advise against it. The same holds true for the immediate start after installation. |
Additional Setup for Monitoring of Java-only SAP Systems with MaxDB
There is still some work to do in order to make the Avantra Agent work properly with a Java-only SAP System using MaxDB.
In order to make the handling easier, we urgently recommend running the Avantra Agent service for Java-only SAP System using MaxDB on Microsoft Windows operating systems as the user [sid]adm.
The user running Avantra Agent (usually, the user xandria on Unix-like operating systems and the user [sid]adm on Microsoft Windows operating systems), needs a so called XUSER entry in order to access the MaxDB Database.
See also the MaxDB documentation: .
Proceed as follows in order to create the XUSER entry:
-
Depending on your operating system:
-
On Unix-like operating systems login to the host running the Avantra Agent and switch to the user
xandria. -
On Microsoft Windows operating systems login as
[sid]admto the host running the Avantra Agent and open a command shell.
-
-
Execute the following command in order to verify if there are any
XUSERentries present for this user:[path_to_sapdb]/programs/bin/xuser list
If there is already a key
DEFAULTpresent, you can skip the following step. If there is also a keycwith a user nameCONTROLpresent, then you are done! -
Execute the following command to create the
DEFAULTkey. This is required (by the MaxDB system) although not used by Avantra. See also the MaxDB documentation : .[path_to_sapdb]/programs/bin/xuser -u CONTROL,[pw_of_CONTROL] -d [SID] -n [host]
where
pw_of_CONTROLis the password of theCONTROLdatabase user andSIDis the database name which usually is the same as the Real SAP SID of the SAP System. -
Repeat the command from Step 2. You should see the following entry:
XUSER Entry 1 -------------- Key :DEFAULT Username :CONTROL UsernameUCS2:C.O.N.T.R.O.L. . . . . . . Password :????????? PasswordUCS2:????????? Dbname :[SID] Nodename :[host] Sqlmode :<unspecified> Cachelimit :-1 Timeout :-1 Isolation :-1 Charset :<unspecified> -
Execute the following command to create a
ckey:[path_to_sapdb]/programs/bin/xuser -Uc -u CONTROL,[pw_of_CONTROL] -d [SID] -n [host]
-
Repeat the command from Step 2. You should also see the following entry:
XUSER Entry  2
--------------
Key         :c
Username    :CONTROL
UsernameUCS2:C.O.N.T.R.O.L. . . . . . .
Password    :?????????
PasswordUCS2:?????????
Dbname      :[SID]
Nodename    :[host]
Sqlmode     :<unspecified>
Cachelimit  :-1
Timeout     :-1
Isolation   :-1
Charset     :<unspecified>
Post-Installation Connectivity Check
Verify the connection from the Avantra Server to the Avantra Agent using a browser (or wget or curl) on the Avantra Server.
Open http://<host name or IP-address of Xandria Agent>:9051/hello:
You have reached the Avantra Agent release 20.5.n running on [host].
Local date/time:
UTC date/time: