Setting up Avantra
Avantra is consistently designed to keep configuration work at minimum, but there are obviously a few items that need to be adapted to your environment. These comprise the definition of Customers, the monitored SAP Systems, Servers and stand-alone Databases (see Setting up a System Landscape using the UI).
The basic setup of Avantra is performed using Avantra UI. This section is intended to familiarize you with the application. You will use the account created during the Avantra installation; it will provide access to Avantra UI and should suffice to proceed with this chapter. If you want to create other user accounts you may want to have a look at Managing Users.
Performing first steps with the UI
Avantra UI is a web-based application that provides the central user interface to Avantra. However, the main part of the user interface looks and works like a desktop application, so you should become familiar with it in a short time.
To work in Avantra UI, you need to be defined as a User in the Avantra System. For the time being, you may use the user and password created during installation.
Login to the UI
In order to use Avantra UI, use your preferred web browser and navigate to URL
http(s)://avantra-server:port/xn/
Enter your User Name into the User field, and the password into the Password field of the login page and click the Sign in button or hit the Return key to login.
There is a Welcome page that contains shortcuts to the most important functions. You can also use the top-level menu in order to navigate through the application like any other desktop application.
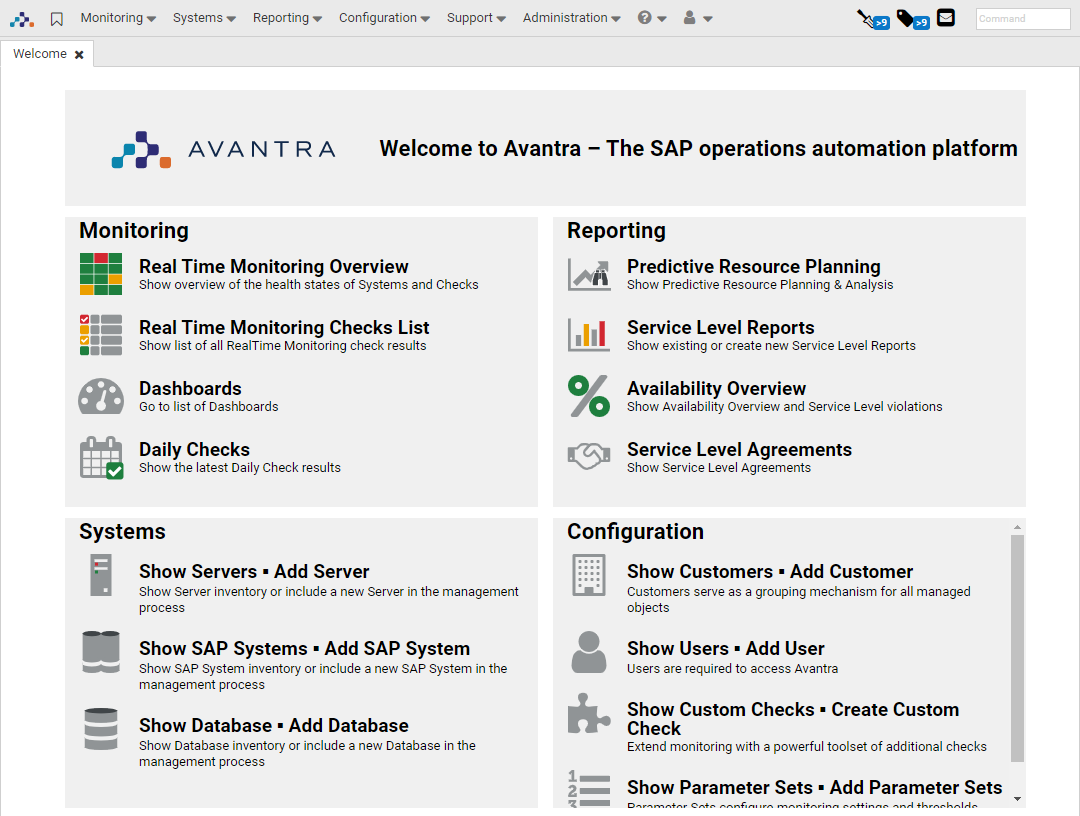
In addition to the top-level menu there is a Command box on the right-hand side. This Command box can be used to enter shortcuts to access certain parts of the application directly (similar to the SAP transaction codes). For the list of available shortcut commands, refer to Avantra Shortcut Commands.
|
The available shortcuts are displayed as a tooltip once you hover over the menu entries.
Alternatively, type |
Once you choose an item from the menu (or enter the appropriate shortcut), a new tab opens, like shown below:
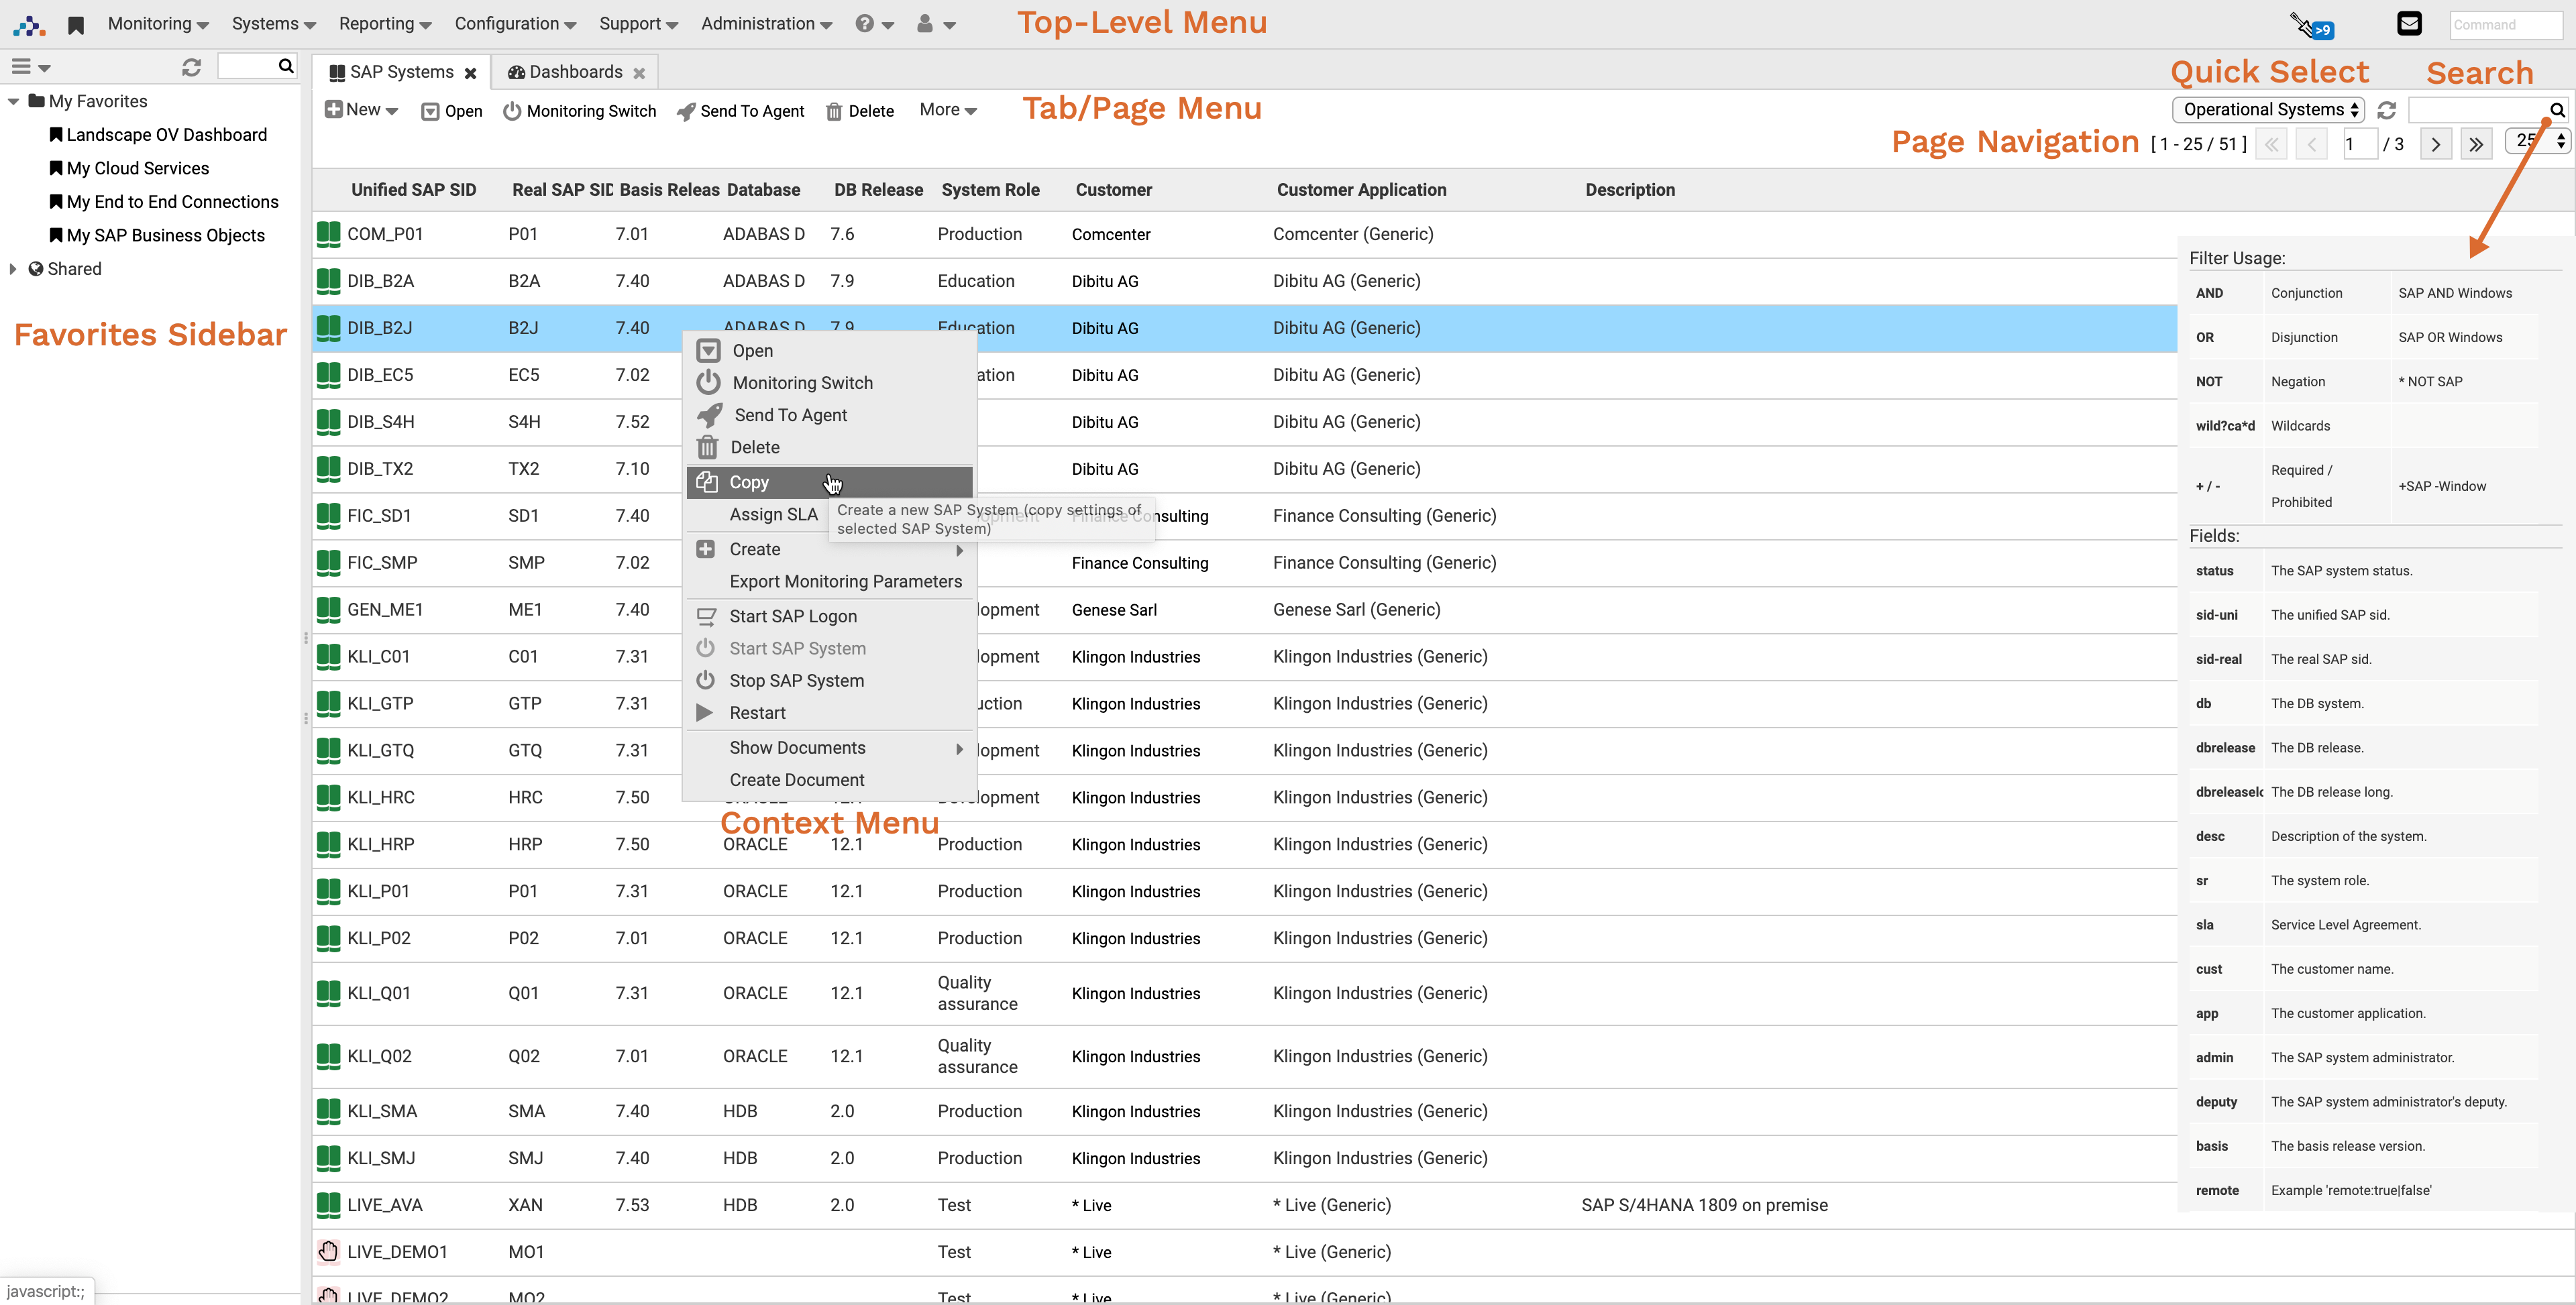
Most of the tabs work with Lists, like lists of Systems, Checks, etc. And almost every tab features a Search box (labeled with a ).
You can enter free text into the Search box that restricts the listed items immediately.
The free text search operates on all values of the columns shown.
You can combine search terms using AND and/or OR operators. Wildcards are supported, as well as the \+first and -second operators in order to include first and exclude second.
In addition to the free text search, the keyword search supported as well. Once you hover the mouse over the icon all available keywords will be shown.
|
Even more, you can combine shortcuts and search items.
For instance, if you enter |
On the right hand side on top of each list, there is the number of displayed list items shown together with the number of total items. Likewise, on the left hand side, there is the page number shown together with the total number of pages. You can move back and forth through the pages using the appropriate icons, and you can choose the page size.
Lists can be customized. Click on the symbol to show and hide list columns once you hover over a column header. Some lists do not show all columns by default, but you can use to show additional columns. You can also resize the column width by hovering over the header column separator and changing the column width to your needs. The order of the columns can also be changed - simply drag a column and drop it any place else. The customizations are saved and reapplied the next time you open the same list again.
There is a Favorites sidebar which can be accessed by clicking the icon on the left hand side of the top-level menu. You can drag any tab on the sidebar (or on the itself, if the sidebar is not yet visible) to save this tab as a favorite. It conserves search and filter settings. Once you saved a favorite, you can open it by double-clicking.
There are private and shared Favorites. Only you can access your private favorites. All Users of the same Customer can see the shared favorites.
|
Setting up a System Landscape using the UI
Before you can start using Avantra reasonably, you need to define your SAP System or stand-alone Database landscape using the Avantra UI. You need to have a running Avantra Agent on all Physical Servers of the System Landscape you plan to define.
|
The order of the definition is important. Always define SAP Systems before the Servers they are hosted on, and always define the Servers before the stand-alone Databases they are hosting. |
-
Define Customers. This can be either companies or projects you are providing a service for, or it can be a single company, if you are just running your own SAP environment.
There is a Root Customer already defined during the installation process, so you may skip this point.
-
Define the SAP Systems, if applicable (see Defining SAP Systems).
-
Define the Servers (see Defining Servers).
-
Define stand-alone Databases, if applicable (see Defining stand-alone Databases).
SAP Instances and Database instances are usually assigned automatically to the SAP Systems. In rare cases you may need to do the assignment manually as described in Assigning SAP Instances to SAP Systems and Assigning Database instances to SAP Systems.
Defining Customers
Perform the following steps to define a Customer.
-
Select from the menu and push the New button.
-
Fill in the Customer's Name and hit the Create button. The Customer is created and its data is shown in a new frame.
-
You may also fill in some of the other fields, like Description or the address data, etc. You may additionally select a value for the TimeZone field if you intend to use Service Level Reports and/or Service Level Agreements.
-
Push the Apply button on top of the Customer frame if you made further changes.
You may also define a Customer Application. They are used as a grouping mechanism for SAP Systems. However, there is a generic Customer Application created anyway once you define the first SAP System for this Customer.
-
Select the Applications tab in the Customer frame and push the New button.
-
Select the appropriate Application Type and hit the Create button.
|
In order to open an existing Customer, choose from the menu, select the desired entry from the list and push the Open button (or double-click the selection). |
Ordering Customers Hierarchically
In order to build a Customer hierarchy (and make use of Permission inheritance), simply drag the child-Customer onto the parent in the Customer list.
To remove a child-Customer from its parent, select the child and push the Detach button.
Defining SAP Systems
Perform the following steps to define a new SAP System:
-
Select from the menu and push the New button, then choose SAP System from the drop down menu.
In the section Configure Agentless Monitoring you will learn how to configure Agentless Monitoring for an SAP System where you cannot install Avantra Agent. But for now we assume you have access to the operating system which hosts the SAP System's instances. -
Enter the Unified SAP SID and Real SAP SID into the corresponding fields, choose a Customer, a System Role, and the SAP System Type. Click Next.
- ABAP-only SAP Instance
-
You also need to define the RFC user you have configured during the Avantra Agent installation process in the RFC User field.
Add the corresponding password in RFC User Password and the client the RFC user was defined in the field RFC Logon Client.
Fill in the ABAP Schema User and the corresponding password in the fields ABAP DB Schema User and ABAP DB Schema User Password.
You can also configure the RFC connection using SNC encryption. Please see the description of the Check RFCConnect and of the Monitoring Parameters concerning SNC, like SNCMode and SNCLibraryPath. - Java-only SAP Instance
-
You also need to define the J2EE User you have configured during the installation process in the J2EE User field.
Add the corresponding password in the J2EE User Password field.
Fill in the Java Schema User and the corresponding password in the fields Java DB Schema User and Java DB Schema User Password.
- ABAP+Java SAP Instance
-
You need to fill in the corresponding data for both the ABAP and the JAVA parts.
- Web Dispatcher and Abap_Scs with Web Dispatcher SAP Instances
-
Web Dispatcher and Abap_Scs with Web Dispatcher SAP Instances monitoring uses solely the SAPControl Web Service Interface. By default, the Avantra Agent tries to access SAPControl by named pipes provided on OS level, which does not require user and password. However, this might not work due to missing file access authorization on OS level, especially on Unix-like operating systems. In this case, please define the SAPControl User, see Defining the SAPControl User and switch to HTTP(S) using SAP Instance Monitoring Parameter SAPControlProtocol.
- TREX SAP Instance
-
There is no user data to fill in.
-
Push OK to create the SAP System
All other data is optional.
If this SAP System is running with a MaxDB, you may want to define a MaxDB DBM Operator and the corresponding password in the DBM Operator Password field. You find the fields in the SAP System Database section of the Properties tab once the Database has been discovered.
If this SAP System is running with an SAP HANA database you may want to define the SAP HANA System DB. To do so you have to create the SAP HANA System DB as a standalone Database. Once you created the System DB you can assign the System DB to your SAP System. The System DB is used to start and stop the SAP System including the SAP database.
In case you do not want the System to have the generic Customer Application, choose one of the Customer Applications from the Customer application combo box.
If you want to assign certain users being responsible for this system, you may select the corresponding values for the Administrator and Administrator’s Deputy field.
If you intend to use Service Level Agreements you probably want to select a value for the SAP System TimeZone.
If you have already defined Service Level Agreements, you can select one from the Assigned SLA list.
You can also set the SAP System not operational by defining Operational Since and/or Operational Until.
In case you made any modifications, click the Apply button.
Remarks:
-
Further data (for example, version information) will be inserted and updated automatically with the next Daily Check. You cannot enter information there.
-
The user and password information is stored encrypted in the Avantra Database and will be transferred to the Avantra Agent in an encrypted state. The Avantra Agent itself also stores the user and password data locally in encrypted format. Transfer of user and password information between Avantra UI and the web browser happens also in a secured way, unless you hit Show.
-
Once the additional data has been retrieved by the Avantra Agent, you can also view Performance and availability data.
|
In order to open an existing SAP System, choose from the menu, select the desired entry from the list and push the Open button (or double-click the selection). |
Defining the SAPControl User
|
SAPControl is used for SAP System Agentless Monitoring, for the DispatcherQueue Check, and for monitoring of Web Dispatcher SAP Instances. Furthermore, it is required for the PARAMETER_VALUES Custom Check of Abap_Scs, Java_Scs ,Trex, and Web Dispatcher instances, as well as for starting and stopping SAP Instances and SAP Systems. |
These functions require a user and password to access the SAPControl Web Service Interface of an SAP Instance. This user is optional for Systems monitored locally. For remote systems, however, the user must be defined.
To define the user, activate the checkbox left to the SAP Control User field.
Then fill in user and password of a valid OS user, for example <sid>adm.
Additionally, you may define a SAPControl user per SAP Instance, if for example the password of the OS user differs on a SAP Instance from the password set in the SAP System properties. If a SAPControl user/password is defined on an instance, it overrides the SAPControl user/password defined on the parent SAP System.
To define a SAPControl user on a SAP Instance, navigate to the Properties tab of the instance and follow the procedure described above.
Please see SAP Instance Monitoring Parameter SAPControlProtocol for further reference.
Defining Servers
|
If the Server names are unique within your Avantra installation, the definition of DNS Domains is not required. In a large environment, DNS Domains may help to identify the server. You can add new DNS Domains by Selecting from the top-level menu and switching to the Customizing tab. Then select the DNS Domains tab. |
Perform the following steps to define a new Physical Server:
-
Choose from the top-level menu and push the New Server button.
-
Select Physical Server.
-
Fill in the name of the server in the Physical Server Name field. Use the value that is returned by the Server's
hostnamecommand!If you do not want to use the value of
hostnamefor the Server Name, the value ofhostnamemust be included in the DNS Host Aliases field (see below). -
Select the Customer and a System Role.
-
Enter the server’s FQDN or IP Address. In case the server has more than one FQDN or IP address configured, use the one that can be connected from the Avantra Server.
-
Push the OK button.
You may enter any DNS alias eventually assigned to this server in the DNS Host Aliases field. You can fill in more than one alias by separating them with commas. Spaces are not supported.
You may additionally select a DNS Domain from the drop-down list.
If you intend to use Service Level Agreements, you probably want to select a value for the Server TimeZone. If you have already defined Service Level Agreements, you can select one from the Assigned SLA list.
There is also an option to choose an Application Type.
You can also set the Server not operational by defining Operational Since and/or Operational Until.
In case you made any modifications, click the Apply button.
Once additional data has been retrieved by the Avantra Agent, you can also view other metrics, like Performance or availability data.
For Cloud Servers you also have the option to start and stop the Server.
|
To open an existing Server, choose from the menu, select the desired entry from the list and push the Open button (or double-click the selection). |
Defining HA-Clusters
In Avantra, a Cluster consists of two or more Physical Servers corresponding to the physical cluster nodes, and one or more Virtual Cluster Servers corresponding to the resource groups switching applications from one physical node to the other.
In order to define a HA-cluster in Avantra, you first have to define the physical servers as outlined in Defining Servers.
The next step is to define the Virtual Cluster Server.
-
Choose from the top-level menu and push the New Server button.
-
Select Virtual Cluster Server.
-
Fill in the name of the virtual server in the Virtual Cluster Server Name field.
This has to be the name the virtual server is known by in the outside world. If you have installed SAP Instances on the virtual sever, you have to use the name that is used in the instance profiles as well.
-
Select the Customer and a System Role.
-
Fill in the Virtual FQDN or IP Address.
This has to be the IP address that is switched between the cluster nodes by your cluster software, and that uniquely identifies the cluster resource group.
-
Push the OK button.
-
Proceed to the section Physical Node Servers and hit Edit.
From the list of Physical Servers choose the corresponding values using the and buttons.
You have to select all physical nodes the Virtual Cluster Server may be active on.
By default only those Physical Server are listed that share the same Customer as chosen in Customers. If you desire to use Physical Servers of a different Customer, select the Show Servers of all Customers check box.
-
Push the Apply button.
|
You can use Virtual Cluster Servers not only in a HA context, but also to as an abstraction layer for applications on a single Server . |
Assigning SAP Instances to SAP Systems
|
As a general rule, SAP Instance of SAP System are discovered automatically once the SAP System and all Servers hosting components of this SAP System are defined and monitored. In other words, there is no need to define SAP Instances |
In order to verify if instances have been discovered and inserted correctly, proceed as follows:
-
Choose from the menu, select the desired entry from the list and push the Open button (or double-click the selection).
-
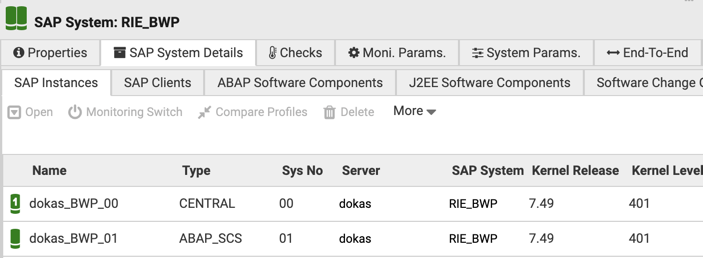
Switch to the SAP System Details tab. You should see a list of discovered SAP Instances as shown below:
If you’re using Logical Host Names, it is recommended to activate the SAP System Monitoring Parameter SAPLogicalHostDetection.
In some cases you perhaps might want to override the SAP Instance Auto Discovery process.
This can be done by setting the Monitoring Parameter SAPInstanceProfiles on the Servers hosting the corresponding SAP Instance. See also Adding, Modifying, and Deleting Monitoring Parameters and the description of SAPInstanceProfiles.
There are only very few cases where you eventually have to create SAP Instances manually, e.g. there are two or more SAP Systems having the same Real SAP SID for a given Customer, or the Server is assigned to a different Customer than the SAP System. In this case perform the following steps:
-
Choose from the menu, select the desired entry from the list and push the Open button (or double-click the selection).
-
Select the SAP System Details tab. On the SAP Instances tab, choose .
-
Select the Instance Type, the hosting Server, and fill in a System Number. Push the Create button.
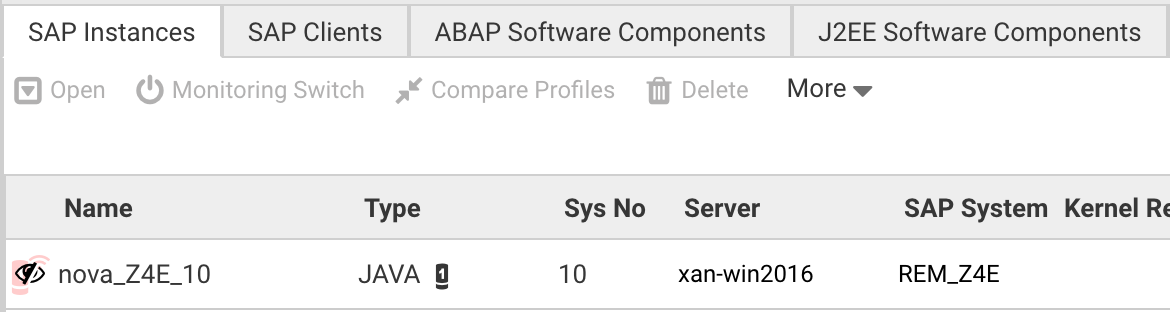
If a SAP Instance is no longer discovered by any Avantra Agent it is (obviously) no longer monitored and displayed like this:
|
In order to open an existing SAP Instance, choose from the menu, select the desired entry from the list and push the Open button (or double-click the selection). |
Assigning Database instances to SAP Systems
|
As a general rule, the Database instance of an SAP System is discovered automatically once the SAP System and all Servers hosting components of this SAP System are defined and monitored. In other words, there is usually no need to define Database instances. |
However, there might be some cases in which the Auto Discovery does not work correctly. As a result, a “wrong”Database host might be inserted, or no Database host at all.
In order to verify if the Database Instance has been discovered and inserted correctly, proceed as follows:
-
Choose from the menu, select the desired entry from the list and push the Open button (or double-click the selection).
-
Proceed to the SAP System Database section of the Properties tab.
You should see a Database entry as shown below:
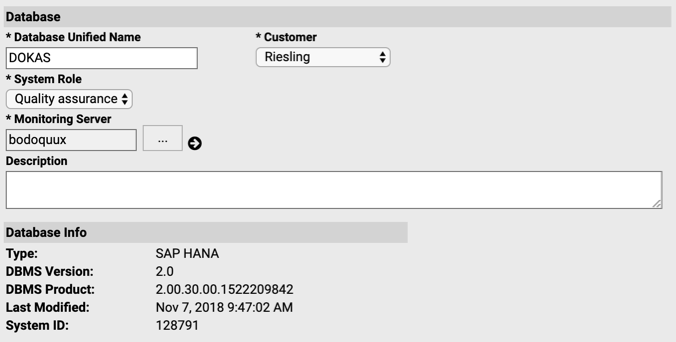
In order to manually define the Database host proceed as follows:
-
Click on the … button next to DB Monitoring Server.
-
Select the Server from the list that monitors the Database. If required, select Show Servers of all Customers. Push the Select button.
-
In order to prevent all future Auto Discovery attempts, check the Prevent Automatic Updates box.
-
Push the Apply button.
Defining stand-alone Databases
|
This section describes the configuration of stand-alone Databases. Do not define Database instances of an SAP System this way. See Assigning Database instances to SAP Systems in this case! There is one exception: if you want to monitor the System DB of an SAP S/4HANA, you have to define it as a stand-alone Database. Please note that a SAP S/4HANA System DB does not require a license. |
Usually the Database is monitored by the Avantra Agent installed on Physical Server hosting the Database, either directly or via a Virtual Cluster Server. In some cases it may be necessary to monitor a Database remotely, i.e. from a Avantra Agent running on a Server not hosting the database.
In order to define a Database perform the following steps:
-
Select from the menu and push the New Database button.
-
Select the Database Type, Customer, System Role, and Monitoring Server.
-
Fill in a Database Unified Name. This has to be a Avantra-wide unique identifier for the Database. Push the New button.
-
Select a value for Customer and System Role, and optionally define a Description.
-
Select a value for Monitoring Server. If the monitoring server is of a different customer than the database, flag Show Servers of all Customers.
-
For Database type
- MaxDB
-
Perform the following steps:
-
Define the Hostname the Database is running on.
localhostis used in case no Hostname is defined.In case you monitor the database on a Virtual Cluster Server the virtual server may not be able to resolve
localhost. In this case use the Virtual Cluster Server name in here. -
If your database is not listening on the default port (
7210) you can fill in the proper value in Port. -
Define the Database, a Username and a Password of a Database User to connect with. You need to fill in an SQL Database User!
-
Define a DBM Operator (e.g. the
CONTROLuser) and a DBM Operator Password. -
Push the Apply button.
-
- Oracle
-
Perform the following steps:
-
Select either Direct Connection or TNS Lookup.
-
In case you choose Direct Connection fill in the Hostname, the Port, and the Database.
-
In case you choose TNS Lookup define either a TNS name key or an TNS entry in field TNS name key or entry. Select a Driver as well. If you choose the recommended Thin Driver make sure you have defined the TNS Admin directory as well.
If you choose TNS Lookup but do not use the Thin Driver, make sure the
ORACLE_HOMEenvironment variable is properly set in the environment of the user running the Avantra Agent, otherwise the Oracle database driver will not be able to access TNS information and TNS Lookup will fail.
-
-
Define the Username and a Password of the Database User to connect with.
-
Push the Apply button.
-
- DB2
-
Perform the following steps:
-
Define the Hostname the Database is running on.
localhostis used in case no Hostname is defined.In case you monitor the database on a Virtual Cluster Server the virtual server may not be able to resolve
localhost. In this case use the Virtual Cluster Server name in here. -
If your database is not listening on the default port (
1527) you can fill in the proper value in Port…. Define the Database, and a Username and a Password of a Database User to connect with. -
Push the Apply button.
-
- Microsoft SQL Server
-
Perform the following steps:
-
Define the Hostname the Database is running on.
In case the managed database is within a named instance you may use this syntax:
[hostname]\[instance]. -
Define the Port and the Database.
-
For the Database User you have to choose between SQL Server authentication and Windows authentication and fill in Username and a Password to connect with. In case you choose Windows authentication you may use this syntax in order to define a domain user:
[domain]\[username]. -
Push the Apply button.
-
- SAP HANA
-
Perform the following steps:
-
Define the Hostname the Database is running on. For Scale Out environments you can enter several host names separated by semicolons.
-
Define the SQL port your indexserver is listening on (by default:
3<xx>15). -
Define the Username and a Password of a Database User to connect with.
-
Define the System DB managing this HANA database. The System DB must be created as a separated stand-alone database.
-
Push the Apply button.
-
- SAP HANA System DB
-
Perform the following steps:
-
Define the Hostname the HANA System DB Database is running on.
-
Define the SQL port your nameserver is listening on (by default:
3<xx>13). -
Define the Username and a Password of a Database User to connect with.
-
Optional: define the SAP Control User and a Password of an OS user used to execute SAP Control commands (start/stop).
-
Push the Apply button.
Once you created your SAP HANA System DB you have to manually assign this System DB to your SAP HANA database or to your SAP System.
-
- SAP ASE (formerly SAP Sybase ASE)
-
Perform the following steps:
-
Define the Hostname the Database is running on.
-
Define the SQL port your database is listening on (by default
5000). -
Define the Database, and a Username and a Password of a Database User to connect with.
-
Push the Apply button.
-
- SAP SQL Anywhere
-
Perform the following steps:
-
Define the Hostname the Database is running on.
-
Define the SQL port your database is listening on (by default
2638). -
Define the Database, Server name and a Username and a Password of a Database User to connect with.
-
Push the Apply button.
-
You can also set the Server not operational by defining Operational Since and/or Operational Until.
In case you made any modification hit the Apply button.
|
In order to open an existing Database, choose from the menu, select the desired entry from the list and push the Open button (or double-click the selection). |
Defining SAP Business Objects
|
To monitor an SAP Business Object you need to define the CMS database as a standalone database in Avantra first. See Defining stand-alone Databases on how to do this. |
Perform the following steps to define a new SAP Business Object:
-
Choose from the top-level menu and push the New button.
-
Fill in the name of the SAP Business Object in field SAP Business Object.
-
Select the Customer and a System Role.
-
Push the New button.
After this, the SAP Business Object configuration is created and appears in the list. Please open the new SAP Business Object by double-clicking it to complete the setup.
-
As Monitoring Server choose the Avantra Agent installed on the SAP Business Object host.
-
To determine the Base URL do the following:
-
Log on to the SAP Business Object Central Management Console (CMC).
-
Click on Applications.
-
Right-click RESTful Web Service and click on Properties. A window appears.
-
Retrieve the base URL from the _Access URL: text box.
-
-
On Windows installations determine the Windows service name from the Windows Services dialog:
-
In the Windows Services list, look for the Server Intelligence Agent (<HOST>) entry.
-
Right-click the entry and choose Properties from the context menu. The service properties will be shown.
-
Copy the value from the Service Name and paste it to the Service Name (Windows only) field in the SAP Business Object properties in Avantra.
-
-
Choose the corresponding CMS database in the Database selection menu.
-
Enter a valid CMS user and password in the CMS User and CMS User Password fields.
-
Optionally configure a OS User for SAP Business Object automation purposes.
-
Press Apply to save your configuration.
Using an Avantra Agent As Gateway
When to Use an Agent as a Gateway
If your network is configured in a way that the Avantra Agents cannot connect directly to your Avantra Server, you might consider using an intermediate Avantra Agent as a Gateway to the remote Agents.
The intermediate Agent must be installed on a host which is reachable from the other Avantra Agents as well as from the Avantra Server. It is also possible to cascade multiple Agents as Gateways if necessary.
Installing an Agent as a Gateway
To install a Avantra Agent as a Gateway, no special action is required. The Gateway functionality is embedded into each Avantra Agent by default. Therefore you simply have to install a Avantra Agent on your gateway host, see Installing the Avantra Agent.
If you need to migrate from an existing avantra-gateway see the following document: Replace Gateway with Xandria Agent 7.3
After you have installed the Avantra Agent on the target host and configured it in Avantra UI, perform the following steps:
-
Open the Properties tab of the corresponding Server.
-
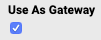
Mark the checkbox Use As Gateway. This will enable the Agent to be used as a Gateway in The Route Configurator.
The Route Configurator
A graphical editor for Routes is provided and it is recommended to configure Routes by means of the so called Route Configurator instead of configuring them manually.
A Route defines the way points a request to and from an Agent has to pass in order to reach its respective destination. Technically, a Route corresponds to a hidden Parameter Set based on the two Monitoring Parameters AgentConnectRoute and MasterConnectRoute.
Creating a Route
To create a Route, proceed as follows:
-
Open . This opens the Route Configurator.
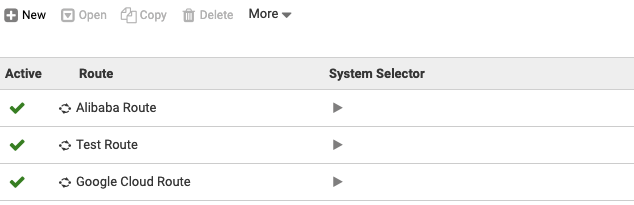
-
Press New to create a new Route.
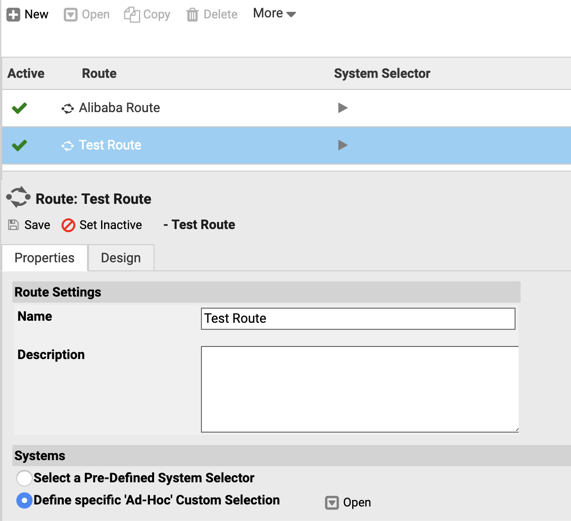
-
Fill in a Name and optionally a Description of the Route.
-
Define a System Selector for the Servers that shall be connected via the Route.
After completing these steps, switch to the Design tab to define the routing.
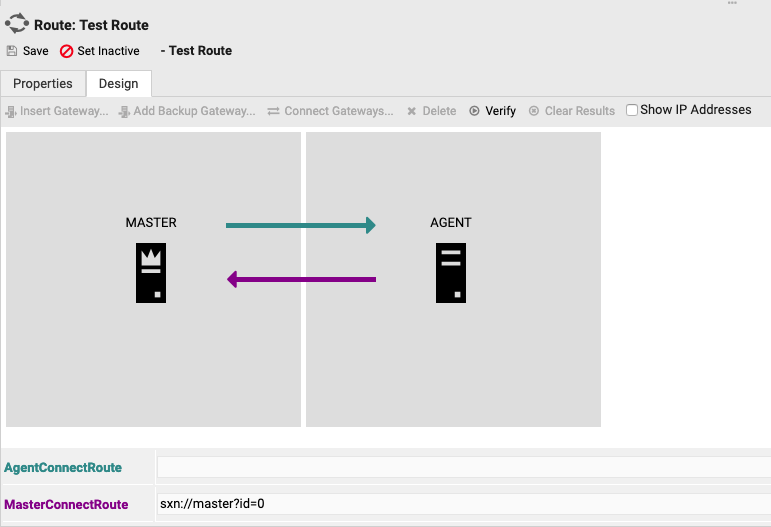
On the left hand side, the Master icon is displayed, and on the right hand side, a placeholder icon for the Servers selected by the System Selector is shown. By clicking on either of the icons, information on the corresponding object is shown in a details view.
You may also click on the arrows connecting the two nodes. This opens the properties of the corresponding network leg. Here you will be able to define individual settings for a leg, like IP address, port, SSL encryption etc.
Designing the Route
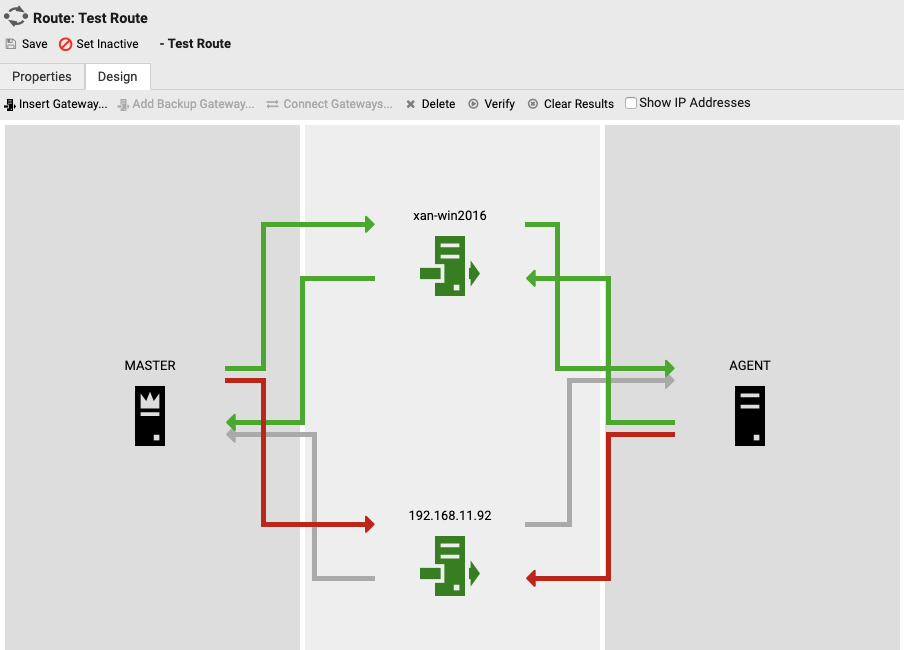
To design the Route, the buttons in the toolbar or the context menu on the respective element (accessible by right-clicking an element) can be used.

-
To insert a Gateway, you must select one or a pair of adjacent legs (shift-click for multi-selection) and press Insert Gateway. A popup window appears which lets you select one of your Gateway Agents. To have all connecting legs created automatically, leave the Add legs automatically checkbox marked. Alternatively, you can use the context menu on the leg by right-clicking it and by selecting Insert Gateway.
-
To add a backup Gateway (for redundant routings), select a Gateway node and press Add Backup Gateway. The legs connected to the original Gateway are copied and connected to the newly created Backup Gateway. Alternatively, you can select Add Backup Gateway from the context menu of the Gateway node.
-
To connect two nodes of your Route, select both nodes using shift-click and press Connect Gateways. A popup window appears which lets you select the direction of the legs you want to create. For example, if you only want to create a leg into direction of the Master, deselect the Agent Route checkbox. In the context menu on the node, you can also select Connect To to bring up a list of possible nodes to connect to.
-
To delete any component of your Route, simply select it an press the Delete button. The Route will be rearranged accordingly. The same can be achieved by selecting Delete from the context menu. Take care to delete the correct element by checking the context menu title; at the moment there’s no undo functionality available.
Defining Leg Details
When you select a leg of the Route by clicking on it, its details are shown in the details pane.
There are multiple leg types available, depending on the target node of the leg.
Type |
Description |
Purpose |
|
A direct TCP/HTTP connection to the specified IP address and port is used |
This is the preferred connection type, when the target IP and port are reachable from the source node. |
|
A reverse tunnel is used; an incoming connection from the target node is used for communication. |
This connection type can be used when connecting to the target node directly is not possible, but a connection from the target node to the source node can be established. |
|
Placeholder for the final leg of the Route to the Agents. |
Defined by the Server IP address and the Monitoring Parameter AgentListenerPort; this must be a placeholder to address all target Servers defined by the specified System Selector. |
|
Possible choice for the final leg of the Route to the Master. |
This setting makes use of the Monitoring Parameters MasterHost/MasterPort on the source node. |
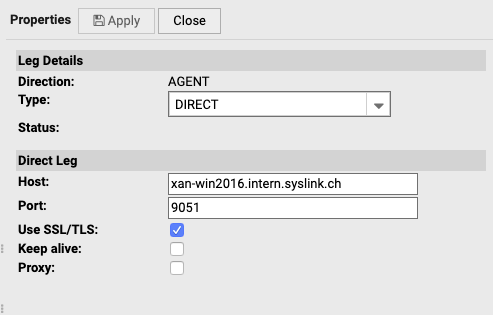
DIRECT Legs
Direct legs require that the target node is reachable directly with a TCP connection. For direct legs an IP address and a port is required.
Field |
Description |
|
IP address or FQDN of the target host |
|
Listener port of the Agent on the target host. |
|
Enable communication encryption of the leg. Deactivate this only in case there are SSL/TLS problems and only until they are fixed. |
|
If activated, connections aren’t closed immediately after transmission (only after 60 secs idle time). This only makes sense for high throughput connections with activated SSL/TLS; in those cases the cost of the SSL handshake per connection can be saved. |
|
If the connections need to use a HTTP proxy, activate this flag. The direct leg connection makes use of the HTTP CONNECT method to tunnel its messages through the proxy. Therefore make sure the HTTP CONNECT method feature is configured correctly on the proxy. |
|
IP address or FQDN of the proxy host |
|
Listener port of the proxy |
REVERSE Legs
A REVERSE leg relies on a configured tunnel on the target node, which maintains a connection to the source node. For this to work, a tunnel configuration must be present on the target node.
The Route Configurator allows to configure tunnels directly if the tunnel affects the Route in direction to the Master.
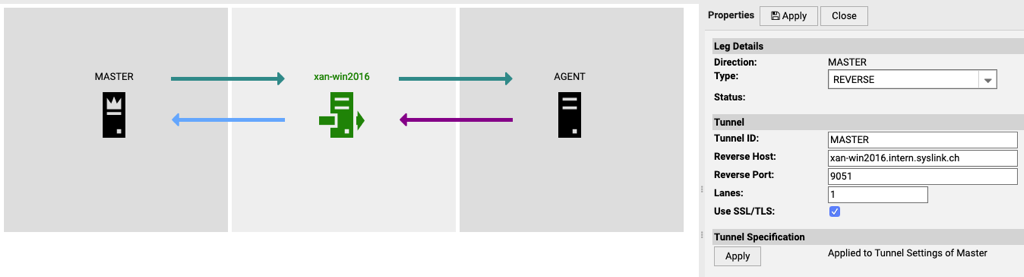
Field |
Description |
|
The ID that is sent from the target node to the source node to identify the tunnel. All messages bound for that tunnel are tagged with this ID. The source node’s Agent then sends those messages via the corresponding tunnel connection. |
|
IP address or FQDN of the source node as seen from the target node. |
|
Listener port of the source node Agent as seen from the target node. |
|
Defines how many connections from the target node to the source node are kept alive for reverse communication. This should only be increased if there are hundreds of Agents communicating via the tunnel. |
|
Enable communication encryption of the tunnel leg. Deactivate this only in case there are SSL/TLS problems and only until they are fixed. |
By pressing Create Tunnel / Update Tunnel in the properties pane of the REVERSE leg, the tunnel is configured on the fly directly on the Avantra Master or avantra-gateway. It will become active and usable after a couple of seconds to minutes.
To configure a tunnel in direction to the Agent, a tunnel specification file must be installed at the corresponding Gateway Agent. The Route Configurator provides this file for download depending on the tunnel setup by means of the Download button, however, since the corresponding Agent can’t be reached directly (otherwise you wouldn’t need a tunnel), you’ll have to download the tunnel spec and copy it to the Agent’s cfg directory. The Agent scans periodically for tunnel specs and will establish the tunnel at runtime.
To verify the tunnels maintained by any node, you may click on the node, and the details pane will reveal all active tunnels of the node together with their states.
Testing Connectivity
The button Verify allows to test the current routing as seen in the editor, without the need to make it active or even save it.
By clicking on the legs afterwards, you can investigate the response time of the respective leg and – in case an error occurred – the latest error message.
To clear the results of the latest connectivity test, simply press Clear Results.
Verify RealTime Monitoring
Select from the top-level menu. The result will look like in this image.
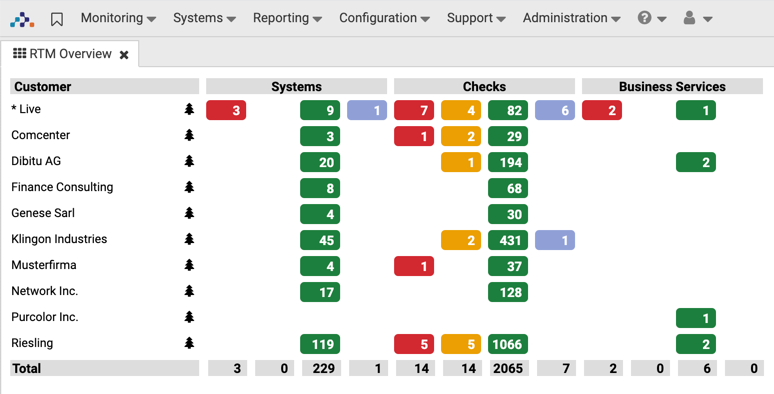
In this overview there is one line per defined Customer, each containing columns for the number of System, Checks, and Business Services in the different check status.
If there are only green entries, everything is fine.
Otherwise: Select from the top-level menu.
There are perhaps Check Results indicating either a problem with the monitored System, or with the Avantra Agent itself. In the latter case, proceed to Basic Troubleshooting.
Basic Troubleshooting
- For a newly defined Physical Server there are no Check Results or there is a Critical AGENTALIVE
-
If you find the Checks in Unknown check status, wait a couple of minutes. Either the Check Results will appear, or the AGENTALIVE Check will turn to critical. In this case perform the following steps:
-
Verify connectivity as described in Verify Network Connectivity and Post-Installation Connectivity Check. If you cannot connect to the Avantra Agent verify it is running at least. If you find any connection issues, try to resolve them.
-
Open your web browser at http://avantra-server:9058 and select netstat from the left hand side menu. Find an entry for the IP Address defined for the Physical Server running the Avantra Agent.
If you find communication errors, try to fix them.
-
- The Server hosting an SAP Instance is monitored properly, but there are no SAP Instance or SAP System Check Results
-
-
Verify the result of the SelfCheck.
-
Check if SAP Instances were entered into the Avantra Database (see Assigning SAP Instances to SAP Systems).
-
Verify Daily Checks
If you verified the RealTime Monitoring is working properly, you may want the Avantra Agent to perform the first Daily Check. In Avantra UI proceed as follows:
-
Select from the top-level menu. Choose the desired SAP System(s) from the list and press the Send to Agent button.
-
Set the flag Full (creates Daily Check) and push the Send Commands button.
A Daily Check is triggered on the target Avantra Agent(s). The result will be returned after the Daily Check has finished. This may take a couple of minutes, depending on the target System Database type, performance and load conditions. If the System is heavily loaded, this might be the right time for a coffee break.
You can verify the Daily Check result by performing the following steps:
-
Select from the top-level menu.
-
From the list choose the one with the appropriate Unified SAP SID and push the Open button..
-
Verify that there are no Avantra Agent error messages in the FULLCHECK entries of the Daily Check.
You can confirm the Daily Check by pushing the Confirm button.
|
You can click on (…) to show the complete Check Result. |
Importing System Landscapes
| This function is only available with the Avantra Pro Edition. |
See this Knowledge Base article: Importing System Landscapes.
Configure End-to-End Application Monitoring
For every SAP System you have defined as described in Defining SAP Systems you can define multiple End Points. These End Points will monitor the SAP System from a user’s perspective, so you may want to place the End Points e.g. in a remote site having a group of users accessing the SAP System.
End-to-End Application Monitoring includes RealTime Monitoring checks, performance monitoring of connection response times, availability recording (from the End Point perspective). It can be defined for both, ABAP and Java stacks, but also for general purpose web servers. For ABAP stacks there is also the opportunity to run ABAP reports that may simulate certain typical user transactions.
Every End Point needs to have a Avantra Agent installed to execute End-to-End Application Monitoring. You can either use any existing Avantra Agent you may have placed in the remote site already, or you install another one.
In order to set up End-to-End Application Monitoring perform the following steps:
-
Choose from the menu, select the desired entry from the list and push the Open button (or double-click the selection).
-
Switch to the End-to-End tab and select the End Point type from the New drop-down.
-
Fill in a End Point Name and push the New button.
-
Open the newly created entry.
-
Click Change#Checked on#: Select a Server from the list. If required, flag Show Servers of All Customers. Push the Select button.
-
For End Point type
- ABAP
-
Perform the following steps:
-
For Connection Type
-
either choose Direct Application Server and select an appropriate item from the ABAP Application Server list,
-
or choose Message Server and Logon Group and define Message Server of Instance, Message Server Port, and Logon Group Name.
-
-
You may also define a SAP Router String.
-
You may expand the section ABAP Advanced Config in order to define an alternate IP address, different logon credentials (by default the RFC user defined with the SAP System is used), an ABAP report/variant to execute, etc.
In case you execute an ABAP report you can also choose whether to include the report in the response time, or to track it as a separate Performance counter.
-
- Java
-
Perform the following steps:
-
For Connection Type
-
either choose Java Application Server and select an appropriate item from the Java Application Server list, choose Protocol, Port, and URL Suffix,
-
or choose Alternate URL (e.g. Web Dispatcher) and define one in URL.
-
-
Select Use basic authentication and a Proxy URL if required.
-
You may expand the section JAVA Advanced Config in order to define an alternate IP address or different logon credentials.
-
- Generic Web Service
-
Perform the following steps:
-
Define a Name for the End Point and push the OK button.
-
Fill in a URL, and f required, define a Proxy URL as well. In case the site requires authentication, set the Use basic authentication flag and define User and Password.
-
Select the HTTP Method, and in case of
POSTdefine some POST data as well. -
For all End Point types you can configure further advanced settings:
-
Define how many successive connection failures will have the connection check turn Critical (Default:
1). -
Define a warning and a critical connection response time, i.e. thresholds that will cause the connection check turn to Warning or Critical, if exceeded.
-
If or if not a Warning connection check will be considered as Uptime in the service availability.
-
-
For the JAVA and the Generic Web Service instance you may define a different User Agent String. For additional information see User Agent String in the HTTP_RESPONSE custom check.
-
Push the Apply button.
-
Please note that you can define multiple End Point instances for the same End Point at a time. While there can only be a single ABAP and a single JAVAEnd Point instance for one End Point, you can configure multiple Generic Web ServiceEnd Point instances.
|
You can use End-to-End Application Monitoring to perform basic monitoring of SAP Systems where no local Avantra Agents can be installed:
|
Configure Agentless Monitoring
Usually, Avantra Agents are installed on the Servers running SAP Instances. This setup was described in section Defining SAP Systems. However, there might be circumstances where you cannot install the Avantra Agent. The reasons may be:
-
The operating system of the Server is not supported by Avantra. Please see Agent Operating Systems for a list of supported platforms. Not supported operating systems include IBM System i (aka AS/400) and System z (aka OS/390).
-
Your platform is supported though, but you cannot install the Avantra Agent due to lack of permissions, or the access is otherwise restricted. A common example is the SAP HANA Enterprise Cloud (HEC).
-
You do not need monitoring on operating system level, but only for SAP Instances, SAP Systems, and Databases.
If any of the above cases Agentless Monitoring or Agentless Monitoring might be an option for you. Agentless Monitoring means another agent located close enough from a network perspective will take over the management part and will access the monitored components over the network only. The only prerequisite is the Avantra Agent performing Agentless Monitoring is allowed to connect to the SAP Instances and Databases. Please make sure no firewalls on either host or network level are preventing this access.
|
While Agentless Monitoring works perfectly well for almost all SAP related Checks, there are a few restrictions. Obviously, there are no operating system related Checks. Additionally, some Database-related checks do not work or only work with certain restrictions, like ORA_ALERTLOG, ORA_DATAFILES. This is due to lack of access to the file systems. See Restrictions of Agentless Monitoring for more information. |
Perform the following steps to define a new SAP System:
-
Select from the menu and push the New button, then choose Agentless SAP System from the drop down menu.
-
Fill the Unified SAP SID and Real SAP SID into the corresponding fields, choose a Customer, a System Role, and the SAP System Type. Hit the Next button.
-
You can setup Agentless Monitoring with or without a SAP Control User. Agentless Monitoring without a SAP Control User is currently only supported for ABAP systems, and there are a few limitations as outlined in Restrictions of Agentless Monitoring.
-
If you want to use the SAP Control user for monitoring, set the flag SAP Control User available. Define the SAP control URL as entry point for Agentless Monitoring. The Avantra Agent will use this URL to get the list of instances of this system. The URL usually is composed like
http(s)://host:5<sysnr>13. Additionally you need to fill in the SAP Control User, which is an OS user of the host the SAP Instance is running on. Usually this will be<sid>adm.You also need to enter the password of this user. -
If you do not have access to the SAP Control User, set the flag No SAP Control User available.
Then you have to define an existing Avantra Agent to be in charge of the Agentless Monitoring. This agent should be located close enough from a networking perspective. Furthermore, you must select an agent belonging to the same Customer as you defined for the remote SAP System. Hit the Next button.
-
-
Depending on the system type, you need to define other users and passwords as well. See Defining SAP Systems for more information.
-
In case you do not use the SAP Control User, you have to manually add the SAP Instances to the SAP System. Push to add a new instance, select the Instance Type, and fill in Sysno and instance host.
-
Push the OK button to create the new monitored SAP System.
-
In case you defined a SAP Control User, the Avantra Agent in charge of Agentless Monitoring will now start to detect the instances of the SAP System using the previously defined SAP control URL. The result of this detection will be reported to the Agentless Monitoring agent’s SelfCheck, sub-section Detection.
In case of success, you will see the instance names in column System with messages like
Instance will be monitored as type ...
You will then see the instances created in the System Inventory tab of the monitoring server, and in the SAP System Details → SAP Instances tab of the SAP System.
In case of failure, you’ll see the SAP system SID in column System probably with a SOAP error message like
Failed to get profile of instance vagabund_00 from remote: Exception during SOAP call on method parameterValue to URL http://vagabund:50013: SOAP-ENV:ServerInvalid Credentials
Please fix the errors indicated, e.g. credentials problem above.
Upon successful completion, your SAP System is now monitored remotely.
Credentials Management
Avantra provides means to define centrally managed credentials which can be used from other objects.
Centrally managed credentials makes sense when the same credential is used multiple times.
This is especially wise for SSH actions in Automation Actions.
Another advantage is that it is much easier to manage centrally managed credentials,
since all credentials are visible in one list and can easily be managed.
Managing credentials is a confidential task. You have to have following permissions:
-
Credential View: users with this permission can view the credentials, but are not able to edit them. Please note that viewing credentials does not include viewing plain passwords.
-
Credential Edit: users with this permission can edit the permissions.
-
View Passwords: users with this permission can view the plain text of stored passwords. User without this permission do not see the password in plain text.
| Please note the Credential Edit does not imply View Passwords permission! A user with Credential Edit might edit a password but cannot see it as plain text without View Passwords permission. |
Credentials are always per customer and only users with the appropriate permissions on this customer can see this permission.
Credential Types
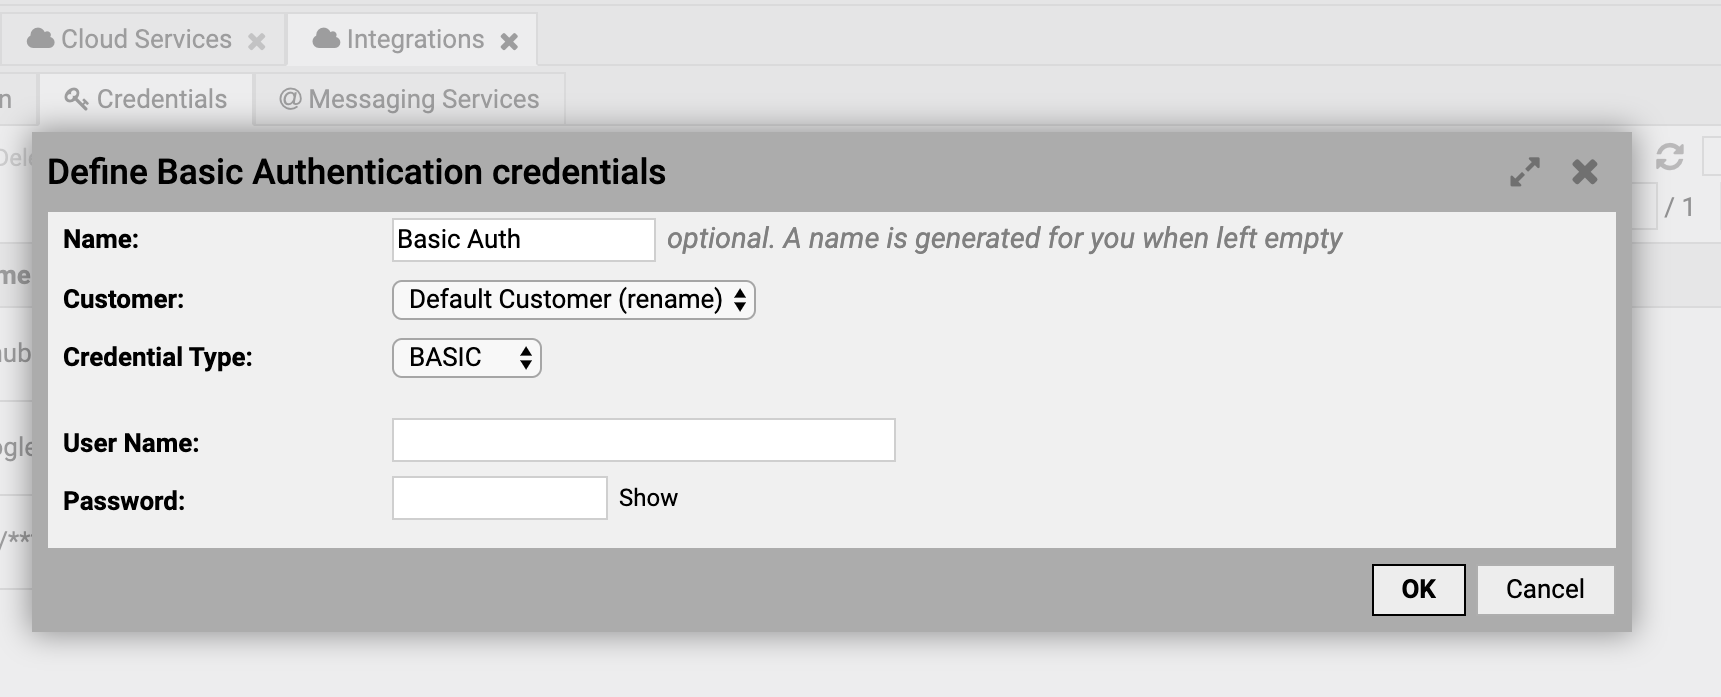
Basic Authentication
Basic Authentication is the simplest authentication type. It does only contain a username and a password. It can be used for Cloud Services which accept basic authentication as credentials (see https://tools.ietf.org/html/rfc7617).
SSH
SSH Authentication is used to open an secure shell (ssh) connection to a host. You can set the following options
-
Hostname: if you leave it empty the ssh connection is opened to the host where the monitoring agent is running on.
-
Port: SSH port, if you leave it empty the SSH default port 22 is used.
-
Username: the user used to connect
-
Password: the password for the user
-
RSA Private Key: the RSA private key must be set when your ssh server does not allow username password login, but only certificate based login. This is much more secure than username password based login.
-
Passphrase: set the passphrase for your RSA private key, if set
-
SSH Config: set additional key values necessary for your SSH connection. This is vendor specific. Please contact your administrator for necessary settings.
OAuth2.0
OAuth2.0 authentication is often supported from cloud based web services. Avantra Cloud Services support this authentication mode. Please refer to https://tools.ietf.org/html/rfc6749 for OAuth2.0 documentation. To use OAuth2, following settings must be provided from your service provider:
-
Client ID
-
Client Secret
-
Authorization URI
-
Access Token URI
-
Scope
-
Additional OAuth2 Settings: this is not part of the OAuth2 standard but your service provider might require additional options.
Once you have entered above settings, click on OK to save your credentials.
Then open the credentials again, the Redirect URI is now set.
Your service provider must know this Redirect URI to successfully authenticate you.
Please refer to your service provider administrator for details how to
set the Redirect URI in your service provider settings.
Once you set the Redirect URI in your service provider, click Authorize to obtain an
access token and a refresh token. Those tokens are used to authenticate you to the service.
Avantra will automatically refresh the tokens. If, for some reasons, your tokens are expired,
then click Refresh Access Token for new tokens.
Cloud Integration
| This function is only available with the Avantra Pro Edition. |
Avantra automatically detects if a Physical Server is running with one of the major cloud providers Amazon Web Services, Microsoft Azure, and Google Cloud Platform. In Avantra UI these Servers are displayed with a symbol, and in the Server Info section of the Server record there is an additional item Cloud providing metadata information of this particular cloud instance.
In order to use automation features like to start and stop Cloud Servers you need to establish an authentication link between your cloud provider and the Avantra Server. This procedure consist of three steps:
-
Define a set of credentials within your cloud setup
-
Define a corresponding Cloud Authentication record in Avantra UI
-
Assign this Cloud Authentication record to the Cloud Server
We will describe these steps in detail for Amazon Web Services, Microsoft Azure, and Google Cloud Platform.
Cloud Integration with Amazon Web Services
Settings in AWS Console
Open your AWS Console and perform the following steps:
-
Open the Identity and Access Management (IAM) service.
-
Select Policies from the left hand side and push the Create policy button.
-
Switch to the JSON tab and paste the following in there:
{
    "Version": "2012-10-17",
    "Statement": [
        {
            "Sid": "AllowStartStopInstances",
            "Effect": "Allow",
            "Action": [
                "ec2:StartInstances",
                "ec2:StopInstances"
            ],
            "Resource": "arn:aws:ec2:*:*:instance/*"
        },
        {
            "Sid": "AllowDescribeInstances",
            "Effect": "Allow",
            "Action": [
                "ec2:DescribeInstances",
                "ec2:DescribeInstanceStatus"
            ],
            "Resource": "*"
        }
    ]
}
Push the Review Policy button.
-
Fill in a Name (e.g.
avantra-sync-and-start-stop-iam-policy), a Description, and push the Create Policy button. -
Select Users from the left hand side and push the Add user button.
-
Fill in a User name (e.g.
avantra-sync-and-start-stop-iam-user), select Programmatic access for Access type, and push Next: Permissions. -
Choose Attach existing policies directly, click on Filter policies , and set the flag next to Customer managed.
-
Set the flag next to the policy you created above (e.g.
avantra-sync-and-start-stop-iam-policy) and push the Next: Tags button. -
Fill in tags if you desire, and push the Next: Review button.
-
Push Create user and afterwards Download .cvs. Store the file in a safe location and push the Close button.
Cloud Authentication settings for AWS in the UI
Open Avantra UI and perform the following steps:
-
Open and choose .
-
Fill in a Name, an optional Description and select a Customer. Push the Finish button.
-
Select the newly created entry and push Open.
-
For User, Access Key ID, and Access Key Secret fill in the values from Procedure: Create an API User with minimum access to EC2.
-
Push the Save button.
Cloud Integration with Microsoft Azure
Settings in Azure Portal
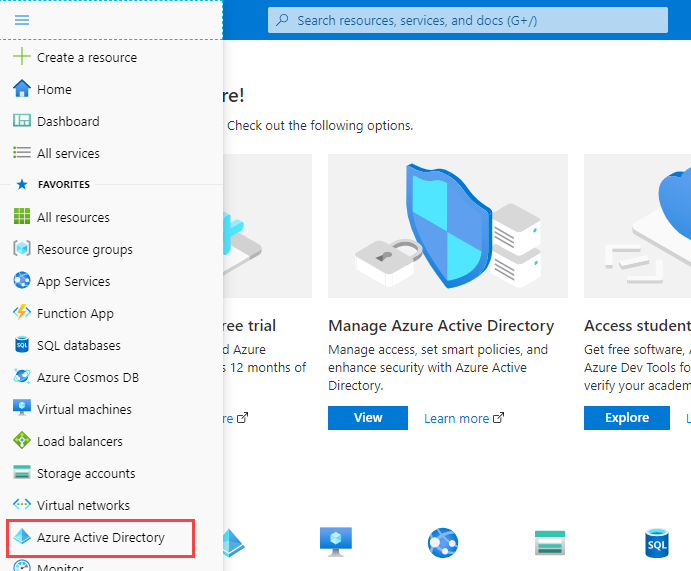
Open the Azure Portal at https://portal.azure.com/ and perform the following steps:
|
We assume you have created at least one Resource group already within Microsoft Azure. |
-
Choose Azure Active Directory from the left hand side menu.
-
Select App registrations in the left hand side menu, and click New registration.
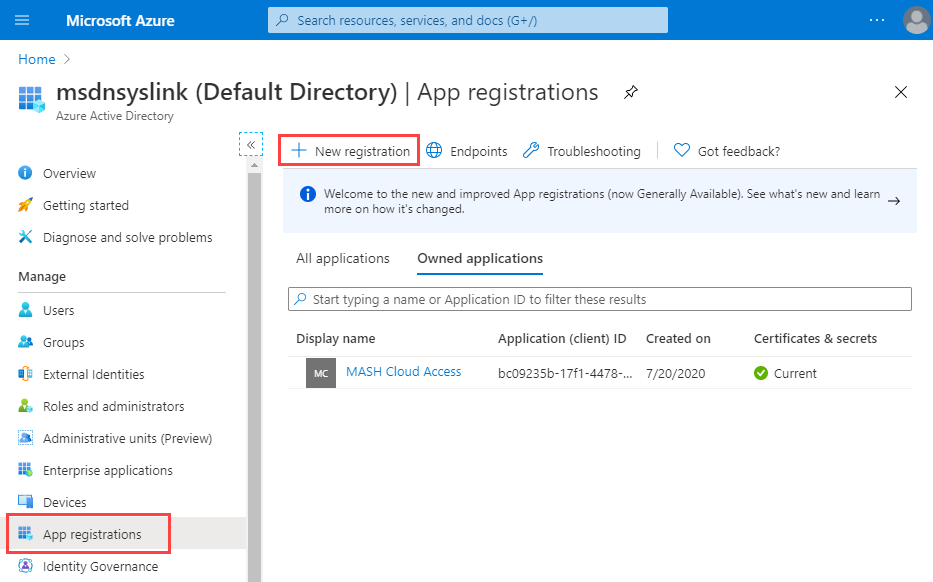
-
In the Register an application screen, enter the name of the application, e.g. “Avantra Cloud Access”, the URL of your Avantra Server (e.g. https://avantra-server/xn) into the Redirect URI (optional) field, and select the supported account type. Click Register.
-
In your newly registered app, select Certificates & secrets in the left hand side menu, and click the New client secret button. In the opened dialog, enter the value password under Description, choose Never as the expiration option, and click Add.
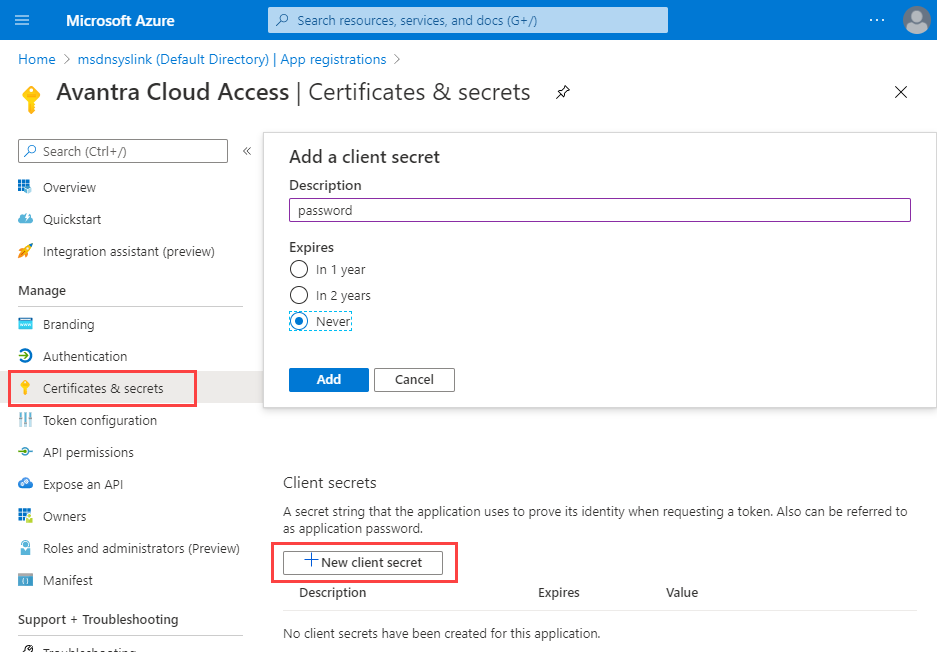
This generates a new password in the VALUES column.
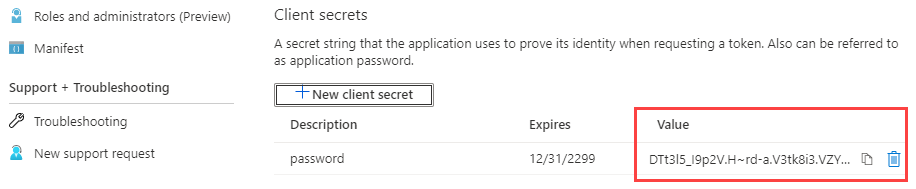
-
Select the created password with your mouse, copy the value to the clipboard, and save it to a secure location.
-
Return to your app registration screen, copy the Application (client) ID, and save it to a secure location.

-
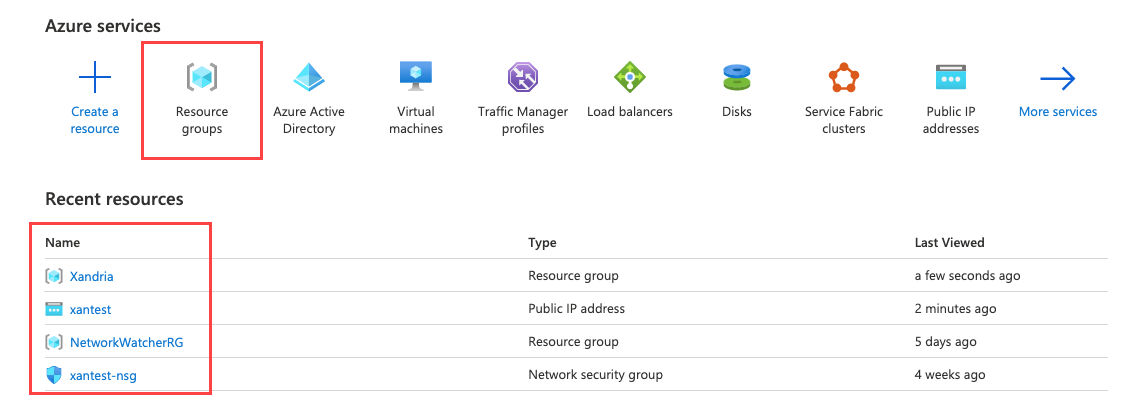
From the Microsoft Azure’s home page, select Resource groups and choose the appropriate resource group.
-
Open Access Control (IAM), and push the Add button.
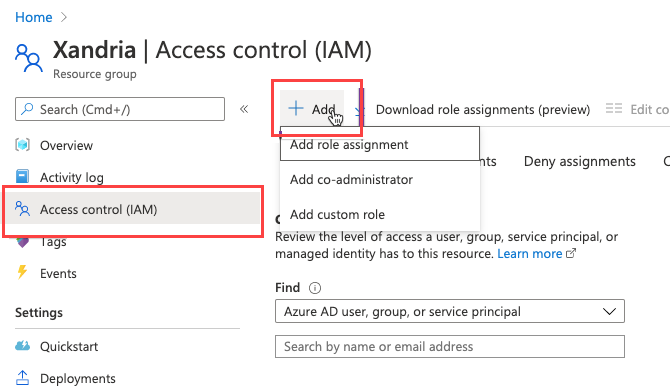
-
In the Add role assignment dialog, choose Contributor from the Roles drop-down list, and
Azure AD user,group, orapplicationfrom the Assign access to drop-down list. And finally, in Select, choose the name you defined in Step 3.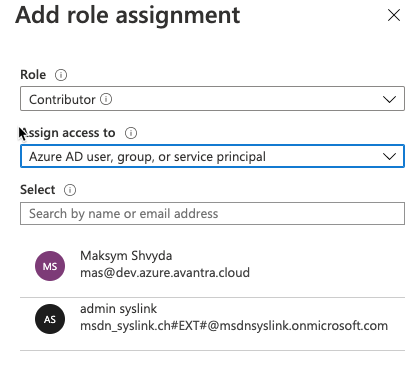
-
Push the Save button.
-
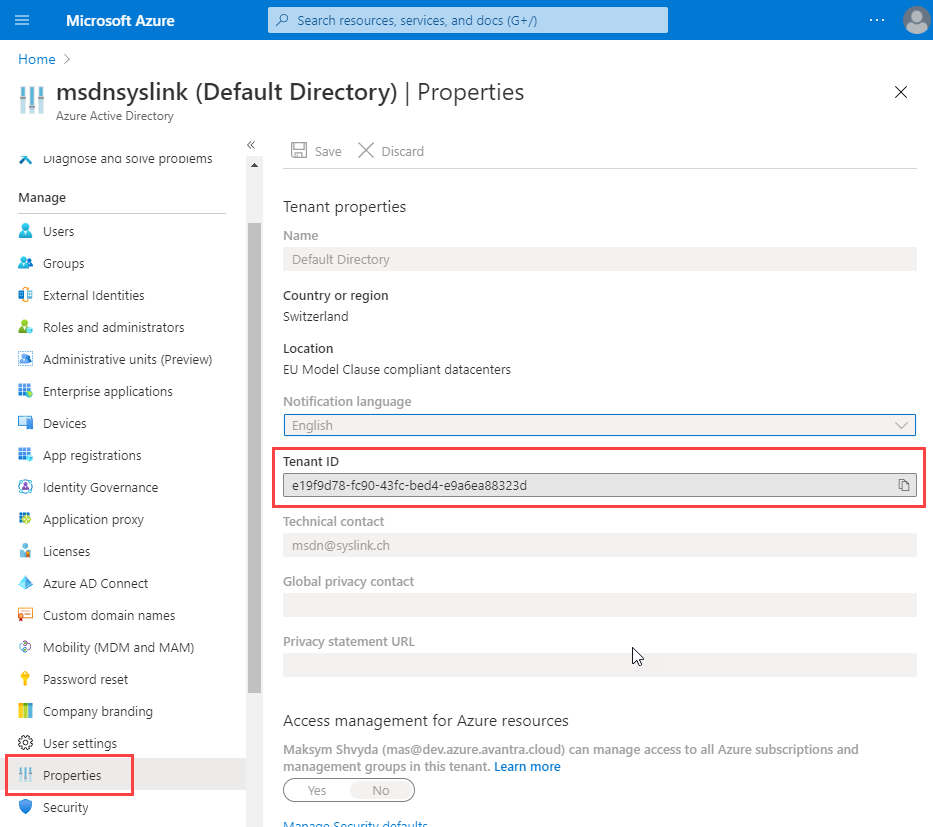
Choose Azure Active Directory and click Properties in the Manage section. Copy the value in the Tenant ID field, and store it in a safe location.
Cloud Authentication settings for Azure in the UI
Open Avantra UI and perform the following steps:
-
Open and choose .
-
Fill in a Name, an optional Description and select a Customer. Push the Finish button.
-
Select the newly created entry and push Open.
-
Fill the value from Step 12 of Procedure: Create an App Registration in Azure in the field Tenant ID.
-
Fill the value from Step 7 in Procedure: Create an App Registration in Azure in the field Client ID (Application ID).
-
Fill the value from Step 6 in Procedure: Create an App Registration in Azure in the field Client Key.
-
Push the Save button.
Cloud Integration with Google Cloud Platform
Settings in Google Cloud Platform Console
Open your Google Cloud Platform Console and perform the following steps:
-
Choose from the top left corner and select .
-
Select the VM instance you want to authorize with Avantra, scroll down, and note the name shown under Service account.
-
Choose from the top left corner and select .
-
Select the user from Step 2 and choose menu:[Create key] in the Actions column. Choose JSON and push the Create button. This generates a JSON file with a private key that is downloaded to your computer. Push Close.
Cloud Authentication settings for Google Cloud Platform in the UI
Open Avantra UI and perform the following steps:
-
Open and choose .
-
Fill in a Name, an optional Description and select a Customer. Push the Finish button.
-
Select the newly created entry and push Open.
-
Open the file downloaded in Step 4 of Procedure: Add permissions to a VM Instance Service Account, copy its content and paste it into the field Service Account (JSON).
-
Push the Save button.
Synchronization of GCP Server Instances in the UI
Open Avantra UI and perform the following steps:
-
Login to the Avantra UI as the
adminuser. -
Choose and select New.
-
For External Service choose
GCP Compute Engine,fill in a Name, e.g.GCP Synchronization, and push the Create button. -
In the newly created item, choose for GCP Service Account your service account that you want to use.
-
For GCP Zone you can either specify one or all zones will be checked automatically.
-
In Filter you may define one or more filter rules to restrict the set of instances considered for the synchronization.
By default, the value of the
Nametag is used for the value Physical Server Name in Avantra, and the private IP address is used for FQDN or IP Address.Push the Apply followed by the Test Query button whenever you make changes and want to verify the filter.
-
For System Type choose
Server, and choose a Default Customer and a Default System Role. You can override these default settings on a per Server level as described below. -
Select the value
yesfor Start Monitoring. Set the flags for Create Server and Update Server (if desired). Push the Apply button and afterwards the Sync button. Confirm that you have tested your query properly. -
If you want to synchronize periodically, set the flag next to Activate background synchronization and choose an appropriate value for the synchronization interval. Push the Apply button.
-
Select to verify the synchronization.
Cloud Integration with Alibaba Cloud
Settings in Alibaba Console
Open your Alibaba Console and perform the following steps:
-
Open the Resource Access Management (RAM) service.
-
Select Users from the left hand side and push the Add user button.
-
Fill in a Logon Name, Display Name, select Programmatic access for Access Mode, and push Ok.
-
Set the flag next to the recently created user and push the Add Permissions button. Search for “AliyunECSFullAccess”, select it, and push Ok.
-
Push Download .cvs, store the file in a safe location and push the Back button.
Cloud Authentication settings for Alibaba in the UI
Open Avantra UI and perform the following steps:
-
Open and choose .
-
Fill in a Name, an optional Description and select a Customer. Push the Finish button.
-
Select the newly created entry and push Open.
-
For Region, select region your ECS instances are located in. For Access Key ID and Access Key Secret fill in the values from Procedure: Create an API User with Full Access to ECS.
-
Push the Save button.
Assign the Cloud Authentication settings to the Cloud Server
Open Avantra UI and perform the following steps:
-
Choose , select the Cloud Server in question and push the Open button.
-
In Cloud Authentication select the recently created item from the drop-down list.
-
Push the Apply button.
ServiceNow Integration
| This function is only available with the Avantra Pro Edition. |
There are several ways Avantra is able to integrate with ServiceNow IT Service Management. Inbound synchronizations include:
-
You can forward Notifications to a ServiceNow instance in order to create incidents in there, as described in Define a ServiceNow Incident Output Channel.
-
You can synchronize servers from the ServiceNow IT Service Management into Avantra, as described in Synchronization of Servers.
Another way to integrate Avantra with ServiceNow is the outbound synchronization:
-
You can synchronize information discovered by Avantra into ServiceNow, as described in Outbound synchronization.
All scenarios require authorization of Avantra with ServiceNow which is described in Authorizing Avantra with ServiceNow.
But first you need to install the Avantra Integration from the ServiceNow Store:
Installing the Avantra Integration from the ServiceNow Store
| You only need the Avantra Integration if you want to create incidents in ServiceNow. It is not required in order to synchronize Servers from ServiceNow or use the outbound synchronization. |
-
Open your preferred browser and proceed to the ServiceNow Store.

-
Search for Avantra and push the Get button.
-
Press Continue to confirm the notice.
-
You can choose to install the app on all instances or only on selected instance. Set the flag next to I accept … and push Get.
-
In your ServiceNow instance, choose and switch to the Downloads tab. Choose Avantra from the list and push the Install button. You probably must be a ServiceNow administrator to accomplish this task.
Authorizing Avantra with ServiceNow
We recommend to use a dedicated (API-) User in your ServiceNow instance for the integration with Avantra, i.e. to create an new user with the flag Web service access only set. You probably must be a ServiceNow administrator to accomplish this task.
Perform the following steps in your ServiceNow instance:
-
Choose and push the New button.
-
Fill in at least a User ID, e.g.
avantra-api-user, a Password, and set the flag Web service access only, if desired. Push Submit. -
Open the newly created user record and push the Edit … button on the Role tab at the bottom of the page.
-
Depending on what you plan to do, add the following roles:
-
To create incidents in ServiceNow, select the role
x_308038_syslink_x.imp_incident_useri.e. typex_into the Collection search box, choose the mentioned role, and push . We recommend to also add theitilrole to make the purpose of the user clear! -
To synchronize servers from ServiceNow to Avantra, add the role
inventory_user. -
To use the outbound synchronization add the role
itil.
-
-
Push the Save button.
Perform the following steps in Avantra UI:
-
Open and choose .
-
Fill in a Name and select a Customer. Push the Create button.
-
Select the newly created entry and push Open.
-
Fill in your ServiceNow Instance Name, and for ServiceNow User and Passwords the values you created above.
-
Push the Save button.
Synchronization of Servers
In order to synchronize server from ServiceNow to Avantra proceed as follows:
-
Open .
-
Choose from the menu, choose
ServiceNowfor External Service, fill in a Name and push Create. -
Open the newly created record.
-
You may fill in a Description.
-
If you want to run the synchronization in the background periodically, you can set the flag Activate background synchronization and fill in an appropriate value for the time period.
Do not set this flag right from the beginning. Walk through this procedure, and after the initial synchronization was successful, set this flag. -
Select the ServiceNow Authentication you created in Authorizing Avantra with ServiceNow.
-
In Table Name fill in the ServiceNow table that contains your server records. This will most likely be
cmdb_ci_serveror one of its sub-tables. It corresponds to thetableNameshown in the ServiceNow REST API Explorer, see also the next step. -
Fill in a Query to restrict the selection of servers from ServiceNow. You may use the ServiceNow REST API Explorer to build your query, just click on the link ServiceNow REST API Explorer. Push Apply and use the Test Query button to verify your selection.
-
For System Type select
Server. This is the only available selection currently. -
Choose a Default Customer and a Default System Role assigned to newly synchronized objects. These values will be used unless you create an attribute mapping overriding the values. See below.
-
In Additional Attribute Mapping you may define how ServiceNow attributes are mapped to the Avantra fields
Customer,System Role,Description,Notes, andIP address. -
You can also select if monitoring shall start immediately after synchronization with field Start Monitoring. Most likely, you will choose
Nohere. -
Set the flag Create New Objects if you want to create a new object in Avantra if a new object is found in ServiceNow.
-
Set the flag Update Modified Objects if you want to modify an object in Avantra if the corresponding object was modified in ServiceNow.
-
Set the flag Delete Objects if you want to delete an object from Avantra that is no longer selected from ServiceNow. This can be objects that are deleted in ServiceNow, or that are no longer selected due to a modified Table Name or Query.
Use this option carefully! -
Push Apply and use the Sync button to start the synchronization.
Outbound synchronization
The outbound synchronization will enhance your ServiceNow CMDB with information discovered by Avantra. First of all you will have to make your ServiceNow instance ready:
-
Setup the ServiceNow Discovery.
-
Run ServiceNow discovery, e.g. go to and click on Quick Discovery.
-
Make sure the discovery was successful.
-
Go to and look for your discovery.
-
The outbound synchronization is based on CI of the class cmdb_ci_sap_sid, so make sure this class is existing and all SAP systems are found by the ServiceNow Discovery.
-
-
Avantra will use it’s own CI classes as addition to the SAP related CI classes already present in ServiceNow. You have to create these classes with the help of update sets provides by Avantra. The CI classes are:
-
ABAP Software Component (x_308038_syslink_x_u_cmdb_ci_sap_abap_software_component)
-
SAP Client (x_308038_syslink_x_u_cmdb_ci_sap_client)
-
SAP License (x_308038_syslink_x_u_cmdb_ci_sap_license)
-
SAP Namespace (x_308038_syslink_x_u_cmdb_ci_sap_namespace)
-
-
Download the ServiceNow update sets from: Avantra downloads
-
Import the update sets. Help can be found in the ServiceNow documentation.
After ServiceNow is ready the synchronization in Avantra can be configured.
-
Open .
-
Choose from the menu, choose
ServiceNowfor External Service, fill in a Name and push Create. -
Open the newly created record.
-
You may fill in a Description.
-
If you want to run the synchronization in the background periodically, you can set the flag Activate background synchronization and fill in an appropriate value for the time period.
Do not set this flag right from the beginning. Walk through this procedure, and after the initial synchronization was successful, set this flag. -
Select the ServiceNow Authentication you created in Authorizing Avantra with ServiceNow.
-
Push Apply and use the Sync button to start the synchronization.
After synchronizing with ServiceNow you will find ABAP software components, SAP clients, SAP licenses and SAP namespaces in you ServiceNow instance related to the SAP system discovered by ServiceNow.
Cloud Service Integration
| This function is only available with the Avantra Pro Edition. |
Integration of Services
Service with No Authentication
-
Open and push New.
-
Fill in a Service Type, Service, Customer and System Role and push New.
-
Select the newly created entry and push Open.
-
Choose the right Monitoring Server
-
If you want you can specify a base URL.
-
Push Save.
Service with Basic Authentication
-
Open and push New.
-
Fill in a Service Type, Service, Customer and System Role and push New.
-
Select the newly created entry and push Open.
-
Choose the right Monitoring Server
-
Either select an already created Basic Credentials or create a new one.
-
If you want you can specify a base URL.
-
Push Save.
Service with OAuth Authentication
-
Open and push New.
-
Fill in a Service Type, Service, Customer and System Role and push New.
-
Select the newly created entry and push Open.
-
Choose the right Monitoring Server
-
Either select an already created OAuth Credentials or create a new one.
-
If you want you can specify a base URL.
-
Push Save.
