Upgrading Avantra
About Versions, Patches, Upgrades, etc.
We first will describe the terminology used in Avantra with respect to versions, patches, upgrades, etc.
Versioning
As described earlier in this document Avantra consists of multiple software components. Each of these components has a particular version number, and the whole Avantra suite has a version number as well.
The version number for Avantra always has the format [major].[minor] with major and minor being numbers. The Avantra version described in this document is 20.5. We also use the term release as a synonym for version.
Every Avantra component has a version number in format [major].[minor].[patch-level] where [major].[minor] denotes the Avantra version the component belongs to, and patch-level indicates the particular patch level of the component.
An exception to this rule is XanMobile which can be considered as a software of its own and hence has its own numbering scheme.
With every new release of Avantra, the version number changes (at least the minor version number), and the patch-level of every component is set to 0. Patches will be released on a per component level comprising first of all bug fixes. The Avantra Server, the Avantra Agent, and the transports share a common patch-level. Details can be found in the Release Notes.
Version Compatibility
As a general rule, all Avantra components sharing the same [major].[minor] version prefix are compatible to each other, regardless of the particular patch level.
Exceptions to this rule will be stated in the Release Notes.
Also, as a general rule, components having a different [major].[minor] version prefix are not compatible!
In order to support smooth version upgrades Avantra Server components ensure a certain degree of compatibility to Avantra Agents with a lower [major].[minor] version number.
This is described in a more formal way in the Release Notes.
Therefore you must not install a Avantra Agent with a higher [major].[minor] version number than the [major].[minor] version number of the Avantra Server components!
Version Upgrades vs Applying Patches
When we talk about applying patches we mean to replace a particular Avantra component with one that shares the same version number except for the patch-level.
The procedures how to apply patches are described in Applying Patches at the very end of this chapter.
When we talk about version upgrades or (short) upgrades we mean to lift the whole Avantra installation from one [major].[minor] version to the next.
The major part of this chapter describes how to perform a version upgrade of Avantra.
Upgrade Notes
|
If you are upgrading from a Syslink Xandria release prior to 7.2, please contact your sales representative or get in touch with us at sales@avantra.com concerning your choice of the Avantra edition. |
This and the following sections describe the upgrade of Avantra Server components from version 7.1.7 or higher to 20.5.
|
Before you start your installation, please ensure to read the release notes for Avantra 20.5. Please also ensure you use the latest software versions and patches of Avantra, as described in the Components section. |
- Upgrade Path
-
You first need to upgrade the Avantra Server to version 20.5 before you can upgrade the Avantra Agents.
Afterwards, migrate any existing Syslink Xandria Gateway to an Avantra Agent as described in Upgrading Avantra Gatewayss
- Java Runtime Environment (JRE)
-
Avantra Server components require the Java 8, 9, or 10 Runtime Environment. Only the 64-bit version is supported.
Avantra Agents 20.5.0 require the Java 8, 9, or 10 Runtime Environment. You may need to upgrade your Java before you can upgrade the Avantra Agents.
Java 11 or higher Runtime Environments are not yet supported.
- Permissions
-
You must have local administrator or root permissions in order to perform the upgrade.
- Microsoft SQL Server
-
The Avantra Server supports Microsoft SQL Server 2008 R2, 2012, 2014, 2016, and 2017.
- Agent Compatibility
-
Avantra Agents version 6.0.32 and higher are supported with Avantra Server 20.5.
- Transports
-
Avantra 20.5 comes with new transport requests. You need to upgrade to Avantra Agent 20.5 before you can import the new transport requests. However, the Avantra Agent 20.5 also supports the old transport requests shipped with Avantra 20.2 and Syslink Xandria 7.3.
Due to the major improvements in the ABAP transports, we recommend to import these transports as soon as your Avantra Agents 20.5 are running in a stable way and you are sure you do not need to downgrade the agent.
Obtaining the License before the Upgrade
|
If you upgrade from Avantra 7.1.7 to Avantra 20.5, you need a new license file. If you upgrade from Syslink Xandria 7.2, 7.3 or Avantra 20.2, you can skip this section. |
While still on Syslink Xandria 7.1.x, logon to your Syslink Xandria UI installation using an administrator account and follow the procedure to obtain a license for Avantra 20.5:
-
Select from the Avantra UI top-level menu. The Licenses page opens.
-
Click on Request / Install Avantra License button and then click on 1. Request License. A dialog box will open showing your Activation ID and some fields to fill in the number of licenses required. Press Continue.
-
A mail to
support@avantra.comwill be opened using the email program of your system with the data entered in the form. Please feel free to modify this email and to add any notes, then submit the mail. -
In response to your query you will receive an e-mail or log entry in your support ticket with the license key. Store it at a save location.
Upgrading Server Components (on Microsoft Windows operating systems)
Follow these steps to upgrade your Avantra Server components to Version 20.5:
Upgrading the other Avantra server components
-
Download
avantra-server-20.5.0-win64.exefrom the SERVER RELEASE 20.5.0 section at the Support menu of avantra.com. -
Open the installer, push Next on the welcome screen and accept the license using the I agree option on the license screen.
-
You are asked to install either the Avantra Master, the UI, or both. Usually you will leave the default and install both. Push Next to continue.
-
Choose an appropriate installation location and push Next.
-
Choose the ports for incoming HTTP and or HTTPS connections of the web UI. You may push the Verify Ports button in order to check if the ports are free. Press Next.
-
Verify the Windows Firewall configuration rules that will be added to your system. Press Next to proceed.
-
Choose the (Windows) user to run the Windows services as. If you use Windows Authentication for the Microsoft SQL Server (which is the default in Step 4 of the Procedure: Installing Microsoft SQL Server Express Edition), make sure you use the same user here as for the Microsoft SQL Server.
If you did not change the command in Step 4 of Procedure: Installing Microsoft SQL Server Express Edition, leave it to the default
LocalSystemhere. If your Microsoft SQL Server is running with a different user, fill in the same user. Press Next to proceed. -
Push Install.
-
On the final screen, make sure you have checked Install UI and Master and push Finish.
Upgrading Server Components (on Unix-like operating systems)
-
Download
xandria-server-20.5.0-[os].binfrom the SERVER RELEASE 20.5.0 section at the Support menu of avantra.com.Make sure the file is executable. Otherwise:
xandria$ chmod 755 avantra-server-20.5.0-[os].bin -
Perform one of the following steps:
-
If your existing Avantra UI installation is listening on a port ≥ 1024, (with or without redirecting some port < 1024 to the actual Avantra UI port) execute the following as user
root:root$ chown -R xandria:xandria /syslink/xangui root$ chown -R xandria:xandria /syslink/.xandria
Please make sure to change the
XANGUI_USER=rootentry in the header of the/syslink/xangui/rc.xanguiscript toXANGUI_USER=xandria. Command below usesvias editor, please use any editor you are familiar with.root$ vi /syslink/xangui/rc.xangui
Perform the following steps as user
xandria. -
If your existing Avantra UI installation is listening on a port < 1024, and you have no redirect scenario in place perform the following steps as user
root.It is recommended to run Avantra processes with a lower privileged OS user than
root, so you change the Avantra UI port during this upgrade.
-
-
In the
/syslinkdirectory runxandria$ ./avantra-server-20.5.0-[os].binThe installer requires a suitable Java 8, 9, or 10 Runtime Environment to run. It usually finds it automatically based on the existing installation. If no suitable Java 8, 9, or 10 Runtime Environment is found, you can specify one like this:
xandria$ ./avantra-server-20.5.03-[os].bin -- --jvm=[path_to_java_executable]with
[path_to_java_executable]the absolute path of thejavaexecutable.Yes, it’s really --first and then--jvm. -
Open your preferred web browser and point it to the URL
http[s]://avantra-server[:port]/xn. Use any User having the Permission Administrator Functions.In some cases, the following additional operations may be required:
-
On the Avantra UI Post Upgrade Steps page push the Start post upgrade steps button.
-
Once finished, click Start Avantra UI.
Installing the License
| You can skip this section if you are upgrading from Avantra 20.2 to 20.5. |
-
Select from the Avantra UI top-level menu. The Licenses page opens.
-
Click on Request / Install Xandria License. Then copy and paste the license key retrieved in Obtaining the License before the Upgrade including the lines marked as
-----BEGIN/END XLIC BLOCK-----to the corresponding text box and press OK. -
A message appears that the license was installed. Verify the Status and Status Message are Ok.
Upgrading Avantra Agents
You have the option to upgrade Avantra Agents manually or automatically (recommended).
Upgrading Avantra Agents Automatically
Avantra Agents are able to perform Agent Self Updates. These updates can be initiated centrally, so the installation of patches and new versions becomes easy even in large-scale Avantra environments.
You need the Trigger Agent Updates Permission in order to perform automatic updates.
|
If you are running Avantra Agents 6.0.x you may need to upgrade their JVM to Java 8, 9, or 10 Runtime Environment before you can upgrade the Avantra Agents. |
External vs. Internal JVM
For your convenience, Avantra has included a JVM installation and update feature. If you make use of this feature, the installed JVM will reside in the Avantra Agent installation directory and does not interfere with your operating system.
Of course you can make use of any Java 8, 9, or 10 Runtime Environment eventually installed. It will be found automatically if its location is included in the PATH environment variable. In this document we use the term external JVM for this kind of installation, and the term internal JVM if it is maintained by the Avantra Agent.
| Installation Type | Advantage | Disadvantage |
|---|---|---|
External |
Automatic Updates through operating system |
Agent needs to be restarted manually after JVM update |
Internal |
Agent restarts automatically after JVM update |
Updates need to be invoked manually |
For IBM AIX you probably want to use the external JVM. There are no packages available in a format that can be deployed by the Avantra Agent.
However, you can compose your own Java distribution package in tar.gz format and install it through the Avantra Agent.
In this case the file must be named [java|jre|jdk|jvm]-[version]-[os]-[osarch].tar.gz and has to contain a complete directory structure with JRE (or JDK).
Example: java-8u123-aix-ppc_64.tar.gz
Valid operating system architectures are displayed in the Server Info section of a Server record.
Managing Internal Java Virtual Machines
|
You need the Avantra Agent 6.0.32 in order to install or update the internal JVM. |
To install or upgrade an internal JVM, proceed as follows:
-
For Microsoft Windows, Linux, and Solaris you will find suitable Java packages at Java SE Runtime Environment 8 Downloads. Always download the
tar.gzpackages, even on Microsoft Windows and Linux. Use the 64-bit package on a 64-bot operating system. -
Select from the top-level menu. Select the Packages tab. Choose Upload from the toolbar.
-
Choose the downloaded
tar.gzpackages from your computer and start the upload. -
Select the Status tab. Select from the toolbar.
In order to upgrade or install Java on a single or a few servers only, you can go to , select the servers, and then choose Manage Agent Java … from the context menu.
-
The Setup Custom Search Criteria dialog appears. Choose criteria to select the servers you want to install or update Java on. A single or a group of named servers can be chosen with server search criteria Server. Press OK to continue.
-
The Java Install/Update dialog appears. Please review the information here. Press OK to continue.
-
You can now verify the process in the Status tab.
Running Agent Update
The Agent Self Updates work as follows:
-
There is just one(!) upgrade package for the Avantra Agent which is valid for all supported operating systems. It is included in the distribution packages and available as separate download at the Support menu of avantra.com.
The packages are named
agent-20.5.n.bin.On Unix-like operating systems these are the same packages you use for the normal installation.
On Microsoft Windows operating systems this package is used for Agent Self Updates as well, but there is an extra package provided for the initial installation which cannot be used for the automatic upgrade.
-
You can upload the packages using Avantra UI and the Avantra Agents retrieve the packages through the Avantra Master and avantra-gateway infrastructure.
-
Avantra UI provides an interface that allows you to select the Avantra Agents supposed to upgrade. You can either choose items from the Server list or define an ad-hoc Selectors.
In order to avoid too many Avantra Agents trying to download the packages at the same time, the update requests are queued. Only update-simultaneous-downloads update requests are triggered at the same time and there is a delay of schedule-wait-time before the next bunch of update requests is triggered, etc. These two parameters can be configured as described in Procedure: Change Properties for the UI.
-
As soon as the Avantra Master transfers the update request to the Avantra Agent, the latter one spawns a child process to start downloading the upgrade package while the Avantra Agent continues to run normally.
Once the download finished successfully, the package is extracted, the Avantra Agent is stopped, old files are replaced, and the newly installed Avantra Agent is started.
-
If there is anything going wrong, Avantra Agent tries its best to fully recover itself, for example, it tries to roll back to the previous version.
-
During the upgrade process, verbose status messages are sent back to the Avantra Master. Avantra UI will display the current status and all log messages of the update attempt, so you can watch the update process periodically.
While the whole process usually works very smoothly, there are a few items to observe:
- Small is beautiful
-
If you plan to upgrade your Avantra Agents, start with one or two Physical Servers first and test the upgrade procedure as well as the new Avantra Agent.
If you feel comfortable with the new version, continue with the rest of your Avantra Agents. By default, Avantra Agents running already on the target release are not upgraded, unless you enforce this.
- Downgrade
-
If the upgrade process went well, but the new Avantra Agent does not work as expected, you can also use this feature to downgrade Avantra Agents to the last known good version.
- Version Information
-
On Microsoft Windows operating systems the version information shown in the Programs and Features dialog of the control panel will not be updated!
Uploading Agent Packages
In order to upload packages, perform the following steps:
-
Select from the top-level menu. Select the Packages tab. Choose Upload from the toolbar.
-
Choose the packages from your computer and start the upload.
Starting the Update
In order to trigger the upgrade perform the following steps:
-
Select from the top-level menu. Select from the toolbar.
-
Fill in appropriate values for the Selectors and push OK.
-
Choose the appropriate version from the drop-down list and set the flags on the Servers you want to update.
-
Confirm your selection by pushing the Start Agent Update button.
-
The Status tab contains the latest status information about the recently scheduled agent updates. You may want to choose the value
Running and Errorsfrom the drop-down list in the toolbar to watch the update progress.
| See Troubleshooting Agent Updates in case of any issues. |
Upgrading Avantra Agents Manually
The Java 8, 9, or 10 Runtime Environment is required. If you manually upgrade an agent (from version 6.0.x) , you need to make sure that a compatible JRE is found. See also Managing Internal Java Virtual Machines.
Upgrading Avantra Agent manually on Unix-like operating systems
Make sure the installer file agent-[version].bin is located in the installation directory of the Avantra Agent, i.e.
typically /syslink.
Run the agent-[version].bin file with the same operating system user the agent is running currently.
|
Please make sure that the OS user can (at least temporarily) write to |
The installer will notice that a previous version already exists and takes care of the upgrade.
Please make sure that the link to the agent start scripts in your init.d directory (depends on your Unix) are updated to the new start scripts at /syslink/agent/rc.agent.
Upgrading Avantra Agent manually on Microsoft Windows operating systems
Simply install the new version of Avantra Agent as described in Installing the Agent on Microsoft Windows.
Upgrading to the new Transport Requests
| You can import the new transport requests delivered with Avantra 20.5.0 only after upgrading to Avantra Agents 20.5.0. |
Please perform the following steps:
-
Identify both transports that need to be used, see the description and release information in the
ReadMe.txtfile within the transports'.zip. -
Import both (corresponding to your release) transports (customizing and workbench) in the client where the RFC User
XANDRIA_RFCorAVANTRA_RFC. You may select Ignore Invalid Component Version. -
If you have this user defined in another client, please also import the customizing (role) transport in this additional client.
-
Be sure that the profile has been generated correctly and that it is the only one granted to this user, i.e. delete all other profiles and roles not specified here.
Upgrading Avantra Gateways
The upgrade is described in this solution document: Replace Gateway with Xandria Agent 7.3
Applying Patches
Permissions
You must have local administrator permissions in order to apply patches on Microsoft Windows operating systems. On Unix-like operating systems you need to have the permissions of the user running the Avantra Server components.
Downloading Avantra patches
|
Before you start your installation, please ensure to read the release notes for Avantra 20.5. Please also ensure you use the latest software versions and patches of Avantra, as described in the Components section. |
You can download the latest patches at the Support menu of avantra.com.
For the remainder of this section, we assume that you save the downloaded component in C:\temp (on Microsoft Windows operating systems) or /syslink (on Unix-like operating systems).
Patching the Avantra Agent
Applying patches to the Avantra Agent works exactly as described in Upgrading Avantra Agents.
Patching the Avantra Server
-
Depending on your operating system, proceed as follows:
-
On Microsoft Windows operating systems, run the installer
avantra-server-20.5.0-win64.exefromC:\temp. -
On Unix-like operating systems, run the installer
avantra-server-20.5.0-[os].binfrom/syslink.
-
-
Open Avantra UI as any User having the Permission Administrator Functions and perform any post-upgrade steps eventually available.
Updating Avantra
Avantra automatically monitors versions of its components and informs you in case a newer version is available. The Admin users receive a browser update notification upon login, however, you can always manually check for updates.
To manually check if newer version is available:
-
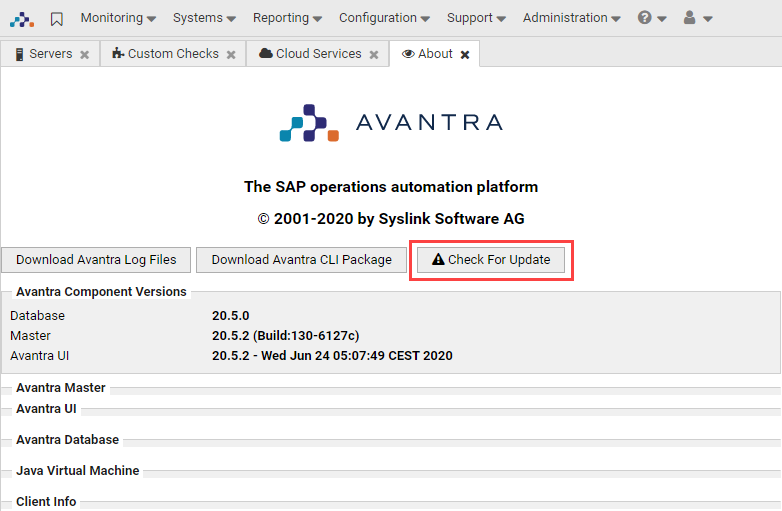
In the top menu, select > About.
The About page displays your current components versions.
-
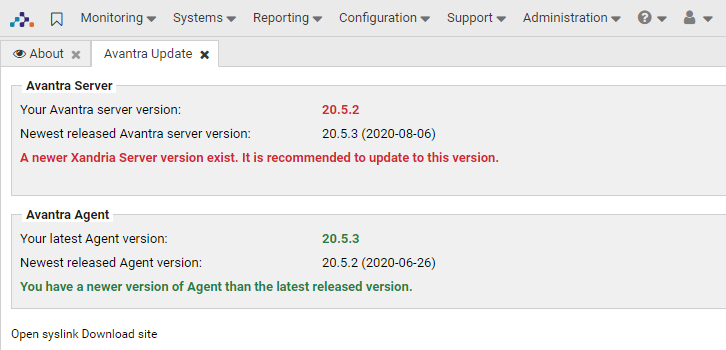
Click the Check For Update button.
The Avantra Update tab opens where you can see what components are up to date (green) and outdated (red).
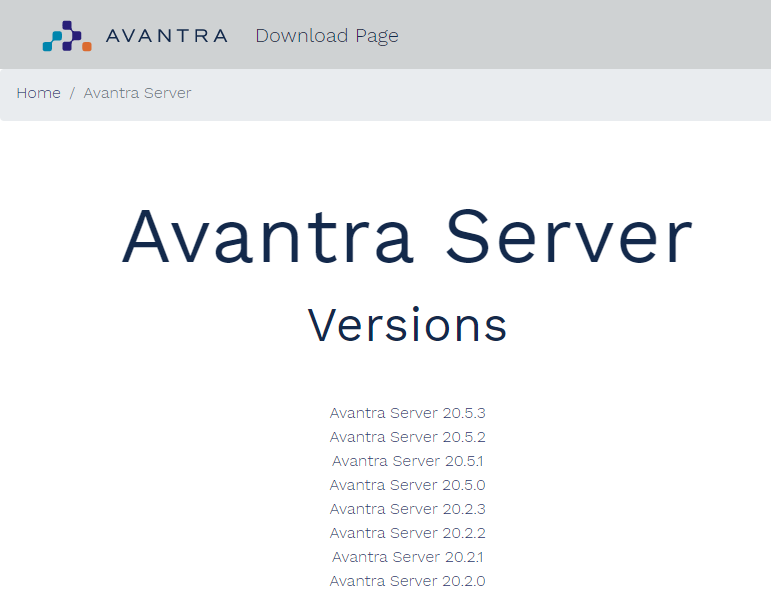
-
If you want to update the component, click the Open syslink Download site link to go to the Avantra Download page.
-
In the Components section, select the component you want to update.
-
In the Versions list, click the relevant version to start downloading.