Operational Tasks
This chapter describes how to perform tasks that are typical for a Service Provider scenario.
Working with Dashboards
| This function is only available with the Avantra Pro Edition. |
A Dashboard in Avantra is a page in the UI you can customize to your liking. It features the positioning of the so-called Dashlets in either a fixed or a floating grid layout.
Dashboards may be private to a User or shared between all Users of a given Customer. There is also an option to open a Dashboard outside of the UI by a direct URL.
As with all objects in Avantra, a Dashboard belongs to a specific Customer, and only Users with View Systems Permission for this Customer are able to access the Dashboard. Likewise, Users can only create Dashboards for Customers they have the View Systems Permission for.
Every Dashboard may contain multiple Sections in order to group the Dashlets.
Adding new Dashboards
To create a new Dashboard, perform the following steps:
-
Select from the top-level menu and click New.
-
Fill in a Name and an optional Description. Select a Customer from the list and choose if the Dashboard is Shared, i.e. if other Users of the selected Customer shall be able to access the Dashboard as well.
Push the Create button. A new tab opens with the title set to the name of the Dashboard.
-
Adding Dashlets
-
Click on Add Dashlet. The Add new Dashlet window opens. Choose a Dashlet from the list. You can narrow down your selection if you choose one of the Categories first. Push the Add button of the Dashlet of your choice. The Configure page opens.
You can click on the Dashlet icon to see a preview of the Dashlet. -
There are options that depend on the particular Dashlet displayed in the upper part of the window. Usually, these options comprise some direct input or the definition of a Selector.
The lower section consists of settings that are common for all Dashlets. You can choose the Grid Width and Grid Height of the Dashlet, or if it should Use the maximum window width. You can also Override Title and Override Subtitle which otherwise are selected automatically. Finally, you can choose a different Refresh Interval if the default is not suitable for you.
-
Push the Apply button to save the Dashlet.
-
Repeat the steps above to add further dashlets.
-
Use your mouse and drag the Dashlets to re-arrange them.
-
To configure a Dashlet you already have added, push the icon inside the Dashlet.
-
To remove a Dashlet, push the icon inside the Dashlet.
-
-
-
Push Configure to open the Configure Dashboard window.
-
You can change the Dashboard Name, Description, Customer, and the Shared flag if you are no longer happy with the values chosen initially.
-
If you do not want to use the Floating Layout, which automatically adjusts the grid layout according to the browser window size, clear the corresponding flag.
-
You can directly access the Dashboard using the URL defined in URL. If you do not want to allow direct access, clear the value in the field.
-
By default, the page accessible by the URL defined above requires login. If you want to access this page automatically without a User to log in, choose an appropriate Auto Login User from the list.
-
Managing Sections
-
Push the Add New Section button to add a new section to the Dashboard. A new section row will be added. Click on the name of the new section and change it accordingly.
-
You can click on to add a Dashlet from this dialogue directly.
-
Choose and to re-arrange sections.
-
Choose to remove a section.
-
-
Managing Styles
-
You can set a different background color or use a background image, either by uploading or by referencing to an online resource.
-
You can change the Title Color as well.
-
You can disable the Dashlets being animated during refresh: clear the Animate Dashlets on refresh flag.
-
Finally, you can Override CSS Styles by defining valid CSS in the text box.
You should be familiar with web development and the usage of the appropriate tools. CSS classes involved are those starting with
z-xdashboardandz-xdashlet.
-
-
Push Apply to save your configuration settings.
-
-
Push Exit Edit Mode to finish the Dashboard creation.
Modifying Dashboards
Modifying a Dashboard is similar to creating one.
-
Select from the top-level menu. Select the Dashboard in question and push Open.
-
Push Edit to switch into the edit mode.
-
Perform the desired steps described in Step 4 of Procedure: Creating a Dashboard.
-
Push Exit Edit Mode to finish the Dashboard creation.
System Dashboards
Currently, there is only one System Dashboard, the RTM Control Center, see also RealTime Monitoring "Control Center" View.
You can also access this Dashboard directly using URL http[s]://[avantra-server][:port]/xn/dashboard/RTM%20Control%20Center, and you can use the rtmuser property for a configuration option without login.
You cannot modify a System Dashboard, but you can make a copy of it and configure it as described in Modifying Dashboards.
Select from the top-level menu. Select the Dashboard in question and choose .
If you want to use the copied Dashboard as a replacement for the original RTM Control Center, i.e. to make it accessible through , define the Dashboard Name in RTMControlCenterDashboard.
Using Dashboards
The main purpose of Dashboards is to display data. But there are few things worth knowing.
Every Dashboard features a Controller that allows you to further restrict or configure the amount of data displayed:
Many Dashlets feature in the upper right corner. If you click on this icon, the corresponding tab opens that provides the underlying data of the Dashlet.
Managing Solutions
Creating Solution Documents
Perform the following steps to create Solution Documents.
Create a Solution Documents from scratch:
-
Select from the top-level menu. Click Create to create a new solution document.
-
In the New Document dialog, you must set the name, the description, and the customer. The customer owns the Solution Documents and only users with the corresponding Solution Documents permissions on this customer can view or edit this document.
-
Click Create to create the Solution Documents.
You can also create a Solution Documents which is tied to a specific object, for example, to a system, check, customer, daily check, monitoring parameter, and more. To do so, navigate to the object and perform the following steps:
-
Select the object and select . You can also right-click the selected object to open the context menu and select Create Document in the context menu.
-
The New Document dialog has already set a default name, which can be changed. Set the description and the customer.
-
Click Create to create the Solution Documents.
Once the Solution Documents is created, a new window opens where you can start writing the document content in a WYSIWYG editor.
Besides writing the document, you can do the following:
-
Change document name, description, and customer.
-
Apply different fonts, colors, and many other commonly used and well-known text styles to your document.
-
Insert links to external resources.
-
Upload and manage attachments to this Solution Documents. Select Attachments to view, upload and delete attachments.
-
Select References to show/hide the Solution Documents references. Solution Documents references are very important for document search. Accurate document references will result in better search results.
-
If a Solution Documents is created from scratch, no references are created. If a Solution Documents is created for a specific object (see above), references to that object are automatically inserted to the Solution Documents.
Editing Solution Documents references:
-
Select References to show/hide the Solution Documents references. Defined references are shown on the left side of the document window.
-
Select Edit References… to open a dialog where references can be created, modified, or deleted.
-
Click Add a Reference to create a new reference.
-
In the drop-down box, select the reference type.
-
Once a reference type is selected, a second drop-down box is presented with possible referenced values. There is a special reference type free text that allows you to use arbitrary kinds of tags for your documents.
-
Repeat steps 3. to 5. to add additional references.
-
Select the icon to remove a reference.
-
Select Apply to save the references.
Finding Solution Documents
Finding Solution Documents is pretty easy. There are basically three ways:
-
Select . A list with all visible Solution Documents is presented. Use the common UI filtering and sorting mechanisms to find documents.
-
Select and click Search in the toolbar. A new dialog opens where you can enter a search term. Click on Search executes a full-text search and shows matching documents.
-
The last document search works differently. If you want to find Solution Documents that are related to a specific object (for example, system, check, customer, and so on), go to that object and select either or right-click that object and select Show Documents. The found documents have references to the selected object. Please note that not only the direct document references are used for the search, but also references of references are considered in the search. To show the relevance of a found document, stars are used to show the importance of a document. Five stars denote the highest relevance.
You need View Documents Permission to view Solution Documents.
Editing a document requires the corresponding Edit Documents Permissions.
Starting and Stopping Systems
| This function is only available with the Avantra Pro Edition. |
Avantra allows you to start and stop SAP Instances, SAP System, and Cloud Servers directly from the UI.
Starting and Stopping of SAP Systems
Open and select the desired SAP System. Push the Open button.
Push the Stop button in order to stop an SAP System, the Start button in order to start it, and the Restart in order to restart it.
In case you push the Stop button you have the option to choose between a hard and a soft shutdown. In case of a soft shutdown – which is only available for ABAP SAP Systems – you have to define a Soft Timeout as well.
If you restart an SAP System, you have the option to define a wait time after the system is stopped before it is started again.
You need Permissions Start/Stop SAP to start and stop SAP Systems.
|
You need to have the SAPControl user defined in order to use this feature. See also Defining the SAPControl User. |
You need Permissions Start/Stop SAP to start and stop SAP Systems.
Starting and Stopping of SAP Instances
Open and select the desired SAP Instance. Push the Open button.
Push the Stop button in order to stop an SAP Instance, and the Start button in order to start it.
In case you push the Stop button you have the option to choose between a hard and a soft shutdown. In case of a soft shutdown – which is only available for ABAP SAP Instances – you have to define a Soft Timeout as well.
|
You need to have the SAPControl user defined in order to use this feature. See also Defining the SAPControl User. |
You need Permissions Start/Stop SAP to start and stop SAP Instances.
Starting and Stopping of Cloud Servers
Open and select the desired Cloud Server. Push the Open button.
Push the Stop button in order to stop a Cloud Server, the Start button in order to start it, and the Restart button in order to restart it.
If you restart a Cloud Server, you have the option to define a wait time after the Cloud Server is stopped before it is started again.
You need Permissions Start/Stop Server to start and stop Cloud Servers.
Starting and Stopping of Databases
Open and select the desired Database. Push the Open button.
Push the Stop button in order to stop a Database, the Start button in order to start it, and the Restart button in order to restart it.
If you restart a Database, you have the option to define a wait time after the Database is stopped before it is started again.
You need Permissions Start/Stop Database to start and stop Databases.
Starting and Stopping Systems using Maintenance Windows
You can also stop and start Systems using a Maintenance Window.
-
Follow the procedure Turning Monitoring On or Off using a Maintenance Window to create a Maintenance Window.
-
Open the recently created Maintenance Window and choose appropriate values for Begin of maintenance, Stop System(s) n minutes after maintenance window starts, End of maintenance (?), and Stop System(s) n minutes before maintenance window ends.
For the Stop process, you also can choose between hard and soft shutdown, and in case of a soft shutdown, you have to define a soft shutdown timeout. The soft shutdown is available only for ABAP SAP Instances and SAP Systems.
-
Push the Apply button.
Using SAP Logon
With Avantra UI you can directly log on to ABAP instances from various views. Some views even will launch the appropriate transaction in the SAP system.
Technically, the .sap files are provided for download and you simply click on it to run SAP GUI. You may configure your browser to automatically open .sap files so you will not even notice that a file has been downloaded.
By default, Avantra UI will enter the same user name as the one you used to log on to Avantra UI. This might not be the same as the one in your SAP systems. You can therefore change the user name in your User Settings (see User Settings) for SAP GUI logon. Enter the desired user name to the field SAP Logon User.
|
If you have set up single sign-on in your organization, please use the same user name as the one which is linked to your Windows domain user. This way you do not need to type the password. |
There are several ways to run SAP logon from Avantra UI.
-
In the SAP system detail view, there is a Start SAP Logon drop-down button which provides a list of ABAP instances. Click on the desired instance name.
-
In the SAP System Details page of the SAP system detail view, right-click on an ABAP instance and choose Start SAP Logon. The same can be done using the More drop-down menu.
-
In a list of checks, right-click on a check of an ABAP system or instance and choose Start SAP Logon. The same can be done using the More drop down-menu.
If you start SAP logon from a check, Avantra UI will directly forward you logon to an appropriate transaction.
-
In the details view of ABAP-related checks, click Start SAP Logon (TA). This view shows the name of the start transaction, Avantra UI will pass to SAP logon.
Retrieving Version Information
You may use Avantra UI to view version information. The different System lists show version information, in particular, the versions of the Avantra Agents can be seen using .
For version information of Avantra UI, Avantra Database, and the Avantra Master choose About.
Retrieving Avantra License Information
You may use Avantra UI to view license information. Select from the top-level menu. The following data is displayed:
-
The number of licensed SAP Systems, SAP Instances, Servers, Databases, and Cloud Services.
-
The license status and a status message. Usually, the status will be Ok. It changes to Warning if, for example, the license is about to expire (there is a 30 day warning period), or there are more systems active than licensed. It changes to Critical if the license either does not exist or is violated in a way that Avantra Master has stopped functioning (like the license has expired). In case of a Warning or Critical status, the message text will show additional information.
-
The number of active SAP Systems, SAP Instances, Servers, Databases, and Cloud Services. Systems are considered active if they require a license and are operational.
-
The license start and end date.
-
The names of SAP Systems, SAP Instances, Servers, Databases, and Cloud Services that are ignored in case there are more systems active than licensed.
-
The hardware key the license is bound to.
There are also sections displaying in greater detail how many Systems per Customer are operational and consume a license. This data can also be exported.
Setting Up and Configuring the Avantra Web Service
| This function is only available with the Avantra Pro Edition. |
The Avantra Web Service provides access to your Avantra environment using the well-known Web Service technology. It is distributed as part of Avantra UI.
Enable/Disable the Avantra Web Service
By default, the Avantra Web Service is disabled. To enable the Web Service you have to enter Avantra UI. Go to the Avantra UI Properties () and set the property webservice to true. Afterward, an Avantra UI restart needs to be triggered.
When Avantra UI has finished restarting, the Web Service's WSDL is accessible at http(s)://avantra-server[:port]/xn/ws/xandria_webservice.wsdl. If you open this URL in a browser you will see the content of the WSDL file.
To disable the Web Service just set the Avantra UI.
How to use the Avantra Web Service by Command Line Executable
Avantra UI includes a command line executable called avantra to access the web service and to read and write data. To get it, follow the procedure below:
-
Go to About, then press Download Avantra CLI Package.
-
A dialog will open and show a command-line example of how to display the help screen of the Avantra CLI. Press Download 'avantra.zip'.
-
Unpack
avantra.zip. The package includes 3 files,avantra.jar,avantra.cfg, and eitheravantra.baton Microsoft Windows operating systems oravantraon Unix-like operating systems.avantraoravantra.batsimply calljava, so you might need to add the full path if Java cannot be found in the path. -
The file
avantra.cfgis pre-configured and contains the complete URL of Avantra UI so you do not have to provide it on the command line. Callavantrato get a usage overview of the command.You can as well include options
user=andpassword=to your config file so you don’t have to specify them on the command line.
Syntax of the Web Service Command Line Executable
The syntax is simple: avantra [options] [command] [command options].
If you have specified the URL, user, and password options in the avantra.cfg config file, the syntax is even more simple and just avantra [command] [command options].
The examples below show the options:
- Display the usage
-
avantraoravantra help - Display help of a command
-
avantra help [command]To show the complete syntax of the
lscommand, useavantra help ls - Show list of servers
-
avantra ls servers - Show a table of SAP systems of one customer only
-
avantra ls -l sapsystems@customer - Turn off monitoring for 120 minutes of monitored object ‘mozart’
-
avantra moni-off -name mozart -duration 120
How to use the Avantra Web Service in a Java Project
Knowledge base document Using the Avantra Web Service in a Java Project shows a procedure for how to set up your own Java project to access the Avantra Web Service programmatically. Other popular program languages provide standard libraries to interact with the Avantra Web Service, which uses standard SOAP, as well.
How to use the Avantra Web Service in an ABAP Project
The Avantra Web Service can be called from ABAP systems as well. Knowledge base document Accessing the Avantra Web Service from an ABAP system describes a detailed procedure, how to create and test the Web Service from an ABAP system.
Working with Changes
Avantra supports the following Change process:
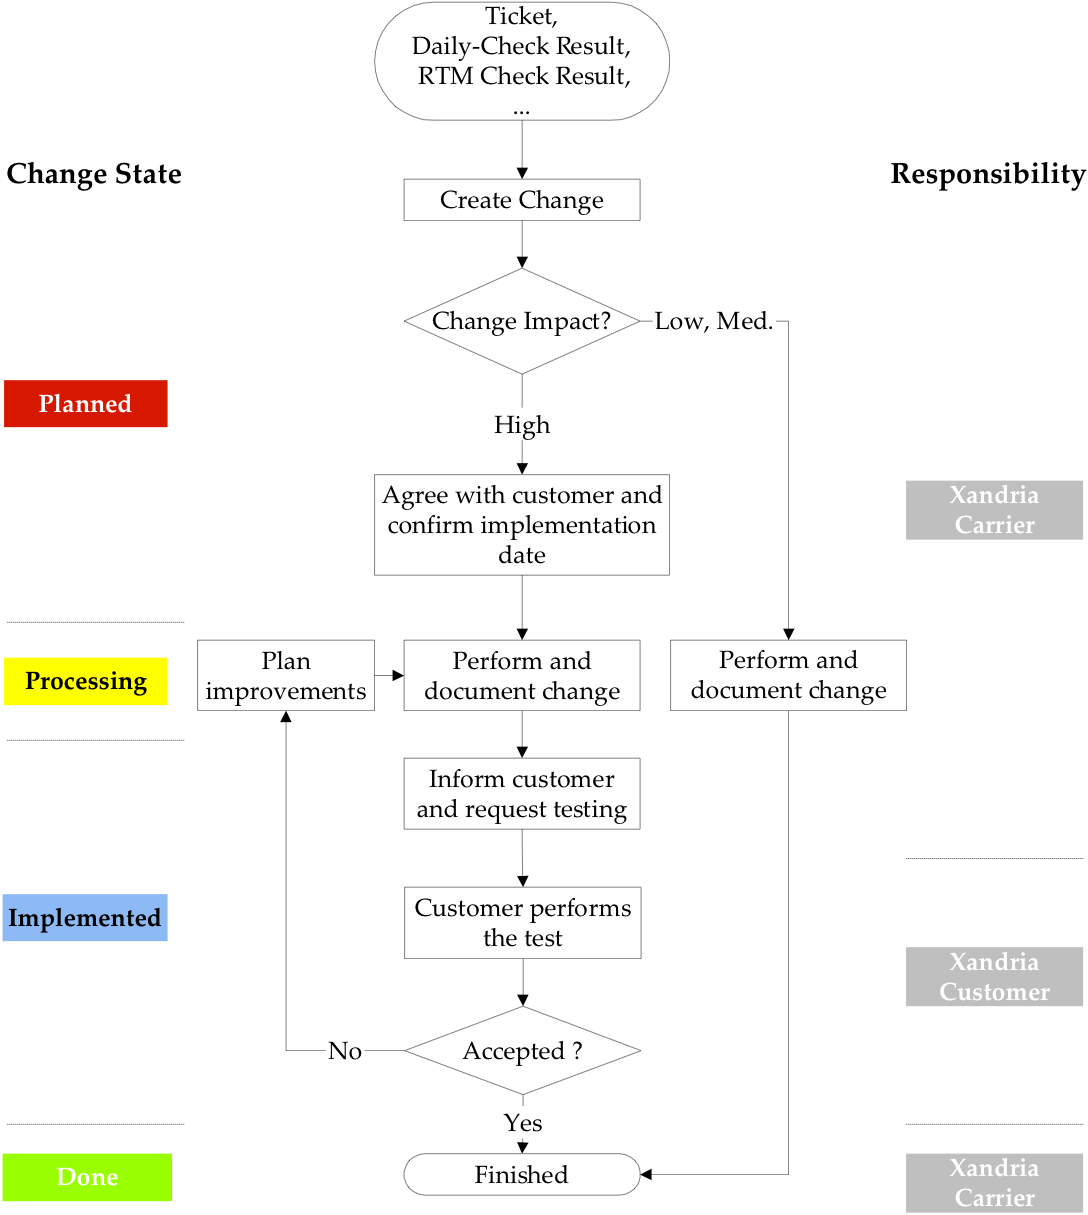
Creating a Change
Perform the following steps to create a Change record:
-
Select from the top-level menu. Choose New from the toolbar.
-
Select a Customer and push Next.
-
Select a Customer Application and push Next.
-
Choose values for Reason, Component, and Impact. Choose a Planned implementation date and fill in a Short Description. Push the Create button.
After the Change is created, it can be edited multiple times. The only restriction is once the Change status is changed to “Closed”, the Change record can no longer be edited.
You need the Permission Edit Changes in order to create or modify Changes.
You need the Permission Approve Changes in order to change the status from planned to processing.
You need the Permission Approve Implemented in order to change the status from implemented to done.
Viewing Changes
In order to set many Changes to the status Done, choose .
You need the Permission View Changes in order to view Changes.
Working with Tickets
Avantra provides a simple Problem Management solution providing the following workflow:
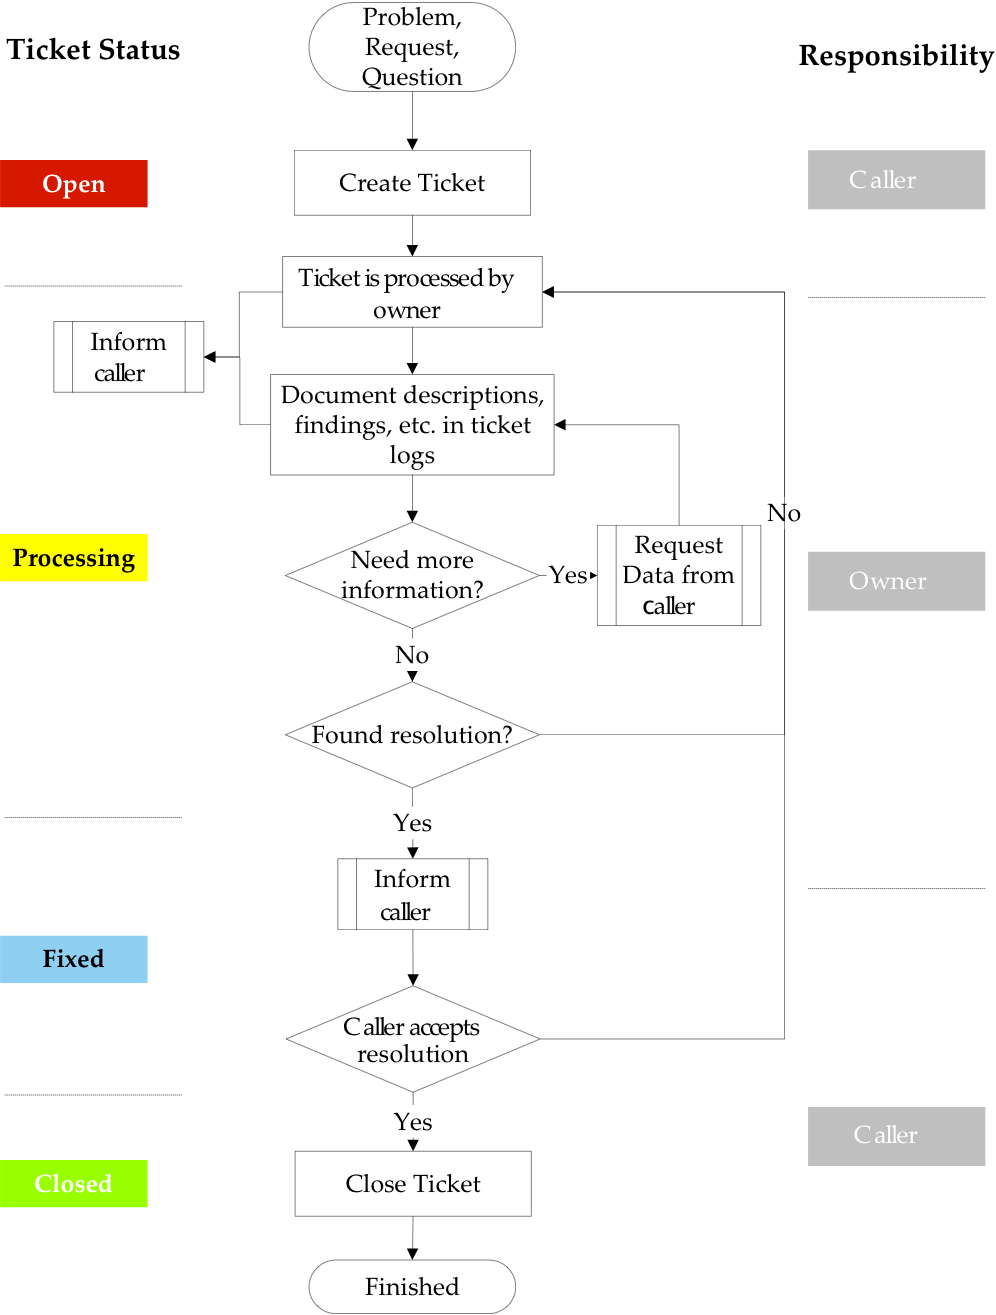
There are two roles important in this workflow: the caller (i.e. usually a representative of the Customer) that opens a Ticket, and the owner (i.e. usually a representative of the Service Provider) which processes the Ticket in order to find a resolution.
There are basically three options for working with Tickets, available from the menu:
-
Select Open Tickets to display a list of all Tickets in states
OpenorProcessing. Unassigned Tickets are shown at the very top of the list and are emphasized with a bold font. Unassigned Tickets are Tickets that have been recently created by a caller and have not yet an owner assigned (i.e. that are not being processed yet). Besides that, the number of Unassigned Tickets is shown on the left side next to the Open Tickets menu. -
Select My Tickets to display a list of all Tickets you are defined as caller or owner in. By default, only Tickets in states
Open,Processing, andFixedare shown. To see alsoClosedTickets select All Tickets from the drop-down box on the right side. -
Select Search Tickets in order to search Tickets.
Once you have selected one of the options above, you see a ticket list. You can open a Ticket to see the details of this ticket.
Creating Tickets
Select from the top-level menu. Choose New from the toolbar. Select either Open Tickets or My Tickets and select New on the toolbar.
Fill in the following fields:
-
Short description: Fill in a short but meaningful description of the problem, request, or question.
-
Priority: Select from the values
LOW,MEDIUM, orHIGH. The default isLOW. -
Type: Select from the values
Problem,Request,Question. The default isProblem. -
Customer: Select the Customer name. This field is required unless you open the Ticket as an owner directly.
Usually, there will be a default Customer already selected.
-
Customer application: Select a Customer Application.
Usually, there will be a default Customer Application already selected.
-
Log Text: Fill in the description of your work or part of work, questions or answers, etc. The WYSIWYG editor provides text styles and formatting features.
The new ticket is created once you push OK.
You need the Permission Call Tickets` in order to create a ticket.
This also allows you to close the Ticket, change the priority, add or remove attachments, and create new Log Text fields.
You need the Permission Own Tickets in order to be the owner of a Ticket, i.e. to change the status to processing or fixed, create new Log Text fields.
Processing Tickets
The ordinary ticketing process, as shown in Figure: Avantra Problem Management workflow, consists of creating several Log Text entries (alternating by owner and caller), and changing the Ticket status appropriately.
In order to create a new Log Text only, push the New Ticket Log button on the Ticket details. This allows changing the Status as well. If you need to modify other parts of the Ticket, choose Edit Ticket from the page menu.
If a Ticket is unassigned (i.e. has no owner yet), you can self-assign it by choosing Edit Ticket on the ticket details page. You can also modify other ticket settings there.