Automated Kernel Upgrade
Overview
The purpose of the Automated Kernel Upgrade feature is to automatically upgrade SAP kernels relieving SAP administrators of many tedious activities, such as:
-
connecting to the SAP server
-
stopping and restarting the SAP system
-
downloading files
-
putting the required packages into specific folders while using particular archiving programs for extracting
-
verifying that no users are connected to the system, no jobs are running and no other activities are being performed
-
making sure that the permissions are set correctly
-
checking if there is enough space
-
etc.
With this automation option, Avantra automatically performs all the checks and actions, like processing the files and folders, stopping and restarting SAP systems, running verifications, rolling back in case of errors, and so on. Administrators only need to select the package to be applied and specify the date and time for the system upgrade.
Prerequisites/Limitations
There are a few requirements/limitations to consider for the Automated Kernel Upgrade:
-
Avantra automates the SAP standard procedure based on SAPCPE. Make sure your system is configured as per any prerequisites defined.
-
Ensure that Avantra Start/Stop automation is successfully tested.
-
SAP NetWeaver should be version 7.10 or higher.
-
Rolling Kernel Switch (RKS) is not yet available.
-
The feature does not support 32-bit kernels.
-
For DB2, only UDB (DB6) is supported.
-
Currently, the feature is available for kernel updates on Linux, AIX, Solaris, Windows (note 32-bit kernels are not supported).
-
For upgrades on Unix-like operating systems, the automation will use sudo for privileged access. Make sure the sudo package is installed in your system.
-
The following directories should be present on the server hosting the SAP system with the user running the Avantra Agent having access to them:
SAP Parameter |
Description |
Default (Kernel) Value |
DIR_EXECUTABLE |
Current directory for executable files and programs |
$(DIR_INSTANCE)\exe e.g.: D:\USR\SAP\QAS\D00\exe |
DIR_INSTANCE |
Instance home directory |
$(LOCALHOSTSIDPATH)$(SAPSYSTEMNAME)\$(INSTANCE_NAME) e.g.: D:\USR\SAP\QAS\D00 |
DIR_CT_RUN |
Central directory for executable files and programs |
$(DIR_EXE_ROOT)\$(OS_UNICODE)\NTAMD64 e.g.: D:\usr\sap\QAS\SYS\exe\uc\NTAMD64 |
| You can also configure the backup and download directories before running the Automated Kernel Upgrade. For details, see KernelBackupDir and KernelDownloadDir. |
Workflow
Before running the Automated Kernel Upgrade, the administrator needs to create an upgrade bundle and configure the update process, which are two independent processes that can be performed separately. For the workflow visibility, we will assume that the created bundle is used in the configuration process as well. After the upgrade bundle is created and the upgrade process is configured, you can monitor and manage the update jobs.
Creating Bundles
A bundle is a selection of archive files containing the upgrade files. The bundle must be put together by the administrator and later uploaded to the SAP system. To create a bundle:
-
From the Configuration menu, select Automation.
-
In the Automations tab, select SAP Kernel Upgrades.
The Bundles tab is displayed, which is empty on the first launch and will later contain all previously created bundles. Note that permissions to maintain bundles for kernel patching are not granted by default and must be added to each required user or group (see this solution article for details).
-
Click New on the toolbar.
The Create SAP Kernel Bundle dialog opens.
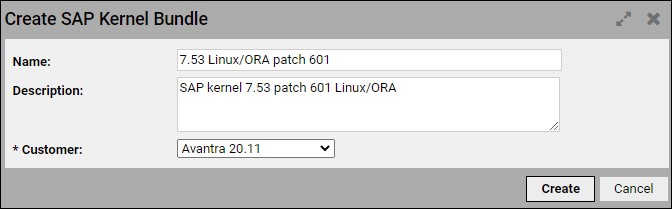
-
In the dialog, enter Name and Description, and select the Customer from the drop-down list.
-
Click Create.
The Bundle container is created and is now available in the Bundles table.

You may notice that Release, Patch, OS, and DB parameters are not filled for this new entry. This information will be passed to the system with the bundle files uploaded during the next step. Clicking Apply, however, will refresh the information and display the OS and DB version of the package.
-
In the lower pane, under the SAP Kernel Bundle Files section, click Upload and navigate to the location where you have your files stored.
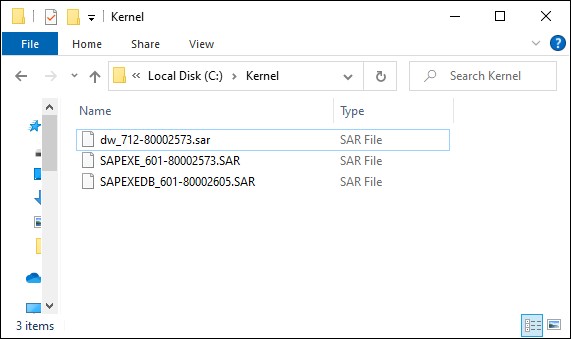
The system only accepts .SAR files. Usually, a default package consists of the
SAPEXEandSAPEXEDBarchives; nevertheless, you can add other packages (for exampledisp+WORK,tp, etc). Also, you can define packages without the two main archives for single or group of files updates. For instance, if you want to patch thedisp+workcomponents only, then you need to define a package with this single archive. The patch file can be uploaded separately after the main files have already been uploaded. However, there are some things to consider:-
Avantra allows uploading a patch file with the Patch Version lower than the Patch Version of the main files, but in such a case the figures in the Patch column will be marked red, drawing attention to a possible discrepancy.
-
The system DOES NOT allow uploading a patch file with a Release version different from the versions of the main files. In such a case, the system will display a warning window, and if the administrator still wants to add the file, he needs to provide an explanation in the corresponding field.
-
-
Select the required files and click Open.
The files are uploaded to the bundle. The process normally takes a few seconds to minutes (depending on the size of the packages and the network bandwidth) to complete. After the files are successfully uploaded, the SAP Kernel Bundle Files table is populated with files-related information.
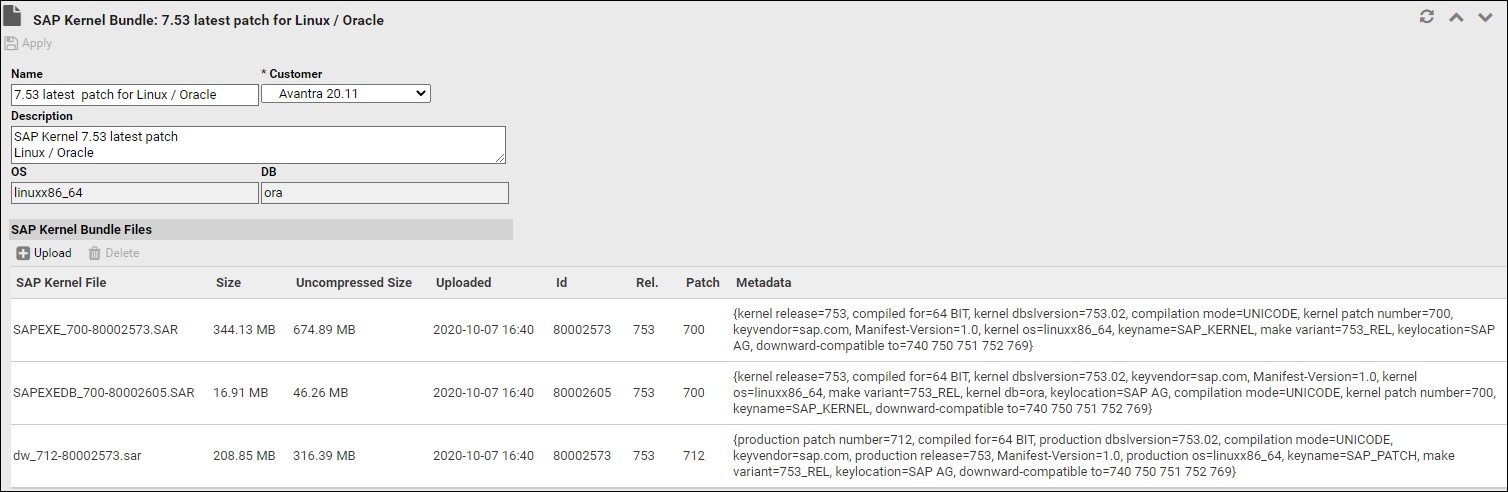
|
After uploading the sar files you may want to change the order of them. It is important to understand that the sar files are extracted (using sapcar tool from SAP) in the listed order. The first file in the list is the first file being extracted and the last file is the last file being extracted. If, for instance, two sar files contain the same file but in different versions, make sure that the version you finally want to have installed on your SAP system is listed at the end of this list. |
Configuring Upgrade Process
Once the upgrade bundle is uploaded, the upgrade process needs to be configured.
|
The process described below has no connection to the bundle created in the previous section. The configuration can be applied to any bundle created before. |
To configure the SAP Kernel upgrade:
-
On the SAP Kernel Upgrade page, click the Runs tab.

-
In the toolbar, click New.
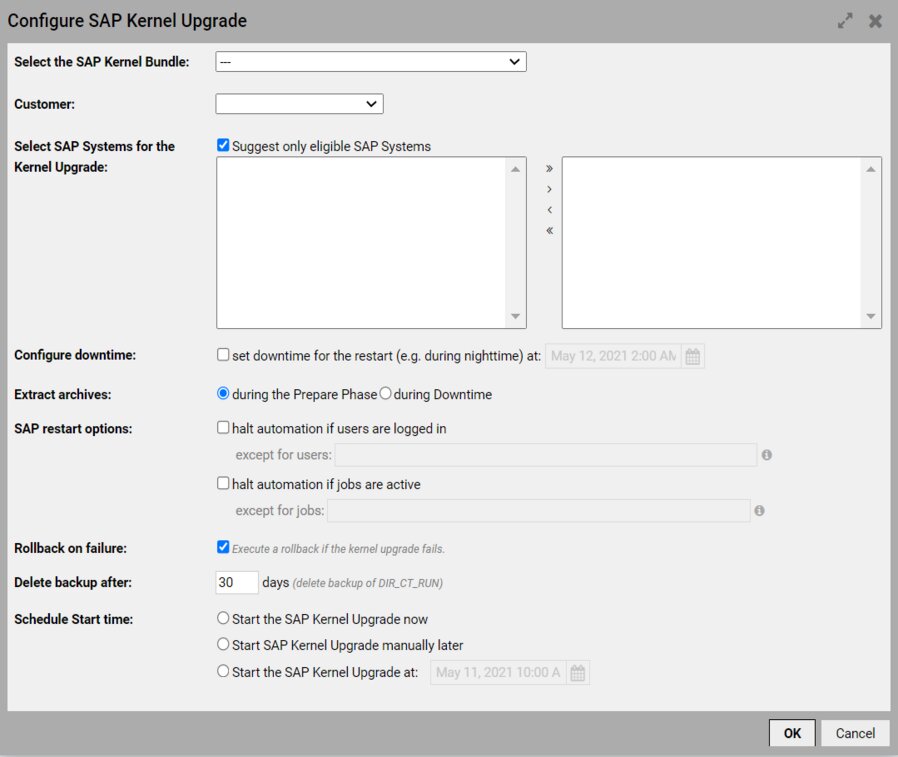
The Configure SAP Kernel Upgrade dialog opens.
-
In the dialog, specify the following parameters:
-
Select the SAP Kernel Bundle: from the drop-down list, select one of the existing bundles. It can be a bundle created in the previous section or a completely different one.
-
Customer: from the drop-down list, select a customer to receive an upgrade.
-
Select SAP Systems for the Kernel Upgrade: select the system in the left window and add it to the right window using the arrows. To view only the systems compatible with the kernel bundle selected above, select the Suggest only SAP Systems eligible to selected kernel bundle checkbox. At your discretion, you can select any SAP system(s) of the customer by clearing the checkbox. The search functionality allows you to quickly find the SAP system you need. You can select several items with CTRL or/and SHIFT keys. Selecting several SAP systems will initiate just as many upgrade processes in parallel.
-
Configure downtime: select the set downtime for the restart (e.g. during nighttime) checkbox to specify the time during which the system will be stopped for upgrading. Leaving the checkbox cleared will start the upgrade process right after the configuration is finished.
-
Extract archives: choose whether to extract archives during the preparation phase or downtime. By default, archives are extracted to the `DIR_CT_RUN`SAP directory.
-
SAP restart options: select between the following options:
-
halt automation if users are logged in: if specified users are logged in, the automation process will pause (the automation will NOT resume automatically once the users log out). Use a comma to separate multiple users, wildcard * supported.
-
halt automation if jobs are active: if specified jobs are running, the automation process will pause (the automation will NOT resume automatically once the users log out). Use a comma to separate multiple jobs, wildcard * supported.
-
-
Rollback on failure: select the checkbox to execute a rollback if the kernel upgrade fails.
-
Delete backup after: specify the number of days after which the copy of the current kernel (kept for rollback purposes) will be deleted. Filling in “0” or leaving the field empty means immediate removal of the backup after upgrading is complete.
-
Schedule Start time: select one of the following options:
-
Start the SAP Kernel Upgrade now: start the process immediately.
-
Start SAP Kernel Upgrade manually later: save the configuration for later use.
-
Start the SAP Kernel Upgrade at: specify the date and time for the upgrade process to start.
Starting the Kernel Upgrade initiates the preparation phase (extracting files, etc.) only: the SAP system is not stopped and users can still connect and work with it. The upgrade process itself will start at the date and time specified in the Configure downtime parameter.
-
-
-
Click OK.
With the configuration process fulfilled, you can proceed to the upgrade management phase.
Managing the Upgrade
When the upgrade process (i.e. the automation job) starts, you can view its progress and manage its phases on the Runs tab. Double-click on the upgrade process in the table to see and manage the job’s parameters.
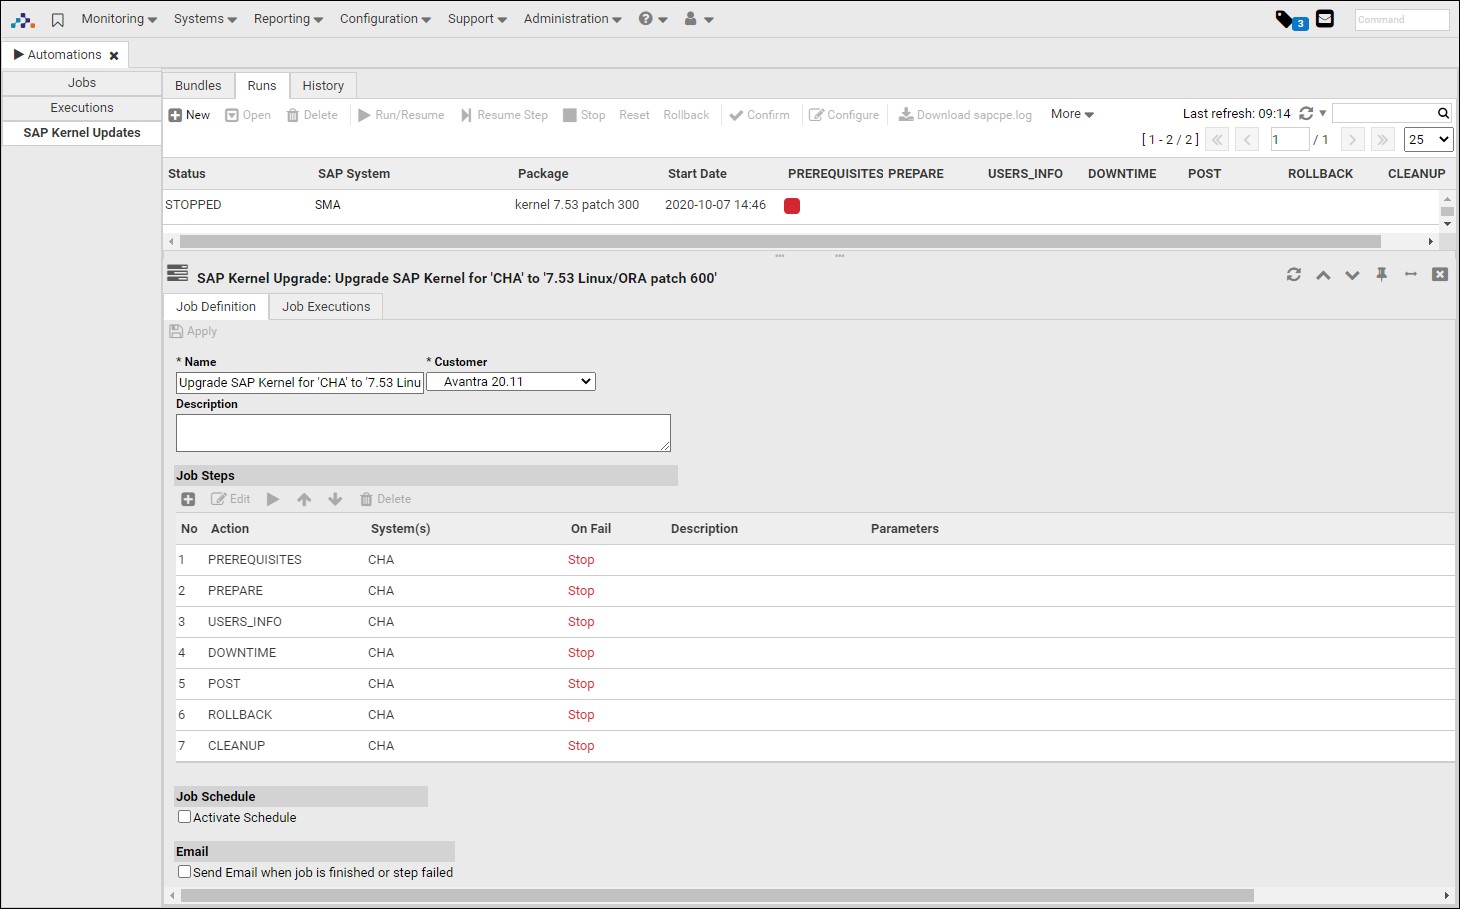
The upgrade process consists of the following phases which are displayed as column headers in the table:
-
PREREQUISITES PREPARE: Avantra checks that all prerequisites are fulfilled (i.e. kernel and patch versions are the same, the upgrade files are present, the agent has access to kernel files, the download locations are available and have enough space, etc.)
-
USERS_INFO: the system sends information to the connected users at the specified date/time
-
DOWNTIME: the system stops the SAP system, performs the upgrade and starts the system
-
POST: the system checks the new Kernel version, verifies that the SAP system is up and running and that connected instances have the same kernel level and active status
-
ROLLBACK: if a rollback is needed, the system activates a maintenance window, stops SAP Instances, copies all files from
Kernel_backup_foldertoDIR_CT_RUN, starts the SAP system, and deactivates the maintenance window -
CLEANUP: the system deletes the backup folder. If the retention period was specified during the configuration step, this phase will only be processed after that period is over. The phase will be marked with a grey flag until that date.
The table also provides information on the upgrade status.
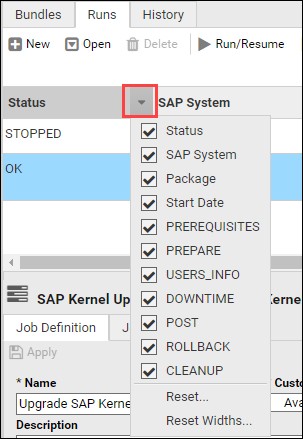
You can select which column to display by clicking the down arrow next to a header title and selecting the required option.
If configured correctly, the automation job should successfully finish all the phases and mark each phase with a green flag. In case of an error, the erroneous phase is marked with the red flag and the upgrade process is stopped. However, the administrator can manually confirm the phase as completed and resume the process using the toolbar buttons:
-
Confirm: if administrators want to continue with the upgrade process despite the error in one of the phases, they can click this button. A confirmation window is displayed where an explanation can be entered. The erroneous phase is then marked with a red flag with a check mark inside. The process then needs to be manually resumed with one of the options below.
-
Run/Resume: resumes the entire upgrade process.
-
Resume Step: resumes only the next step of the upgrade process and the process will be halted after the step is executed.
-
Stop: stops the upgrade process.
-
Reset: resets the kernel upgrade.
-
Rollback: rolls back the upgrade process to back up the SAP Kernel in its previous state.
-
Configure: opens the configuration window where you can override certain parameters specified during the process configuration step:
-
Ignore logged in users
-
Ignore running jobs
-
Planned downtime
-
Rollback on failure
-
Keep backup
-
-
Download sapcpe.log: downloads the sapcpe.log where you can review all the information on the upgrade process. The system also uses the very same file during the POST phase.
Double-clicking the upgrade process opens the details pane with the Job Definition and Job Executions tabs. On the Job Definition tab, you can do the following:
-
Change the Name, Description, and Customer for the upgrade process
-
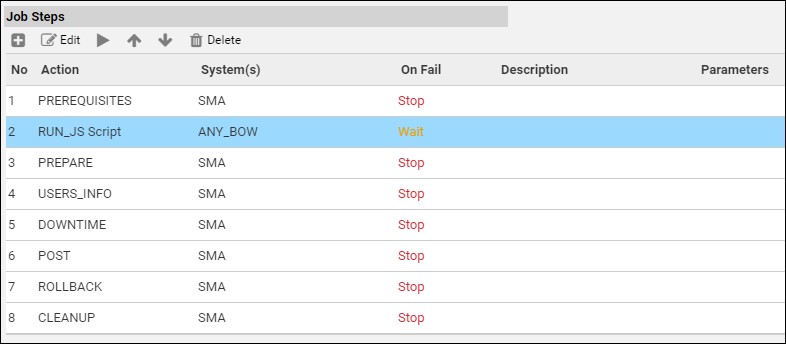
View and edit the upgrade job’s steps. By default, only the automatically defined steps are displayed, however, you can add supplementary automation steps if needed. To do so, select the step and click the button in the toolbar. In the opened dialog window, select one of the predefined automation steps from the Action drop-down list.
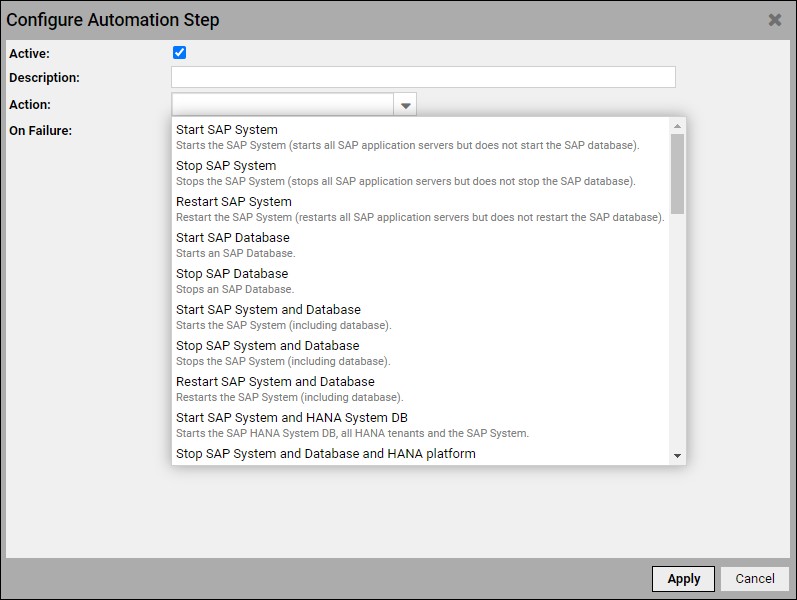
Also, you can activate/deactivate this additional step, give it a description and choose what to do in case of a failure.
The step is added to the list of job steps and can be executed, moved up or down the execution queue, and deleted using the correspondent buttons on the toolbar.
-
Schedule the job execution by selecting the Activate Schedule checkbox in the Job Schedule section.
-
Specify the recipients for the email notifications about job completion or step failure.
On the Job Executions tab, you can view the detailed execution information on a selected upgrade process.
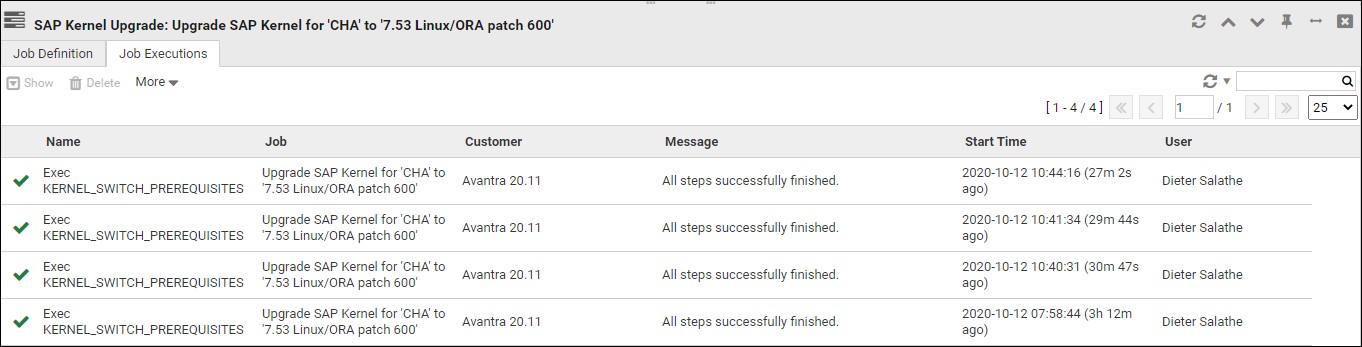
The table provides information on the name of the job, the customer the upgrade was done for, the start time of the job, and the user that initiated the process. It also shows the message with additional information about the execution. By selecting a single row in the table, you can view the extended information about the step and view the log entry. You can also select several items in the list and delete them or download the .CSV file containing the displayed information.