Managing Users, Groups, Roles, Permissions Sets, Permissions, and Advanced Options
In Avantra access control is implemented by means of Permissions contained in Roles which link Users or Groups of Users to Customers, or by means of Permissions contained in Permission Sets assigned to a User directly linked to a Customer.
Users
A User in Avantra is basically an account to access the application with a little bit of information attached to it. You may store personal information, like address, phone number, e-mail address, etc. The most important of these attributes is probably the password.
Once you have created a User it's almost worthless, because by default it has no Permission assigned. It can log in to Avantra WebUI, but it can only see its own profile, and log out again.
In order to have a starting point, there are a few Users built-in already, and these Users do have Permissions (by means of assigned built-in Roles).
The purpose of Roles is to link one or more (or even all) of the Permissions available within Avantra (which are listed in Users) on the one hand, and to one or more (or even all) Customers on the other hand.
List of Avantra built-in Users:
Application Root User
You have created this account during the installation.
This account has all Permissions (for all Customers) within the Avantra application. The Permissions are defined in the Super Administrator Role. This Role cannot be removed from the Application Root User, and the User can neither be modified, locked, or deleted. Also, compliance with the password policy is not verified for this User.
We strongly recommend not to use this account for your daily business. Instead, you may create a new User and assign the Administrator Role.
unassigned, messenger
Only used internally in case a Ticket or a Change does not yet have an owner, or a Ticket has been created through a Notification Action.
You are not able to select or modify these Users but you may come across them in Ticket or Change pages.
Managing Users
Any actions that change the Permissions of a User, like assigning Roles, Permission Sets, or Groups, as well as changing passwords or locking Users, are only effective if the User logs in next time.
But you can log out a User immediately (and by this to force them to log in) as described in section Logout a User or all Users.
Changing Your Own Password
Select the Account icon > Change Password from the header. Enter the old and new passwords, and click OK.
Creating a One Time Password (OTP)
Users can create One Time Passwords (OTP) in both the Classic UI and Next Gen UI. A one time password (OTP) is a unique, temporary code that provides an extra layer of security during login. You can use your choice of authenticator with Avantra.
One Time Passwords are available for SAML users.
In the Classic UI:
- Click Account icon > User Settings.
- Click Setup OTP (one time password).
- Scan the QR code that appears on the screen with your authenticator app.
- Enter the code provided by your authenticator app.
- Click Activate OTP.
Confirmation of successful registration appears and OTP authentication is active for next login.
In the Next Gen UI:
- Click the control menu in the top right-hand corner.
- Click OTP registration.
- Scan the QR code that appears on the screen with your authenticator app.
- Enter the code provided by your authenticator app.
- Click Submit.
Confirmation of successful registration appears and OTP authentication is active for next login.
Signing in with a One Time Password (OTP)
One Time Passwords are available for SAML users.
With a One Time Password registered, you sign into Avantra by:
- Entering your username.
- Entering your password.
- Entering the One Time Password from your authenticator app.
- Click Continue.
- Click Next to sign in.
Creating a Passkey
Users can create Passkeys in the Next Gen UI only. Passkeys are a modern, secure replacement for passwords that allow users to sign in to apps and websites using biometrics like a fingerprint or facial recognition, or a device PIN.
Passkeys are not available for SAML users.
- Click the control menu in the top right-hand corner.
- Click Passkey registration.
- Follow your machine's prompts to create a passkey.
A notification appears to confirm the successful registration of a passkey that will be used for the next login.
Signing in with a Passkey
Passkeys are not available for SAML users.
With a passkey registered, you sign into Avantra by:
- Clicking Passkey.
- Follow the prompts to input your passkey.
- Avantra automatically signs you in if the passkey is correct.
Creating a User
- Choose Administration > User Management from the top-level menu and click New.
- Fill in the User ID, Password, First Name, Last Name, and select a Timezone from the drop-down list. Click Create.
- If the User is supposed to receive email Notifications, you probably want to fill in an Email address as well.
- You can set the Disable Notifications flag in order to avoid receiving Notification emails even if the User is permitted to.
- If you have made any changes click Apply.
In order to create a User, you need the Edit Users Permission.
Only the user with Administrator Role has permission to change the User ID in Avantra WebUI.
Changing a User's Password
- Choose Administration > User Management from the top-level menu, select the desired entry from the list, and click Open.
- Click Change Password.
- Fill in the New Password and Click Change.
In order to change a User password, you need the Edit Users Permission.
In order to change your own password, see Changing Your Own Password.
Assigning/Un-assigning a Customer to a User
Assigning a User to a Customer means to make the User a Customer representative. You can then only assign Permission Sets instead of Roles.
A User without Customer assignment usually represents a Service Provider, or it's supposed to to represent more than one Customer.
- Choose Administration > User Management from the top-level menu, select the desired entry or entries from the list (on the Users tab), and choose more > Assign Customer.
- Select the Customer from the list. To unassign choose
---. - Click OK.
In order to assign/unassign a Customer, you need the Edit Users Permission.
Deleting your One Time Password (OTP)
You can only delete your registered One Time Password (OTP) in the Classic UI.
- Click Account icon > User Settings.
- Click Setup OTP (one time password).
You are informed that there is an OTP authentication registered, and a timestamp for when it was done.
- To delete the OTP, click Delete OTP.
- Click Yes.
A message appears confirming deletion of the OTP.
Deleting a User's One Time Password (OTP)
Administrators and those with the Edit Users Permission can delete a User's OTP.
- Click Administration > User Management.
- Click the Users tab if required.
- Double click on the user to manage.
- You are informed that there is an OTP authentication registered, and a timestamp for when it was done.
- To delete the OTP, click Delete OTP.
- Click Yes.
A message appears confirming deletion of the OTP.
Deleting a User's Passkey
Administrators and those with the Edit Users Permission can delete a User's passkey.
- Click Administration > User Management.
- Click the Users tab if required.
- Double click on the user to manage.
- Click the Passkeys tab.
- Select the passkey to delete.
- Click Delete Passkey.
Locking/Unlocking a User
You can lock a User in order to prevent them from accessing Avantra WebUI.
- Choose Administration > User Management from the top-level menu, select the desired entry or entries from the list (on the Users tab), and click Lock/Unlock User.
- Select Edit > Lock/Unlock from the page menu.
- In order to lock a User, flag the Lock check box and fill in the Lock Reason field. In order to unlock a User, clear the Lock check box and clear the Lock Reason field.
- Click OK.
In order to lock/unlock a User, you need the Edit Users Permission.
Editing User Groups
See Managing Groups for additional information.
In order to add a User to a Group or to remove a User from a Group you may perform the following steps:
- Select Administration > User Management from the top-level menu. Select the Users tab (if not selected). Open the desired User from the list.
- Switch to the Membership tab and click click Assign Groups.
- Choose one or more Groups and move them to the right frame using the
>(and<) icons. - Click OK.
In order to modify the Group assignments of a User, you need the Edit Users Permission.
Editing User Roles
If the User is linked to a Customer you need to assign Permission Sets instead, see Editing Permission Sets.
See Managing Roles for additional information.
To link a User to a Role or to unlink a User from a Role, you may perform the following steps:
- Select Administration > User Management from the top-level menu. Select the Users tab (if not selected). Select the desired Users from the list.
- choose More > Assign Roles.
- Choose one or more Roles and move them to the right frame using the
>(and<) icons. - Click OK.
In order to modify the Role assignments of a User, you need the Edit Users Permission.
Editing Permission Sets
See Managing Permission Sets for additional information.
In order to link Users to a Permission Set or to unlink a User from a Permission Set, perform the following steps:
- Select Administration > User Management from the top-level menu. Select the Users tab (if not selected). Select the desired Users and click Open.
- Switch to the Membership tab and click Assign Permission Set.
- Choose one or more Permission Sets, and move them to the right frame using the
>(and<) icons. - Click OK.
In order to modify the Role assignments of a User, you need the Edit Users Permission.
Deleting a User
- Select Administration > User Management from the top-level menu. Select the Users tab (if not selected). Select the desired Users.
- Click Delete. A warning message pops up.
- Click Yes to delete the User.
In order to delete a User you need the Edit Users Permission.
Users cannot be deleted if they own Solution Documents, Service Level Reports templates or jobs, or shared Dashboards. In this case, you need to reassign these objects to another user before.
If a user is deleted, the following information is deleted as well:
- Information on the administrator user or the deputy of monitored objects, for example, SAP Systems and Servers.
- Information on the user of Notification output channels
The following information is reset to the built-in User unassigned:
- Changes
- The confirm user of Daily Checks, RealTime Monitoring Checks, and its history
Viewing All Permissions of a User
This option allows you to see all Permissions a User has per Customer on a single page.
- Choose Administration > User Management from the top-level menu, select the desired entry from the list, and click Open.
- Switch to the Permissions tab.
Please note that processing this list can take some time for Users having the Administrator Role assigned.
Logout a User or all Users
This option allows you to force a logout of a given User. Such an action may be required to enforce a Permission change while the User is logged on. Probably it's more appropriate to ask the User to log out and log in himself.
You can also select to log out all Users except yourself.
- Select Administration > User Management from the top-level menu. Select the Groups tab.
- Choose More > Show Logged on Users.
- Choose the desired entries and click Force Logout.
In order to log out Users, you need the Edit Users Permission.
Using Client Certificates for Login
See the Avantra Knowledge base Article Using Client Certificates for Login for a description.
Using an API key for login
You can create an API key in the User profile to authenticate against GraphQL APIs without supplying a password or using a SAML/directory login.
This API key can be used instead of the password in communicating with the Avantra API. Also, it gives access to the resources (which you have permission for) to create automations/connections in Avantra. It is convenient for SAML users configured to have access to an Avantra Server.
This feature is only available in the Enterprise Edition. For more information about editions please see the Avantra Editions Matrix.
Roles
There are also built-in Roles.
Administrator Role
The Administrator Role contains all Permissions available in Avantra (as listed in Permissions) except for Receive Notification Messages.
The Administrator Role can be modified or even deleted, and you can add or remove Permissions.
Also, this role is linked to all Customers, i.e. it's effective automatically for any newly created Customer.
Super Administrator Role
Contains the same Permissions as the Administrator Role but is tightly linked with the Application Root User, cannot be assigned to any other User, nor can it be modified, duplicated, deleted, etc.
Default Messenger Notification Role
You should consider this Role as a template for creating your own Roles, in other words, if you want to use it, please duplicate it and change the name accordingly.
This Role contains the only Permission Receive Notification Messages to allow receiving email Notifications.
Managing Roles
Creating a Role
- Select Administration > User Management from the top-level menu. Click New on the Roles tab.
- Fill in the Name of the Role and click Create.
- Open the recently created Role.
- Enter a Description of the Role.
- Click Assign Customers in order to select the Customers you want to link the Permissions to.
- Switch to the Permissions tab. Click Assign in order to choose the Permissions included in this Role.
- Click Apply.
Up to now, this Role is only an empty container. You have to link it with Users (and/or Groups), add Permissions to it, and also link it to Customers. If you link to the Customer Root, the permissions of the role will be applied to all customers, including newly created ones.
You need the Edit Roles Permission to perform this action.
Editing Role Users
See Editing User Roles for how to perform this task.
Copy a Role
The Copy function is provided just for your convenience. If you have an existing Role with, for example, a well-defined set of Permissions, and you want the same set of Permissions to be assigned to a different combination of Users and Customers, you can simply duplicate the Role, change its name, and modify the User and Customer assignment.
- Select Administration > User Management from the top-level menu. Select the Roles tab.
- choose More > Copy.
- Enter a new Name and click Copy.
- You may want to change the Users and Customers assigned to the Role, or even the Permissions.
You need the Edit Roles Permission to perform this action.
Delete a Role
- Select Administration > User Management from the top-level menu. Select the Roles tab.
- Choose the desired entry and click Delete.
You need the Edit Roles Permission to perform this action.
Permission Sets
There is also a built-in Permission Set:
Customer Representative
This Permission Set is automatically created once a User is assigned to a Customer, and it's removed automatically once the User is no longer assigned to the Customer.
A User can only represent one Customer, therefore the Permissions defined in this Permission Set are linked only to the represented Customer.
The default set of Permissions is View RTM, View Daily Checks, View Availabilities, View Tickets, Call Tickets, View Changes, View Customers, View Systems, View SLRs, and View SLA, i.e. by default a Customer representative has only basic Permissions.
This Permission Set can not be modified or deleted, but the set of Permissions included can be modified.
Managing Permission Sets
Creating a Permission Set
- Select Administration > User Management from the top-level menu.
- Click New on the Permission Sets tab.
- Fill in the Name of the Permission Set, and optional Description and choose a Customer.
This field does not link any Permissions to the selected Customer. It defines only Users having the Permission Edit Roles for this Customer are allowed to modify the Permission Set record, and only Users having the Permission View Roles for this Customer are allowed to view the Permission Set record.
- Click Create.
- Open the recently created Permission Set.
- Switch to the Permissions tab.
- Click Assign in order to choose the Permissions included in this Permission Set.
- Click Apply.
You need the Edit Roles Permission to perform this action.
Delete a Permission Set
- Select Administration > User Management from the top-level menu.
- Select the Permission Sets tab.
- Choose the desired entry and click Delete.
You need the Edit Roles Permission to perform this action.
Groups
It is probably most straightforward to think of Groups as Groups of Users (while you could also think of them as Groups of Roles). Instead of assigning multiple Users to a Role you could also create a Group containing the Users and link this Group to a Role.
Groups may save you some configuration work if you have defined a significant number of Users. If your business is an enterprise or a large Service Provider, you probably have an immediate understanding of how to map your organizational structure to Groups and Roles. You perhaps want to Group all the staff having administrative Permissions.
Managing Groups
Managing Groups is very similar to the management of Users and Roles.
You need the Edit Groups Permission for Group management.
Creating a Group
- Select Administration > User Management from the top-level menu.
- Click New on the Groups tab.
- Fill in the Name and optionally a Description of the Group.
- Click Create.
- Switch to the Users and Roles tab. Click Assign Users and Assign Roles in order to assign Users and Roles.
Deleting a Group
- Select Administration > User Management from the top-level menu. Select the Groups tab.
- Choose the desired entry and click Delete.
Defining a Password Policy
Avantra allows you to force your Users to define passwords of a certain strength, as well as to change their passwords on a regular basis.
For this purpose, you can define that passwords:
- Have to be at least of a certain length (min 12 characters), or
- expire after a defined number of days, or
- have to be different from the previous password, or
- must contain at least one lowercase letter
- must contain at least one uppercase letter
- must contain at least one numerical character, or
- must contain at least one special character (i.e.
! " # $ % & ' ( ) * @ + , - . / : ; < > ? [ \ ] ^ _ ` { | } ~),or - must not contain the user ID, or
- must not contain the user's first, middle, or last name, or
- must not contain more than two sequential characters, e.g., YYY
- can only be changed by an authorized User (i.e., Users cannot change their own passwords), or
- any combination of the above.
By default, Avantra requires passwords to have a minimum length of 12 characters. However, you can choose to increase this, but you cannot set a shorter length.
When a user needs to change their password, the new password is checked against a list of commonly used passwords to exclude easily compromised variants. Also Avantra custom vocabulary is added to the dictionary (e.g., passwords cannot contain the word 'avantra')
To enable the password check, tick the correspondent checkbox in the password policy parameters
In order to activate the password policy, you need the Edit Customizing Permission. Please perform the following steps:
- Select Administration > User Management from the top-level menu and switch to the Password Policy tab.
- Set flags to (or remove from) the check boxes of the policy that is appropriate for you. Fill in values in the fields (if applicable).
- Click Apply.
Once you have changed the policy, there may be Users with passwords that do not comply with the new policy. When these Users log in, they still can use their old password. Once they have logged in they get a 1 day grace period and are requested to adapt the password to the current policy (there is a corresponding message in the status area). If they refuse to do so, they are no longer able to log in once the expiration date has passed.
If password expiration is activated, Users will be notified in the status area to change their passwords, starting nine days in advance. If they refuse to do so, they are no longer able to log in once the expiration date has passed.
Advanced User Management Options
Avantra WebUI allows you to use external services for user management. Microsoft Active Directory and the SAML 2.0 (Security Assertion Markup Language 2.0) are supported.
The following features are supported:
- Authentication including optional automatic user creation
- Authorization, i.e. mapping AD groups or SAML attributes to Avantra roles and groups
More information can be found in the following two Avantra knowledge base documents:
Working with Active Directory
- Select Administration > User Management from the top-level menu. Select the External User Directory tab.
- Activate the check box Enable Active Directory.
- Enter the name of your AD domain, for example,
company.com. - Enable the Auto detect AD Server check box to let Avantra WebUI automatically detect the AD server, which is recommended. If you enable this option, the Active Directory Host and Port fields will be disabled. When you click on Test Connection, Avantra WebUI will show you the auto-detected host.
In case auto-detection does not work, fill in the Active Directory Host and Port fields. You can leave the field Port blank to use the default port. - Enable Use LDAPS (recommended) which is highly recommended. This makes sure that no credentials will be sent in clear text.
- For testing purposes, you might need to ignore SSL certificate errors, for example, if the CA cannot be found in Avantra WebUI's Java keystore. For production environments, it's recommended to not check the Ignore SSL Certificate issues and instead fix possible SSL issues.
Possible own CA certificates must be added to the file <your-jre>/lib/security/cacerts and Avantra WebUI must be restarted. This can be done with the following commands:
cd <bin-dir-of-your-jdk>
keytool -list -keystore cacerts
keytool -keystore cacerts -importcert -alias <yourCAAlias> -file <your-certificate.cer>
keytool -list -keystore cacerts
- Avantra tries to detect the Base DN (also called naming context). If Avantra is not able to determine the correct base DN, you can specify it here.
- Use Test Connection to test the connection to your Active Directory.
- Optionally, enter an AD user and password, which is only used under rare circumstances to configure authorization by AD and authentication by SAML.
- Use Test Login to test login to your Active Directory and to read the Active Directory user
memberOffield. Avantra does not store the user and password provided in this Test Login dialog. - Active Directory server is now set up.
- To manually create users managed by Active Directory, Select Administration > User Management from the top-level menu. Click New on the Users tab. Then fill in exactly the same User ID as used in Active Directory. Press Next to continue.
- From the list of options to set the password for the new user, choose Active Directory user.
- Add roles and groups to the newly created user, as described in Managing Users
Locally defined users will continue to work with local passwords. Avantra WebUI will always first check if there is a locally defined user, before going to the Active Directory.
Configure AD User Synchronization and Authorization
- Select Administration > User Management from the top-level menu. Select the External User Directory tab.
- Configure the Active Directory Server.
- Enable the Activate AD Credentials Check check box to activate username and password validation against your Active Directory.
- Enable the Activate automatic User creation check box to automatically create users in Avantra the first time they log in. If this check box is not checked, users must be created manually before they can log in.
- Enable the Activate automatic User permission synchronization check box to automatically assign permissions to users when they log in to Avantra. More detailed information about user permission synchronization can be found in the solution document Active Directory Integration.
Integrate SAML based authentication
You can have several SAML configurations in Avantra. To see the list of existing configurations or to create a new one, go to Administration > User Management in the top-level menu and select the SAML tab.
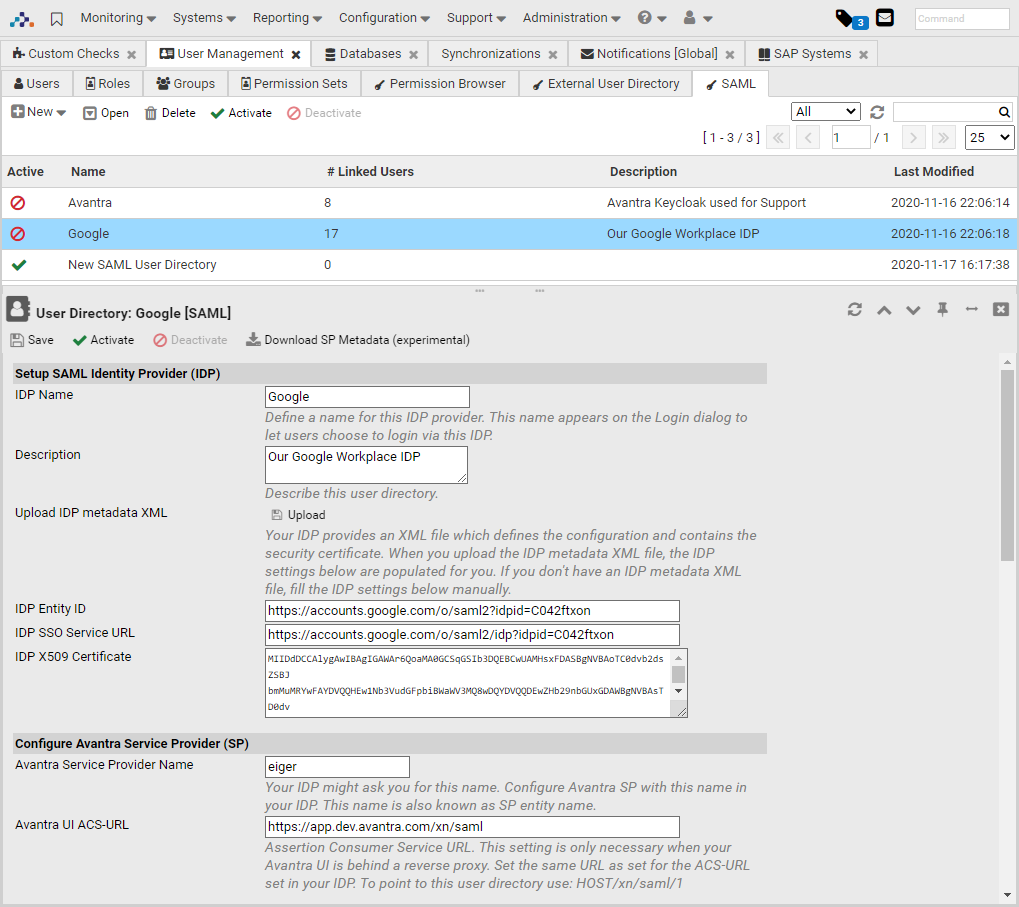
In the SAML Configurations table, you can see the names of the configurations, the number of linked users, the time of the last modification, and the status. Using the buttons in the toolbar, you can create a new SAML configuration, change the status of the existing ones or delete a configuration.
Double-clicking on the SAML configuration opens its properties. To configure SAML:
- Define a name for your IDP. This name appears on the Avantra WebUI login dialog as an alternative login option.
- Upload the IDP metadata XML file of your IDP. If you don't have such an IDP metadata XML file, fill in the IDP-related fields.
- Set Avantra Service Provider Name. This name must be registered in your IDP.
- To manually create users managed by SAML, Select Administration > User Management from the top-level menu. Click New on the Users tab. Then fill in exactly the same User ID as used in SAML. Press Next to continue. From the list of options to set the password for the new user, choose SAML user. Press Create User to create the user.
- Add roles and groups to the newly created user, as described in Managing Users.
Configure IDP Managed User Synchronization and Authorization
- Enable the Activate automatic User creation check box to automatically create users the first time they log in to Avantra WebUI. If this check box is not enabled, users must be created manually before they can log in.
- Enable the Activate IDP managed Authorization check box to automatically manage permissions in Avantra WebUI based on SAML attributes or settings. More detailed information about SAML-based user permission can be found in the solution document SAML Integration.